
Serendipity Blackmagic / Veripress 7.1.01+ adds job plate version recognition to Job Genie functionality.
Previously, if a RIP setup (with an assigned Job Genie) detected new plate file versions, the files were polled, displayed in the RIPMonitor, and submitted for proofing as a new job page. In effect, this meant that if a single plate was updated, the remaining unchanged plates would need to be re-RIPped by the platesetter to accompany the job for proofing purposes.
Plate Version detection, allows the RIP Job Genie to recognise an updated job plate, replace the older plate, then re-submit the complete job/page with the other existing plate files without the platesetter needing to RIP them again.
NOTE – Plate Version can only function correctly if all the job plates are present in the RIP Polling folder. The Workbench > RIP > AutoProofing > Advanced > Delete Jobs from RIP After Autoproofing option must be turned OFF (unticked).
This article is intended to build on the How to Create a Job Genie tutorial. It will use an example newspaper publication in a step-by-step guide to creating a Job Genie that includes the use of Plate Version, and utilise other Job Genie features that have been added since the original tutorial.
The Job Genie will configured to recognise 1-bit tiff platesetter files using this file name format:
- 001FPQQZKQQ20180705.C,1
- 001FPQQZKQQ20180705.K,1
- 001FPQQZKQQ20180705.M,1
- 001FPQQZKQQ20180705.Y,1
assemble them as complete job pages in the RIPMonitor named like this:
180705 FremdProdukt Kirchenzeitung 001
and submitted for proofing as part of a publication named:
180705 FremdProdukt Kirchenzeitung
CREATING THE JOB GENIE
- Open the Workbench application.
- Select the Job Genie Data Type, then create a New Job Genie.
- Create a Task for the Job Genie by clicking the Add button at the bottom of the Task panel. Task 1 will appear the panel – this can be renamed if appropriate.
Each task in a Job Genie specifies how job file names are collected, broken down into defined parts, displayed in the RIPMonitor, and assembled into pages and publications for proofing.
Tasks are processed in order by the Job Genie. When a job file name has been matched by a task, it is removed from searches made by subsequent Tasks. In this case, the Job Genie only requires one Task.
Proceed through the five (5) Job Genie Tabs, configuring them as follows:
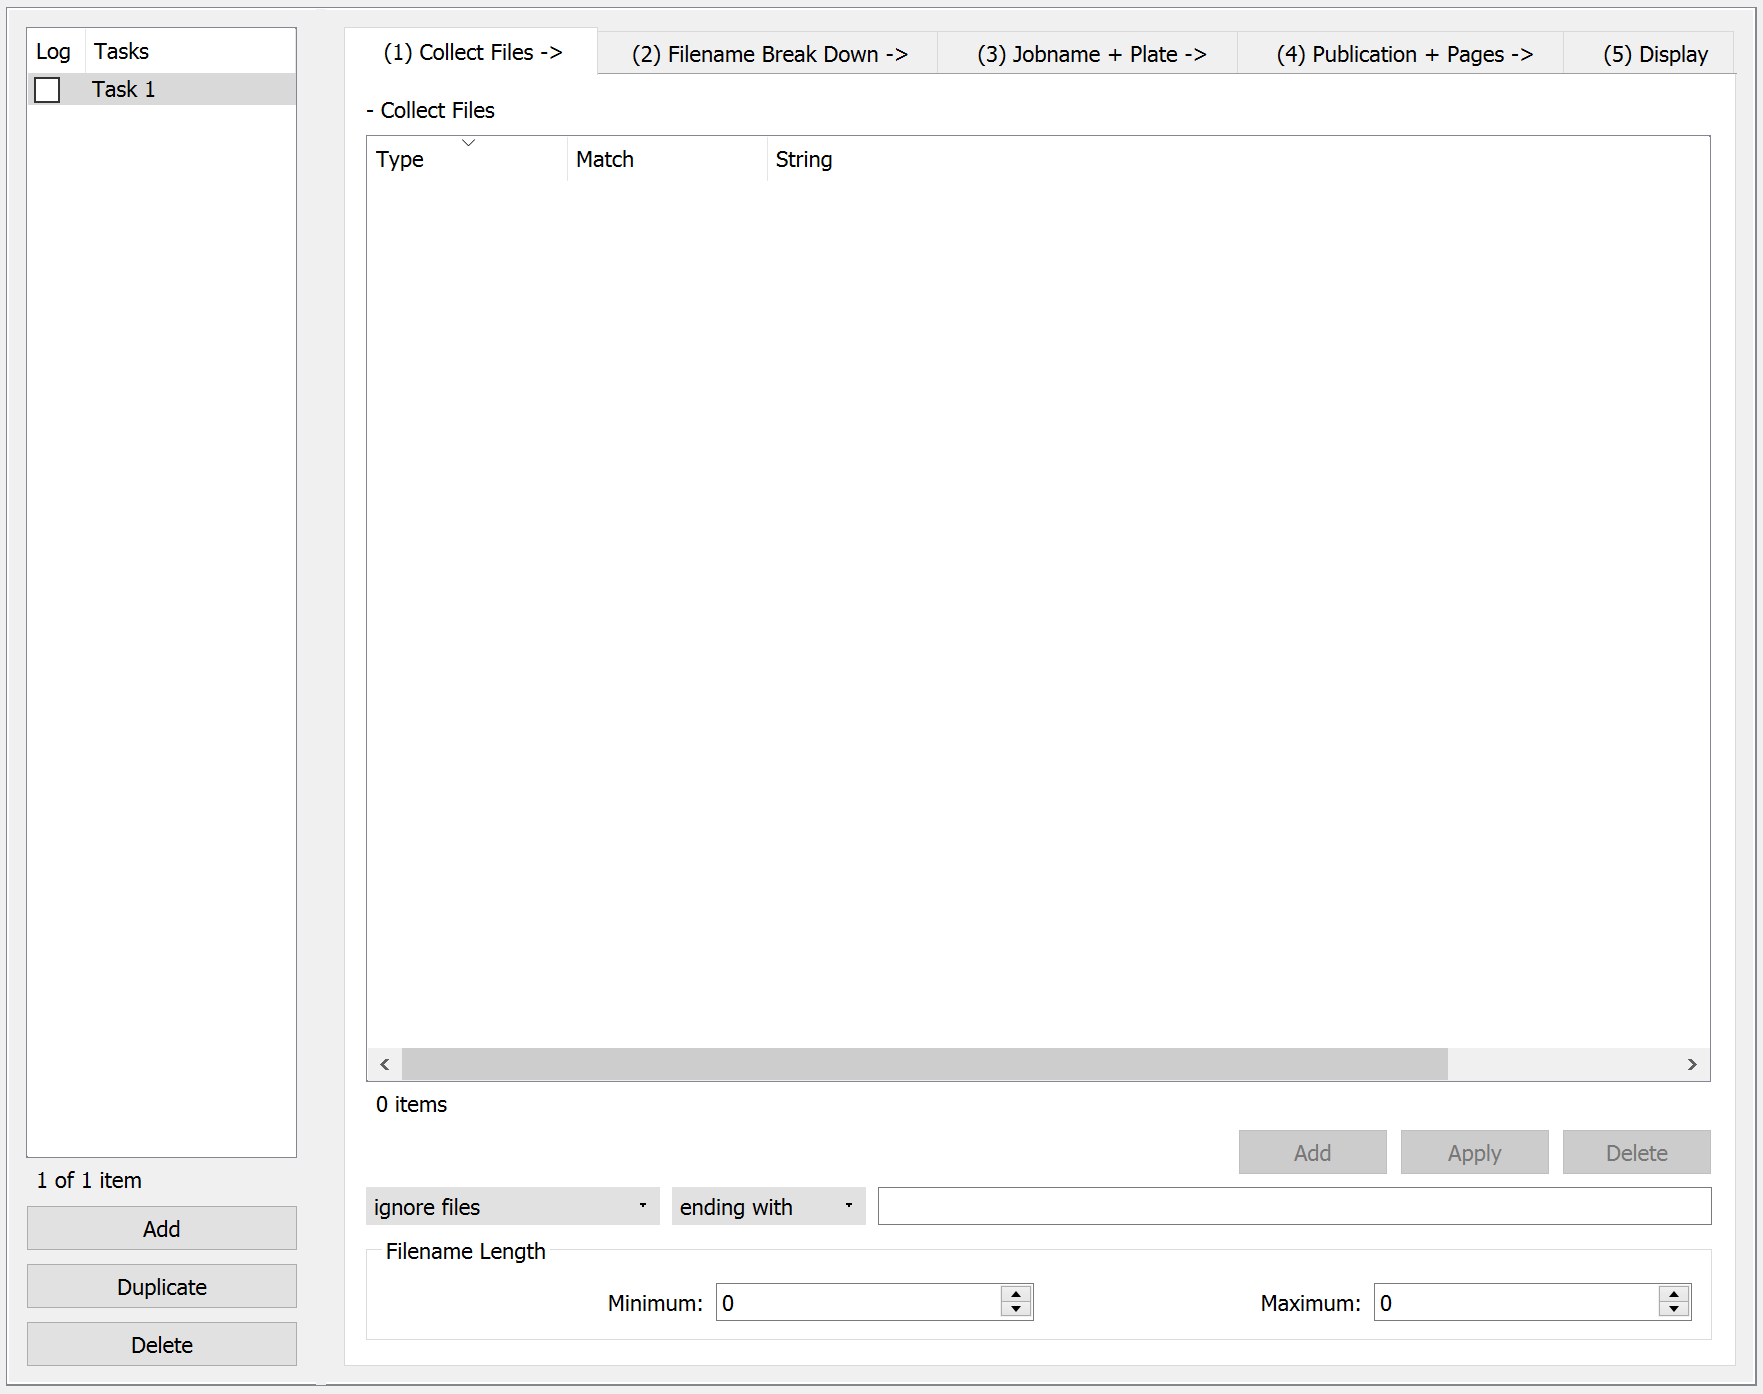
[1] Collect Files
This tab defines the filename types that are collected for sorting by the Job Genie. Files are collected by choosing an action and a qualifier for the action from the drop-down menus, then entering the character string the Job Genie will search for in the text field.
In this case, none of the newspaper platesetter files have any relevant common naming elements, such as a .tif extension, and only appropriate files will be placed in the RIP polling folder.
No special collection filtering needs to be applied, so this tab will be left un-edited.
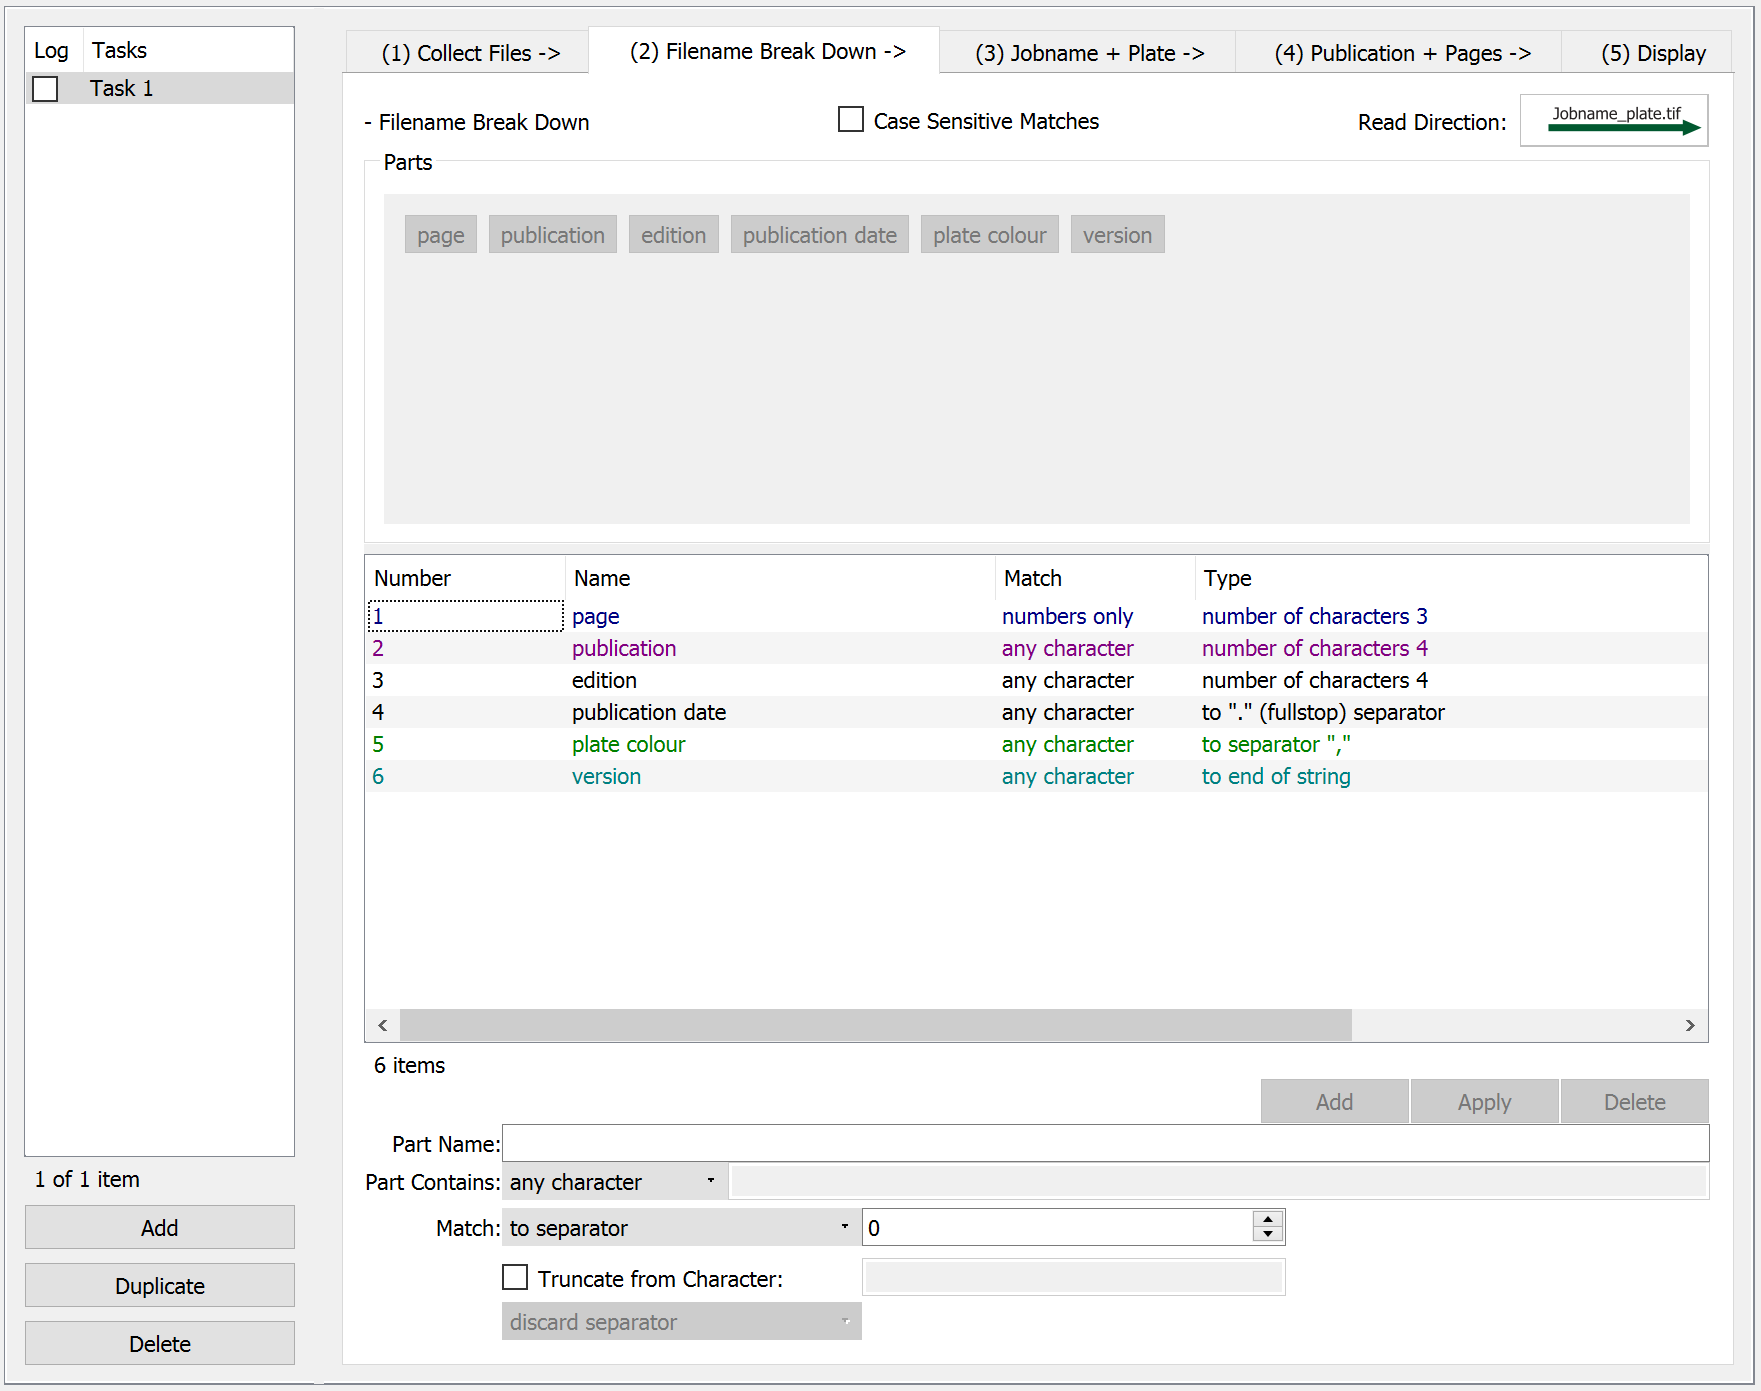
[2] Filename Break Down
This tab is where the different parts of the filename are identified and broken down for the Job Genie. Each part will be separated out using the selection parameters at the bottom of the panel.
The newspaper filenames
001FPQQZKQQ20180705.C,1
used in this example, contain the following information:
- page – 3 numeral page number.
- publication – 4 character code for the newspaper name.
- edition – 4 character code for the specific edition of the newspaper publication.
- publication date – 8 numeral [reverse] date of issue.
- plate colour – 1 character plate colour of the file (C,M,Y or K).
- version – plate version number.
The filenames will be broken down like this:
- page: 001
- publication: FPQQ
- edition: ZKQQ
- date: 20180705
- plate colour: C
- version: 1
Define the six (6) filename parts as follows:
- Leave the Case Sensitive Matches checkbox un-ticked.
- Set the Read Direction, by clicking on it, to Left —> Right.
- ‘page’ definition
- Type page into the Part Name field.
- Select numbers only from the Part Contains drop-down menu.
- Select number of characters from the Match drop-down menu.
- Enter 3 in the text field to the right of the Match drop-down.
- Click the Add button.
- ‘publication’ definition
- Type publication into the Part Name field.
- Select any character from the Part Contains drop-down menu.
- Select number of characters from the Match drop-down menu.
- Enter 4 in the number field to the right of the Match drop-down.
- Click the Add button.
- ‘edition’ definition
- Type publication into the Part Name field.
- Select any character from the Part Contains drop-down menu.
- Select number of characters from the Match drop-down menu.
- Enter 4 in the number field to the right of the Match drop-down.
- Click the Add button.
- ‘publication date’ definition
- Type publication date into the Part Name field.
- Select any character from the Part Contains drop-down menu.
- Select to “.” (fullstop) separator from the Match drop-down menu.
- Select discard separator from the bottom drop-down menu.
- Click the Add button.
- ‘plate colour’ definition
- Type plate colour into the Part Name Field.
- Select any character from the Part Contains drop-down menu.
- Select to separator from the Match drop-down menu.
- Type a comma , in the text field to the right of the Match drop-down.
- Select discard separator from the bottom drop-drop menu.
- Click the Add button.
- ‘version’ definition
- Type version into the Part Name field.
- Select any character from the Part Contains drop-down menu.
- Select to end of string from the Match drop-down menu.
- Click the Add button.
[3] Jobname + Plate
This tab defines how the Job Genie assembles separate plate files into complete jobs. In this example, each newspaper page will be assembled from four (4) individual plates into a single CMYK page for proofing.
NOTE – This tab is where the ‘version’ filename part will be assigned as the Plate Version.
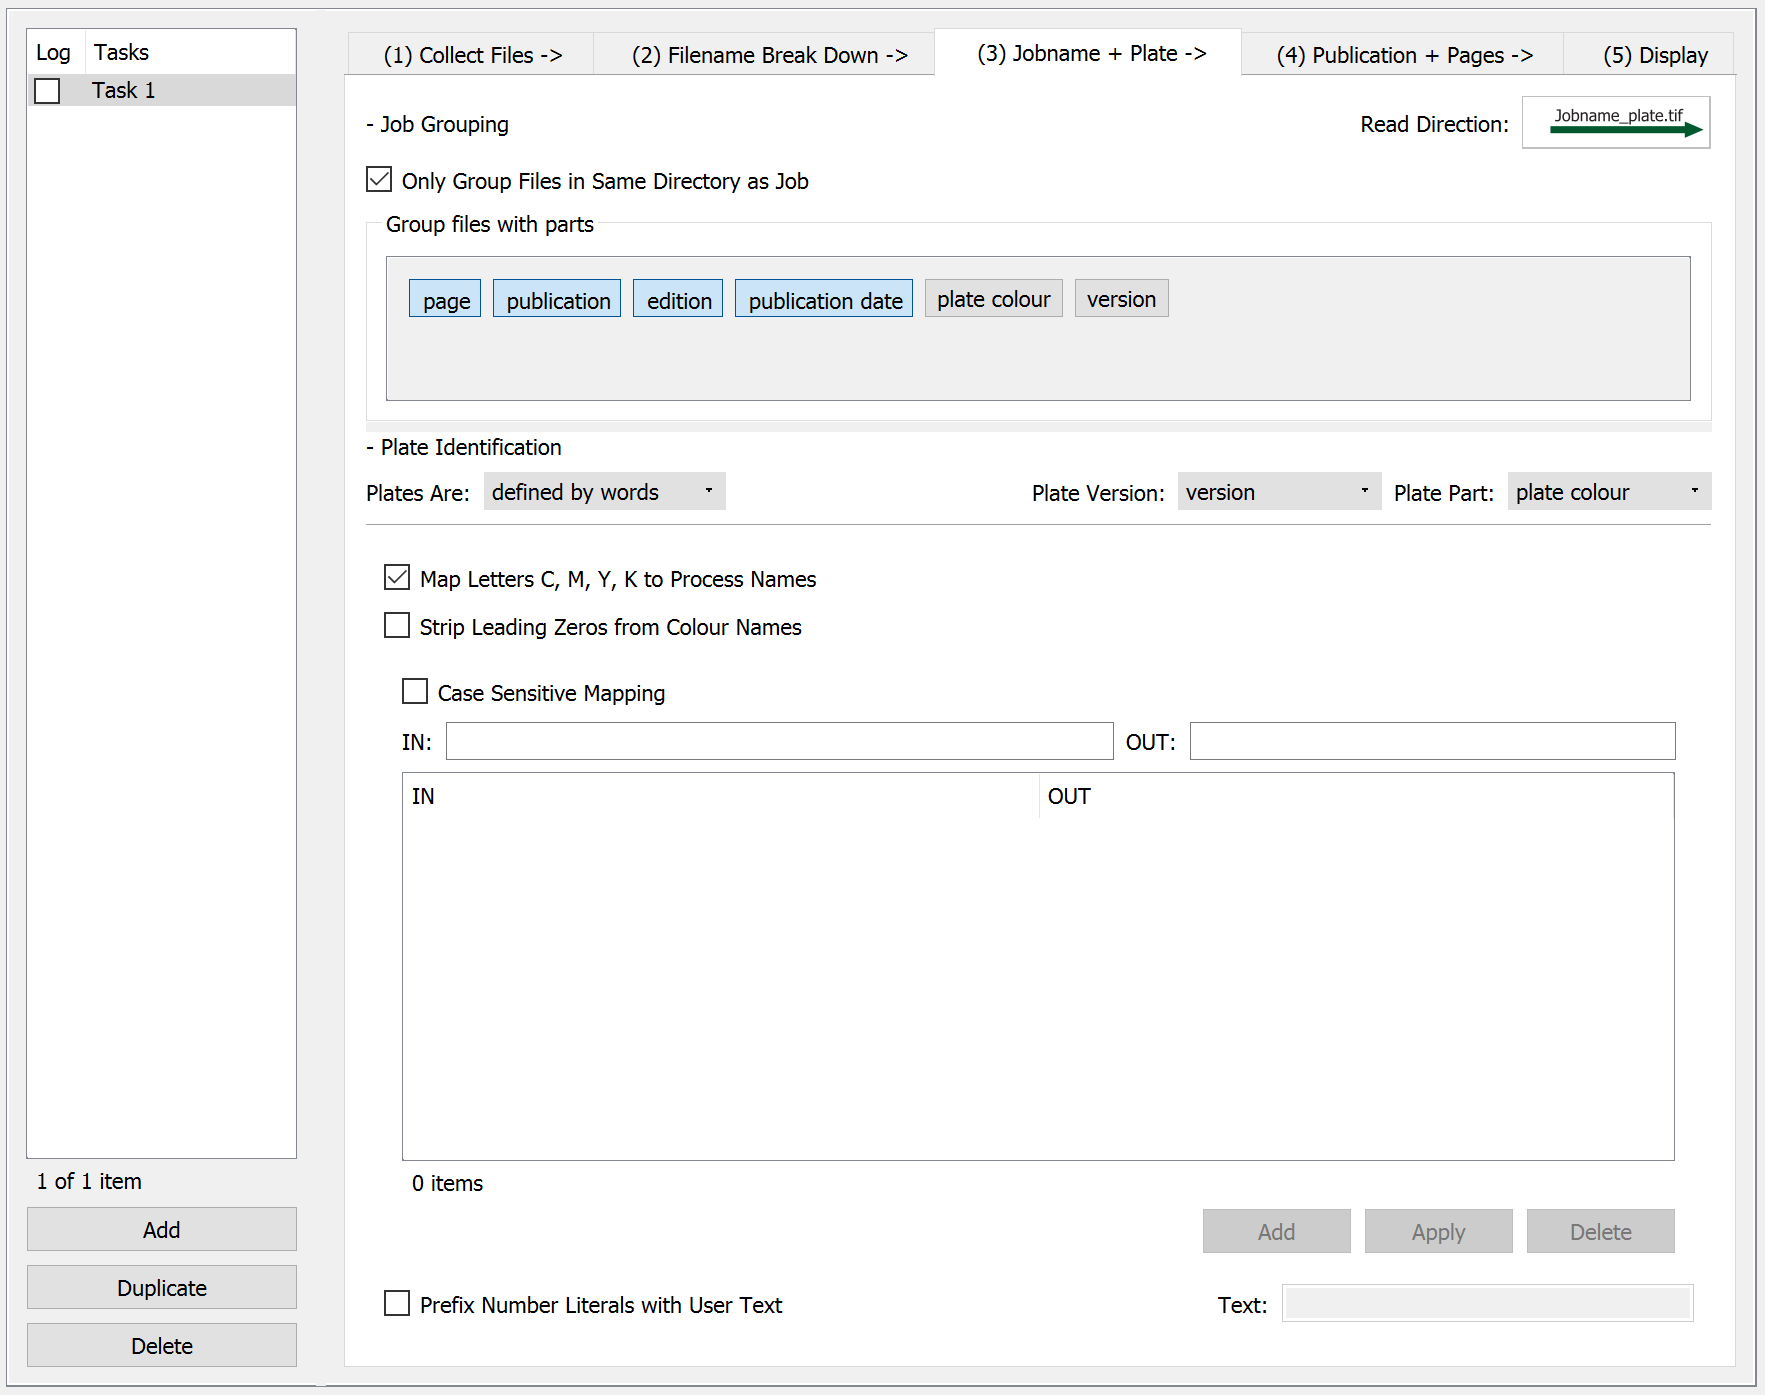
- Tick the Only Group Files in Same Directory as Job checkbox.
- Leave the Read Direction button set to Left —> Right.
- In the Group files with parts panel:
- Click (highlight) the page, publication, edition, and publication date tiles.
- In the Plate Identification panel:
- Select defined by words from the Plates drop-down menu.
- Select the version filename part from the Plate Version drop-down-menu.
- Select plate colour from the Plate Part drop-down menu.
- Tick the Map Letters C, M, Y, K to Process Names checkbox.
NOTE: In tab [2] Filename Break Down part list, the ‘version’ entry will now be displayed in CYAN denoting the Plate Version, the ‘plate colour’ entry will be displayed in GREEN denoting the Plate Part.
[4] Publication + Pages
This tab is where the Page Number, Publication, Section and Edition parts of the filenames are defined for the Job Genie. It is also where the ‘publication’ and ‘edition’ codes in the example platesetter files will be re-mapped to their full names for soft proofing purposes.
- Select defined by numbers from the Page Numbers Are drop-down menu.
- Select page from the Page Number Part drop-down menu.
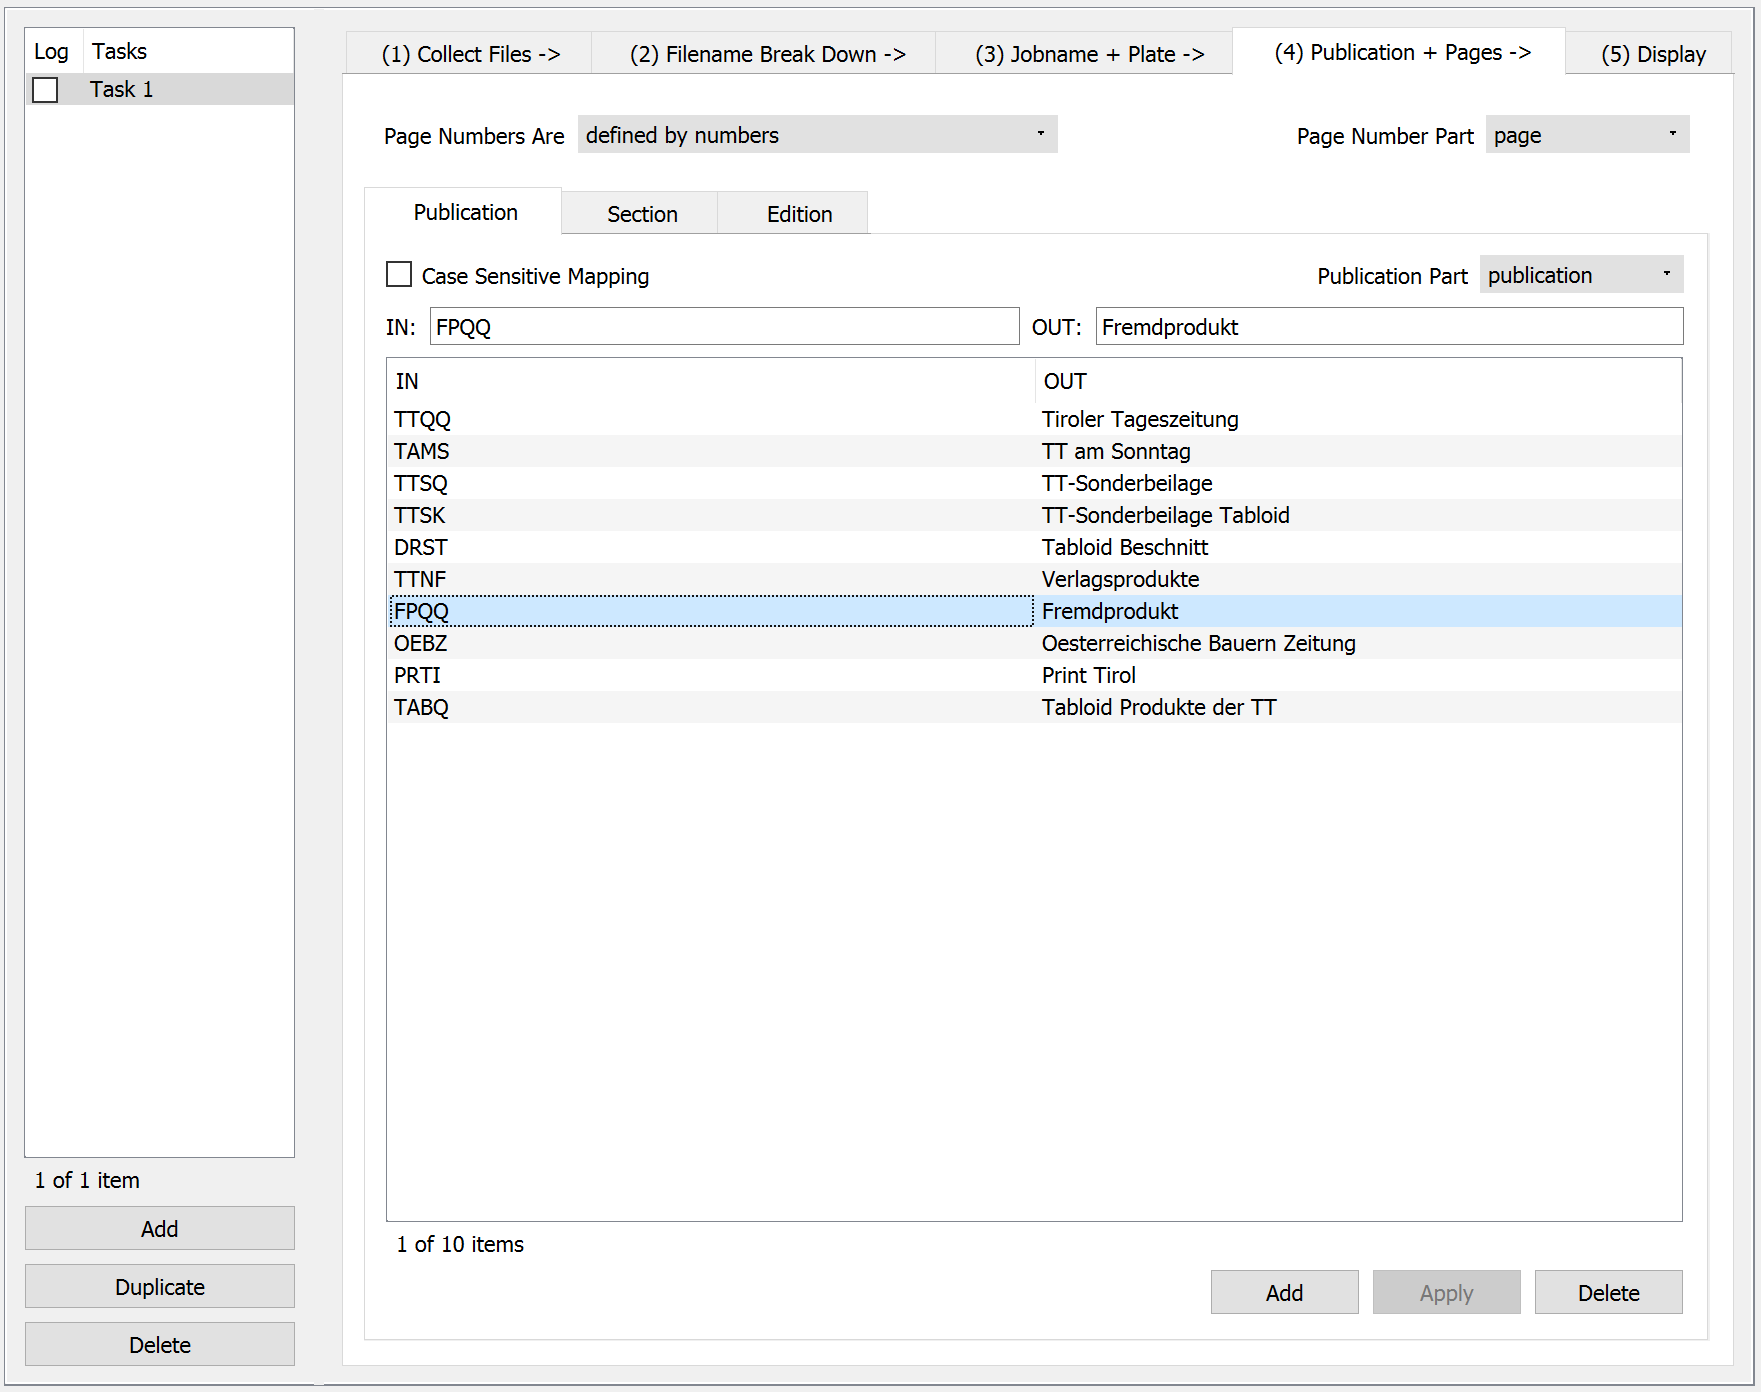
- Click on the Publication tab:
- Leave the Case Sensitive Mapping checkbox un-ticked.
- Select publication from the Publication Part drop-down menu.
- Next, re-map the publication code in the filename(s) to their full name(s).
- Type FPQQ in the IN field
- Type Fremdprodukt in the OUT field
- Click the Add button
- Repeat the steps above for the other newspaper publication codes. Click on an item in the list to edit it and click Apply to save the edit.
The Section tab is not required for this example.
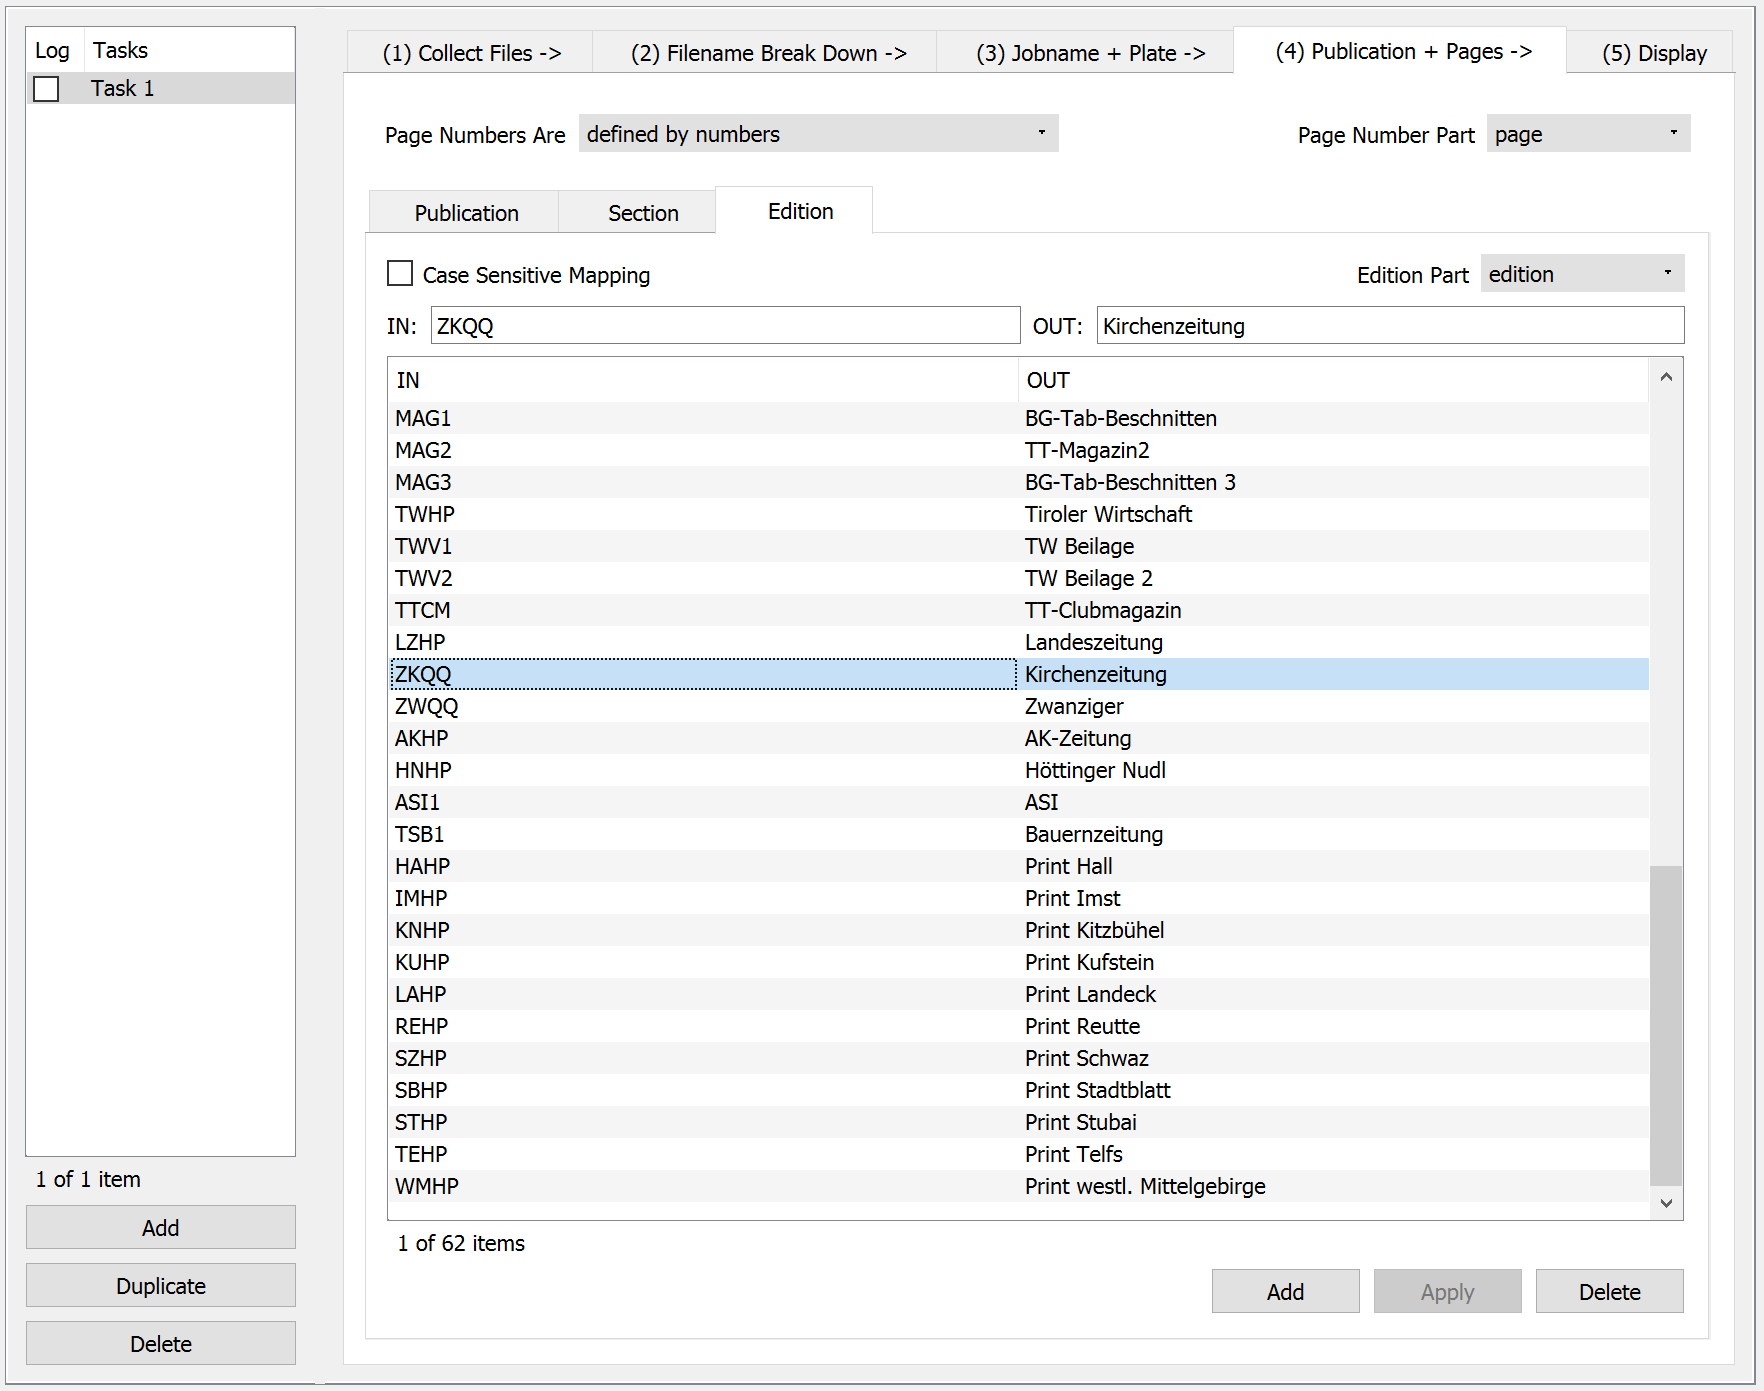
- Click on the Edition tab:
- Leave the Case Sensitive Mapping checkbox un-ticked.
- Select edition from the Edition Part drop-down menu.
- Next, re-map the edition code in the filename(s) to their full name(s).
- Type ZKQQ in the IN field.
- Type Kirchenzeitung in the OUT field.
- Click the Add button.
- Repeat the steps above for the other newspaper publication codes. Click on an item in the list to edit it and click Apply to save the edit.
NOTE: In tab [2] Filename Break Down part list, the ‘page’ entry will now be displayed in DARK BLUE denoting the Page Number Part, the ‘publication’ entry will be displayed in PURPLE denoting the Publication Part.
[5] Display
This tab is where the collected page Jobname, Publication, Section and Edition names are defined for display in the RIPMonitor.
The Job Genie uses the Publication Name String configured in the Publication tab to group any pages with filename parts in common into a Publication for proofing.
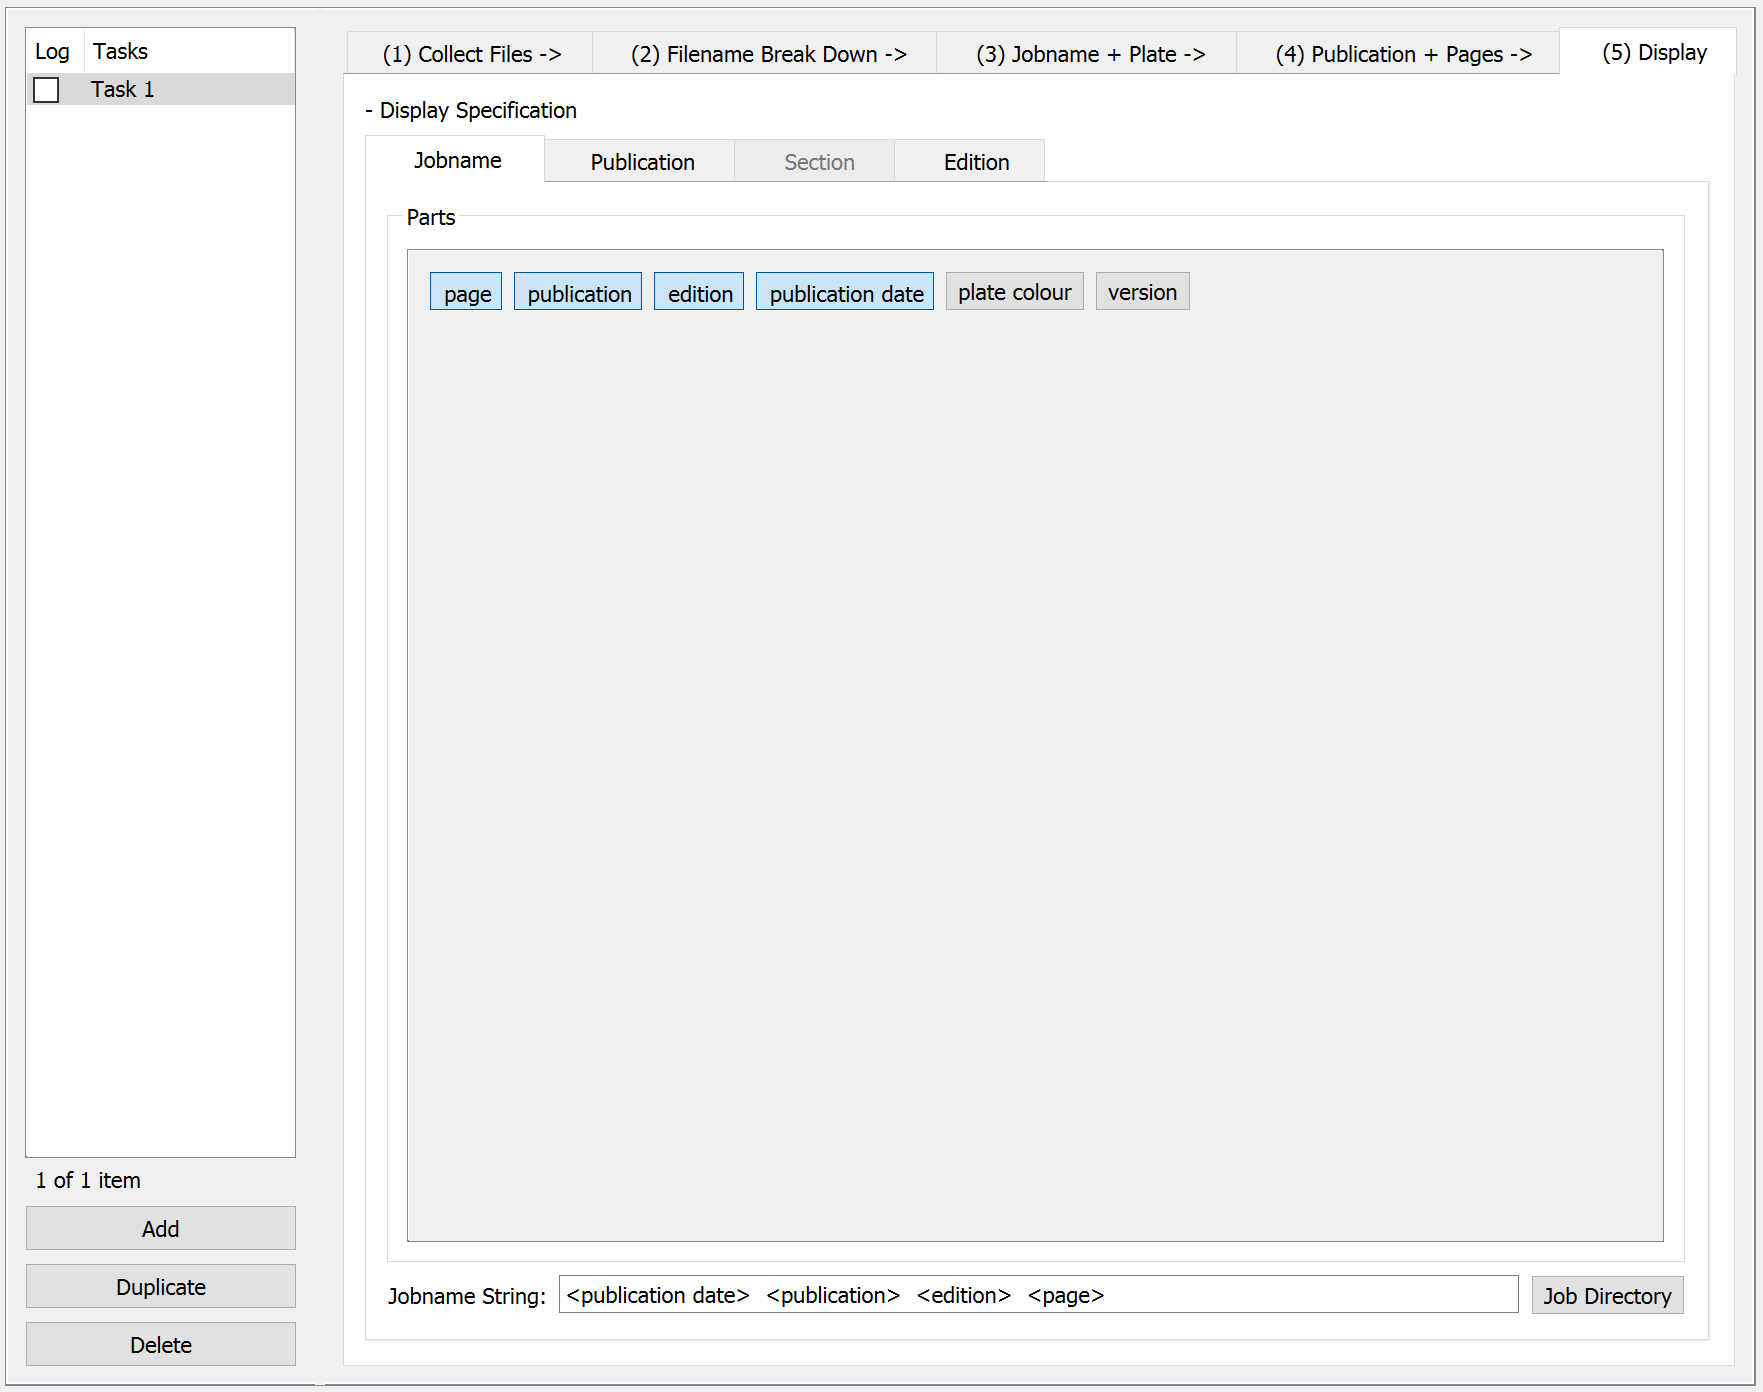
- Click on the Jobname tab:
- In the Parts panel click (highlight) the publication date, publication, edition and page tiles in that order. Filename part text tags will appear in the Jobname String field as the tiles are selected, resulting the following:
- <publication date><publication><edition><page>
- To make the job name appear legibly in the RIPMonitor, insert (type) spaces ‘ ‘ between the ‘>’ and ‘<‘ characters in the Jobname String field so the line appears like this:
- <publication date> <publication> < edition> <page>
- In the Parts panel click (highlight) the publication date, publication, edition and page tiles in that order. Filename part text tags will appear in the Jobname String field as the tiles are selected, resulting the following:
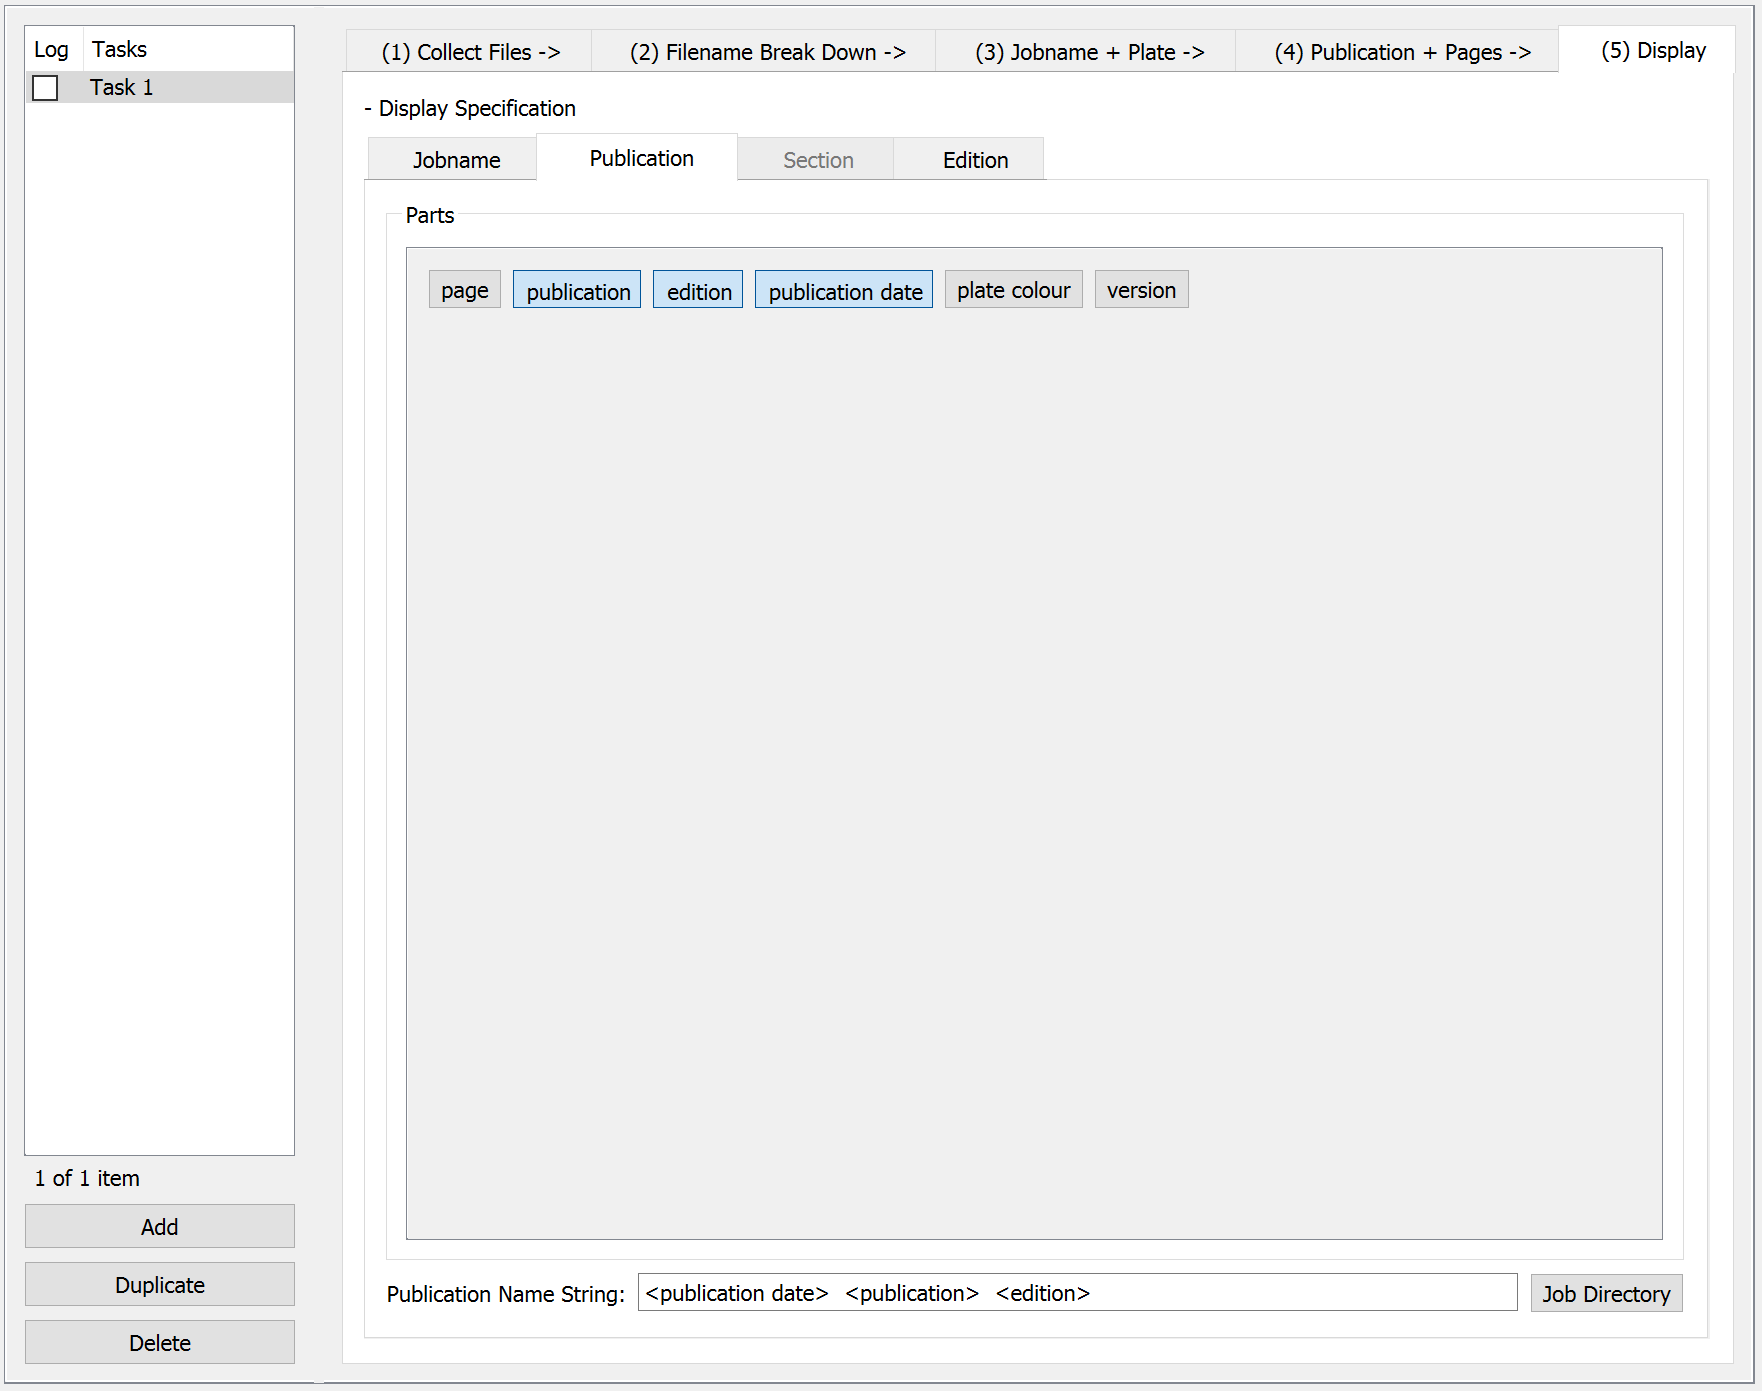
- Click on the Publication tab:
- In the Parts panel click (highlight) the publication date, publication and edition tiles in that order.
- Filename part text tags will appear in the Publication Name String field as the tiles are selected, resulting the following:
- <publication date><publication><edition>
- To make the publication name appear legibly in the RIPMonitor, insert (type) spaces ‘ ‘ between the ‘>’ and ‘<‘ characters in the Publication Name String field so the line appears like this:
- <publication date> <publication> < edition>
The Section tab is not required for this example.
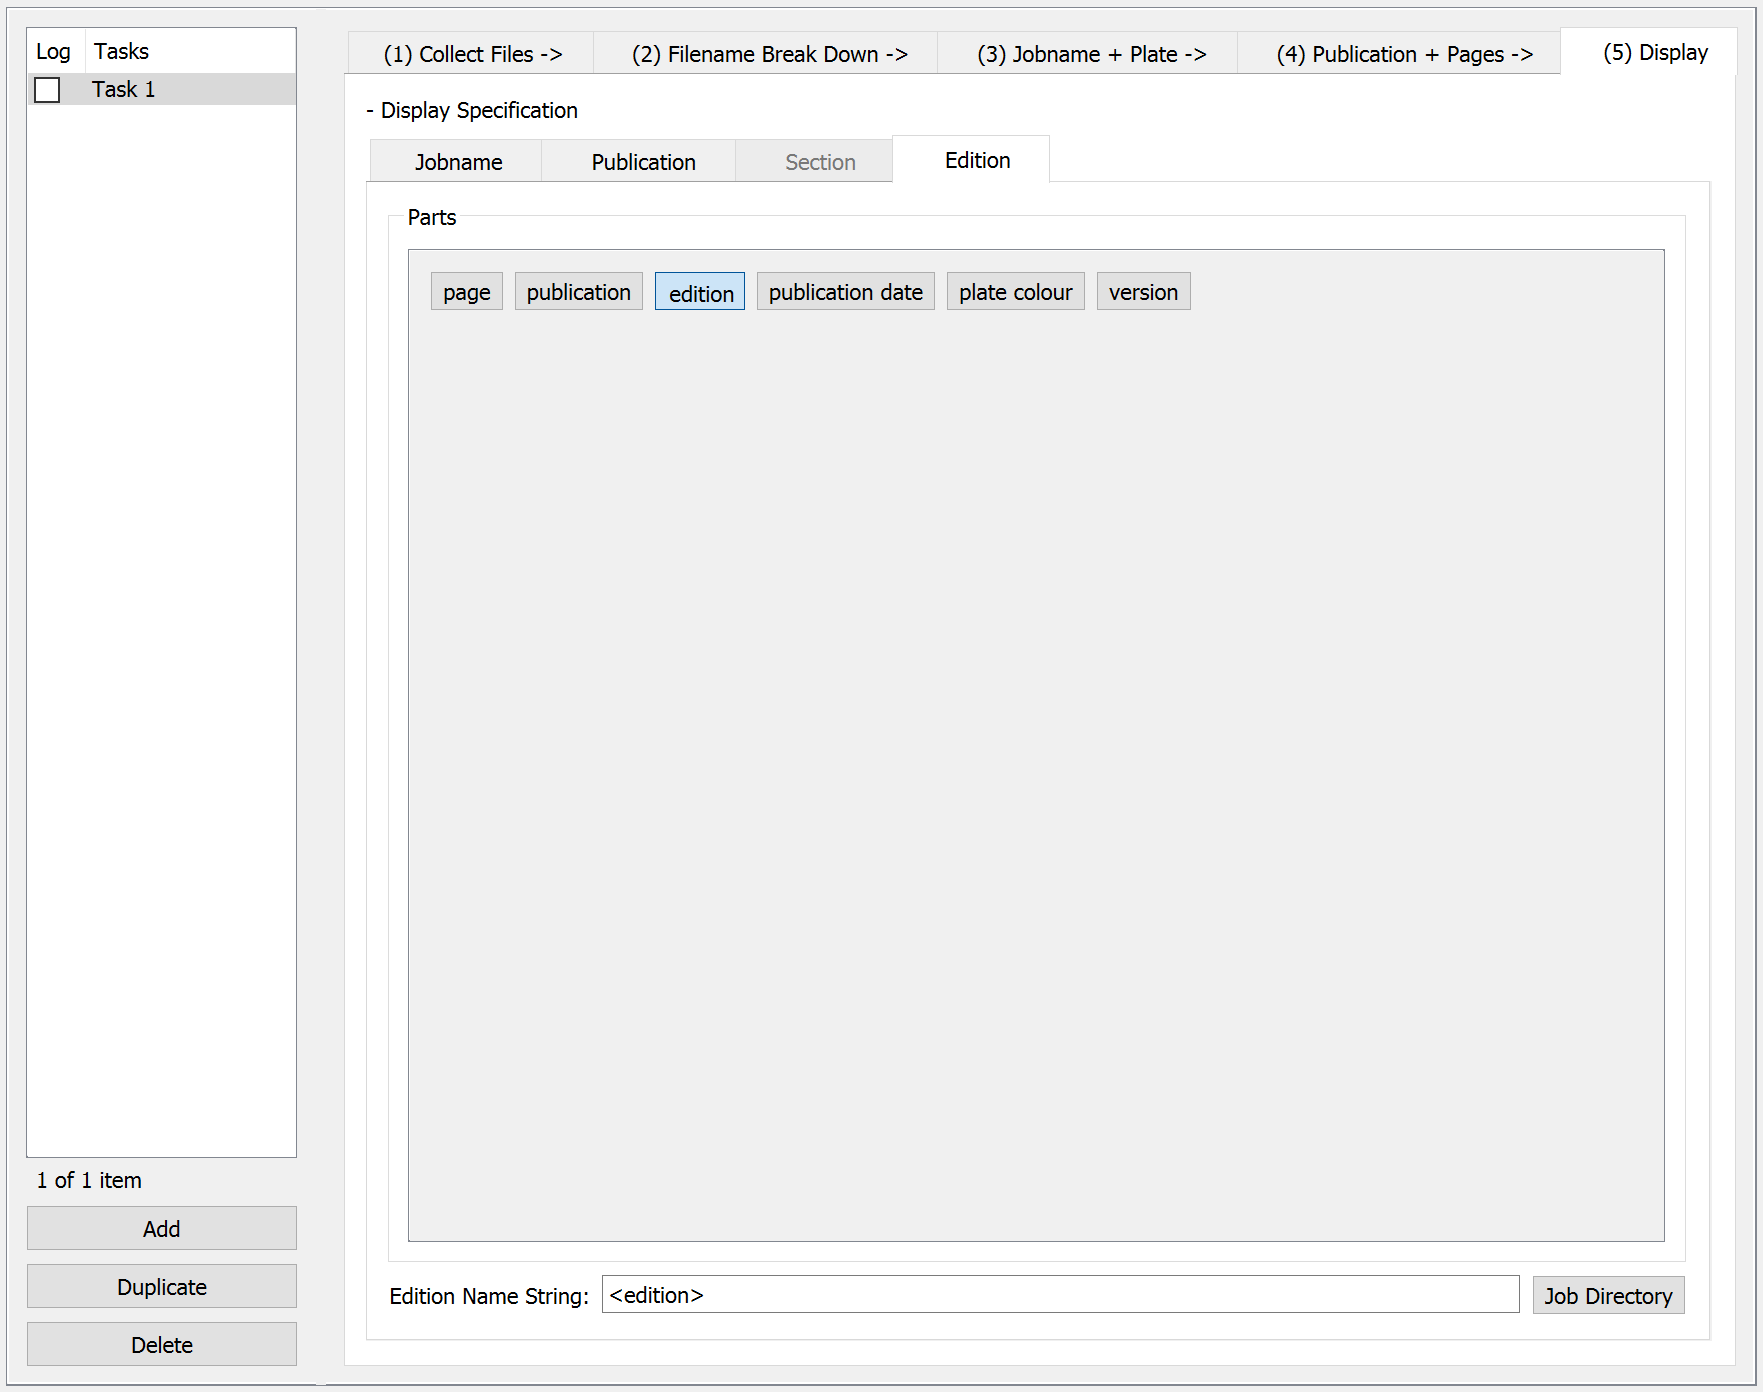
- Click on the Edition tab:
- In the Parts panel click (highlight) the edition tile.
- The edition filename part text tag will appear in the Edition Name String field as follows:
- <edition>
Job Genie configuration is now complete.
To set up the RIP proofing workflow:
- Create a RIP in Workbench, in this example the RIP will be named German Newspaper.
- Select the RIP Driver, in this case TIFF Based RIP (User Configurable).
- Assign the Job Genie in the Polling panel.
- Configure Connection and AutoProofing settings as required, then Save.
RIPMONITOR, PLATE VERSION AND (SOFT)PROOFING
When polling begins the newspaper plate files will be collected into complete CMYK jobs for proofing and displayed in the RIPMonitor like this:
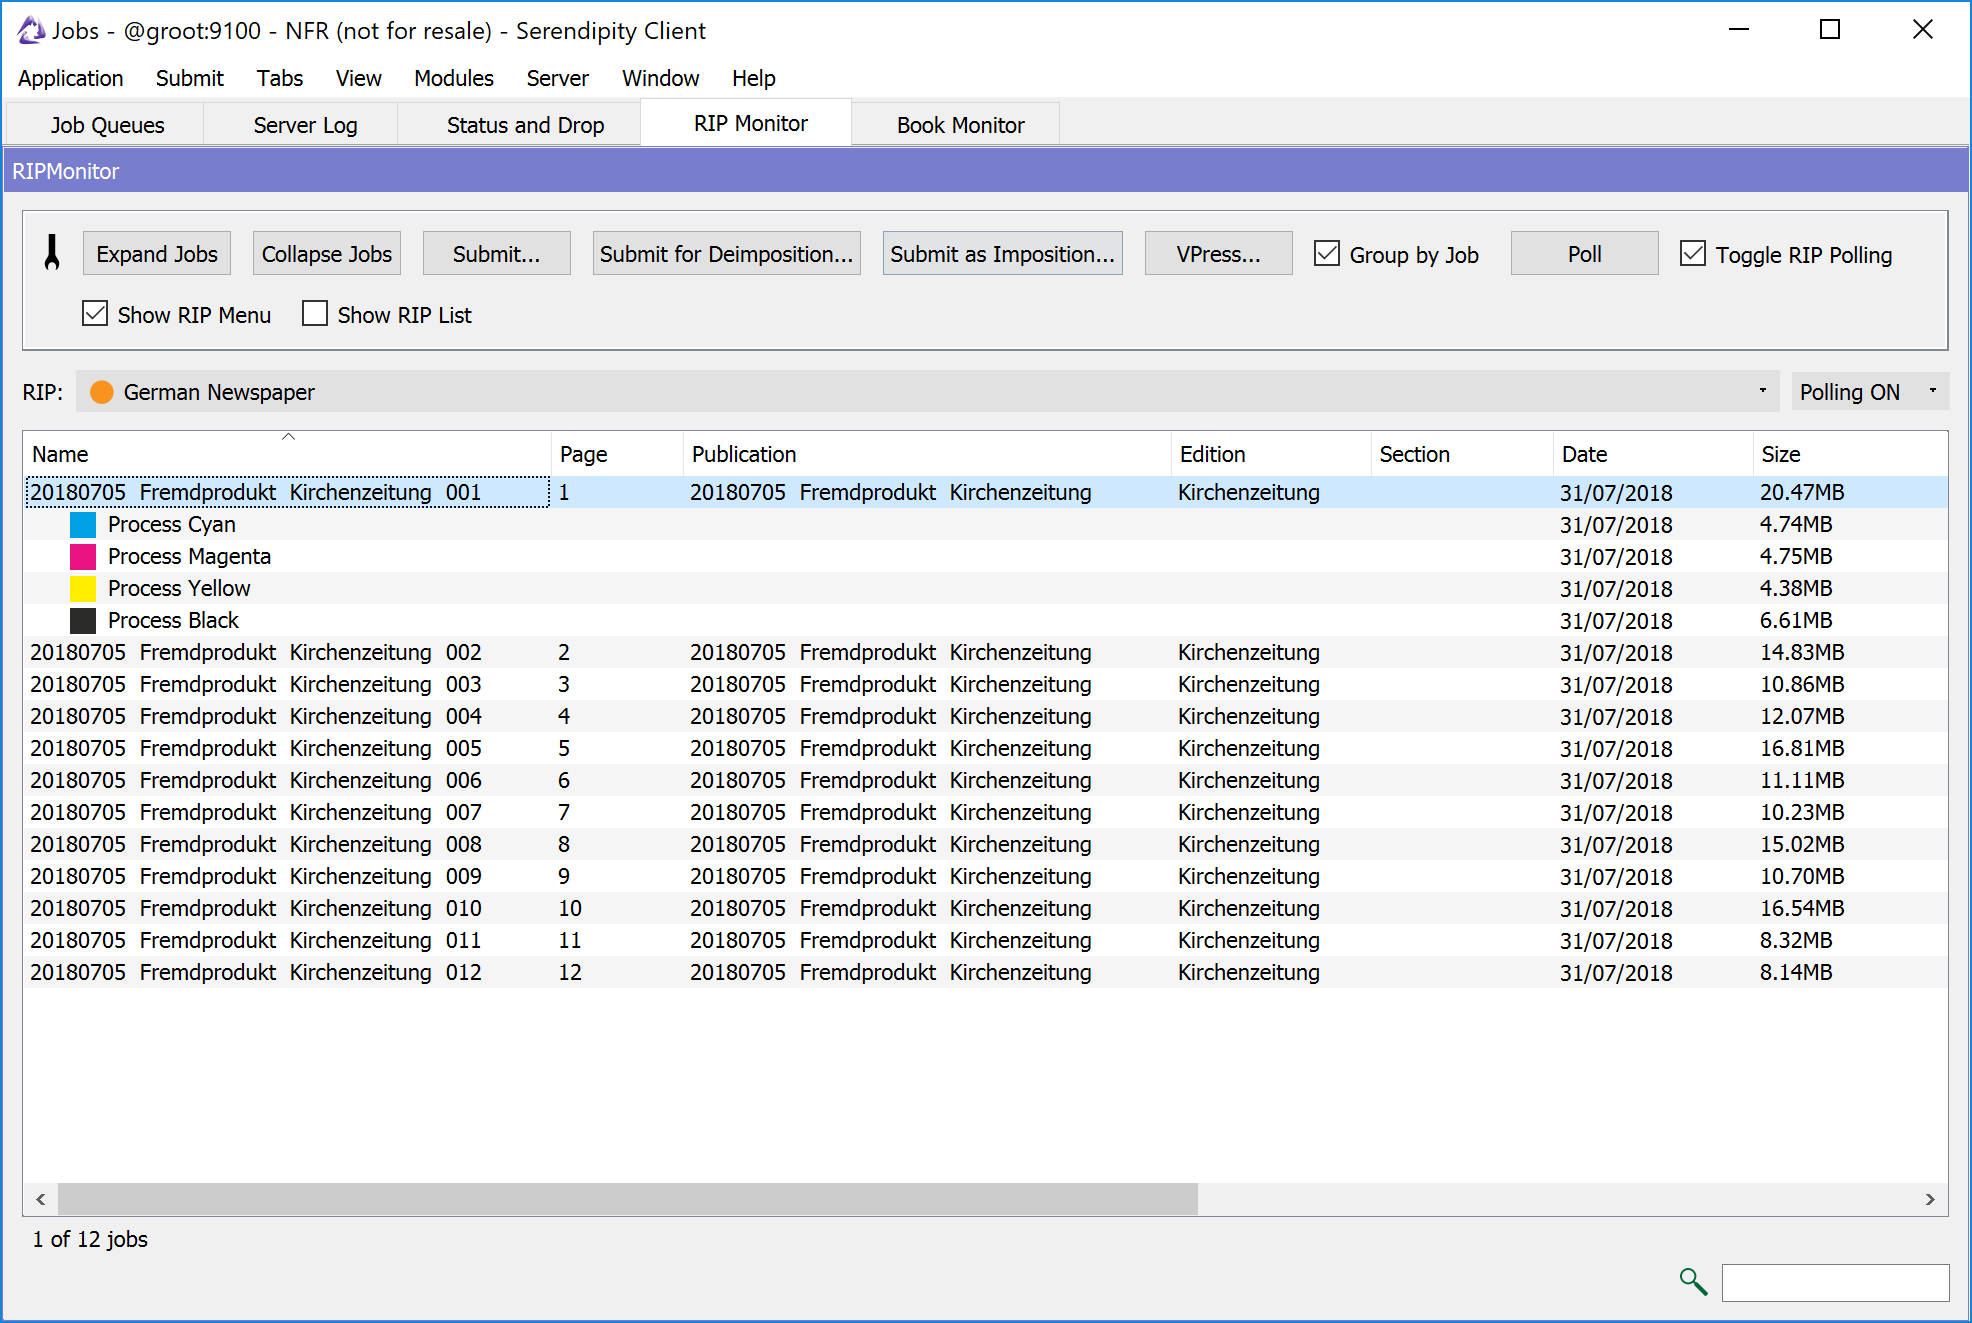
In the image above, page 1 of the newspaper has been expanded using the Expand Jobs button in the RIPMonitor Toolbar.
Scrolling to the right using the horizontal scroll bar, we can see the original plate file names for each of the CMYK plates for page 1:
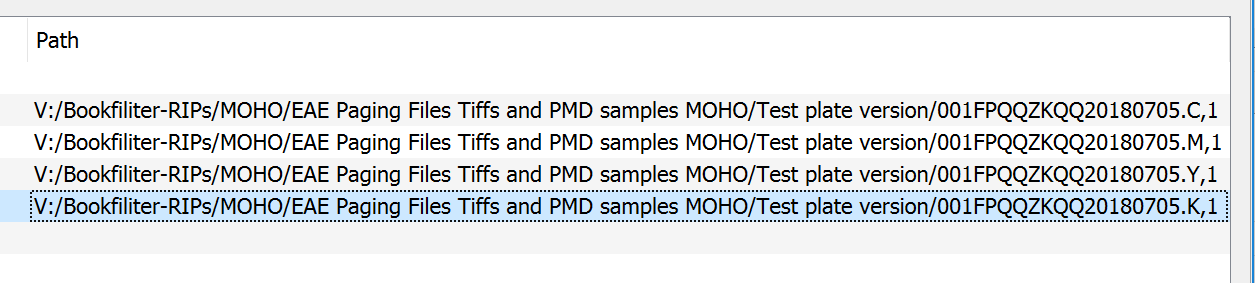
Note the ‘1’ at the end of each file name denoting plate file version 1.
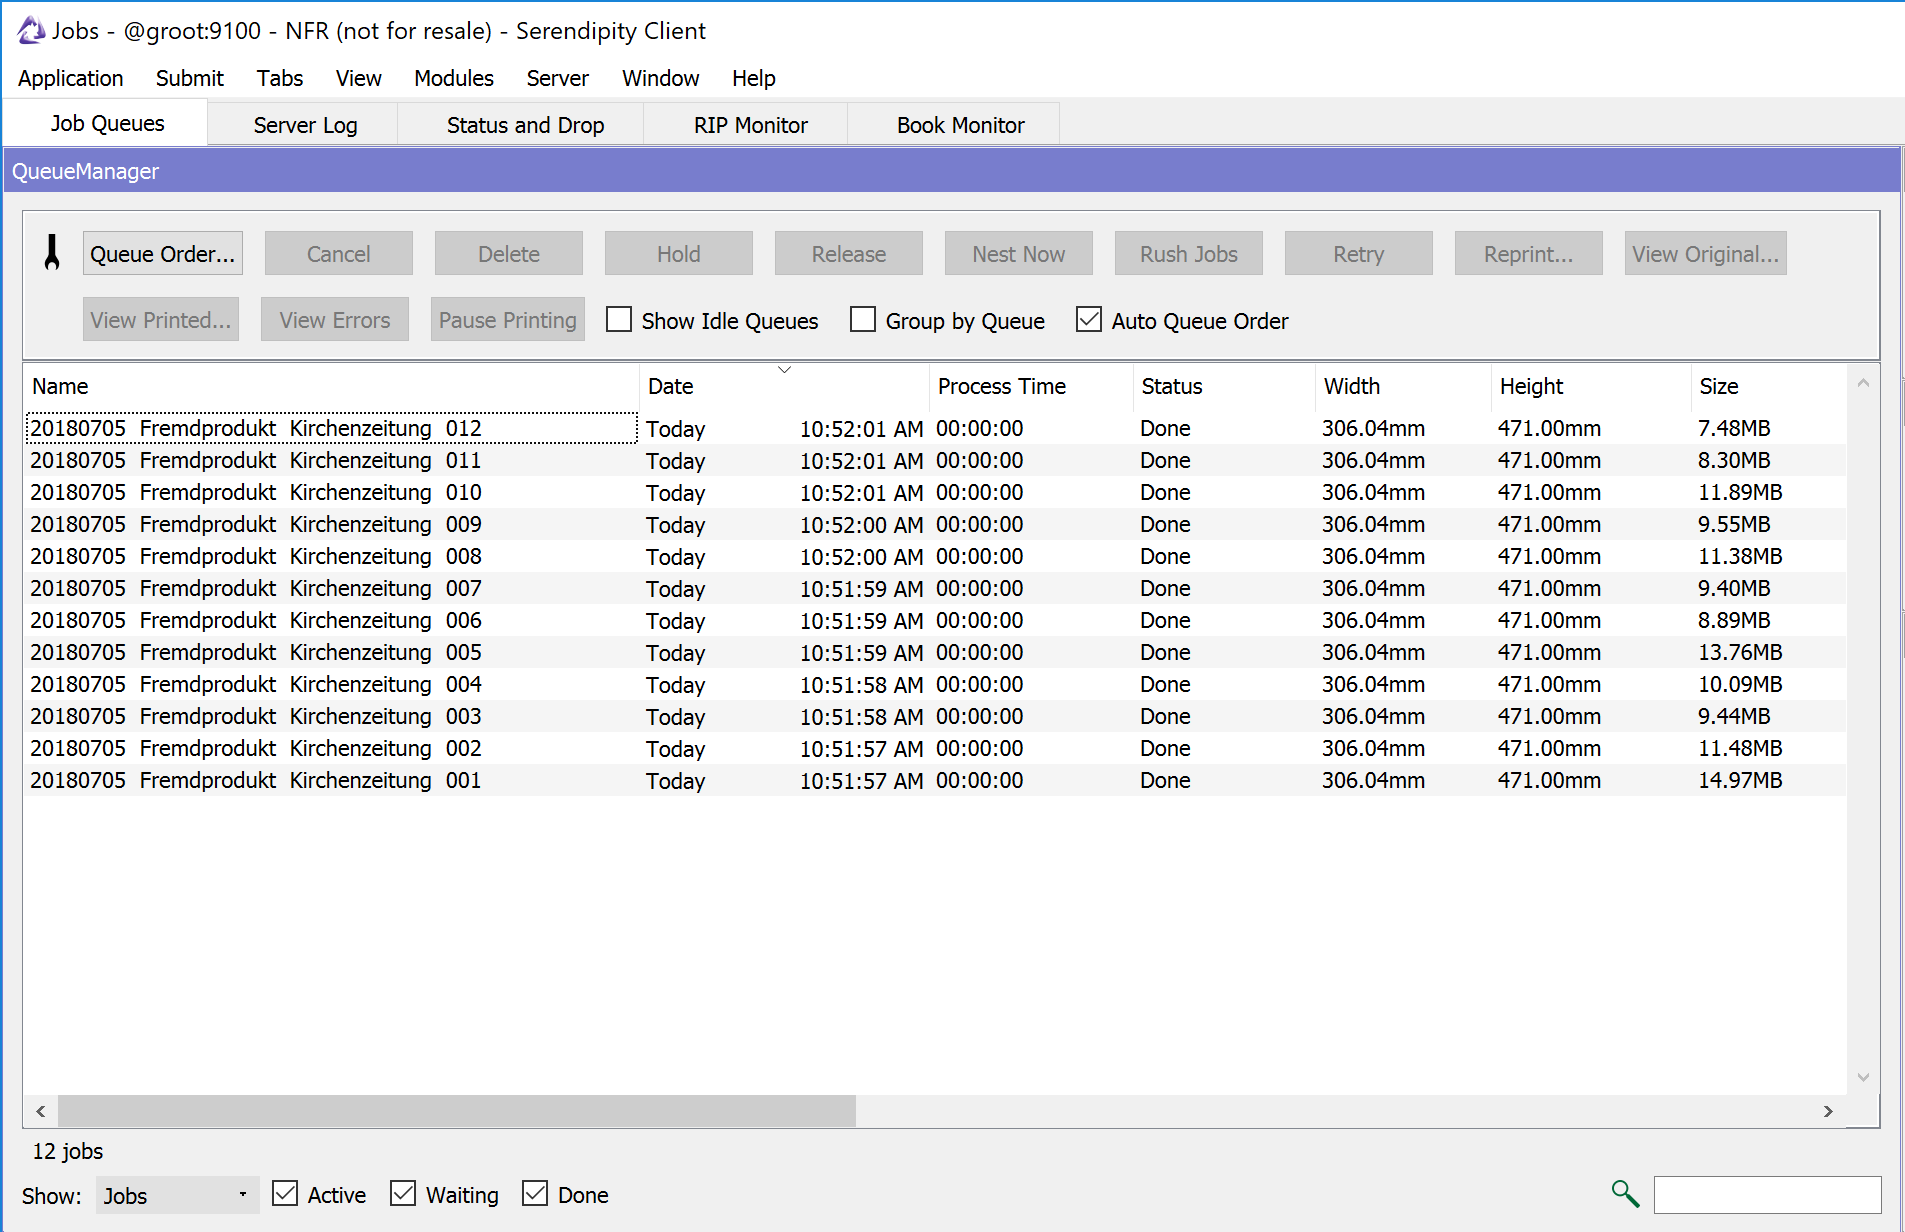
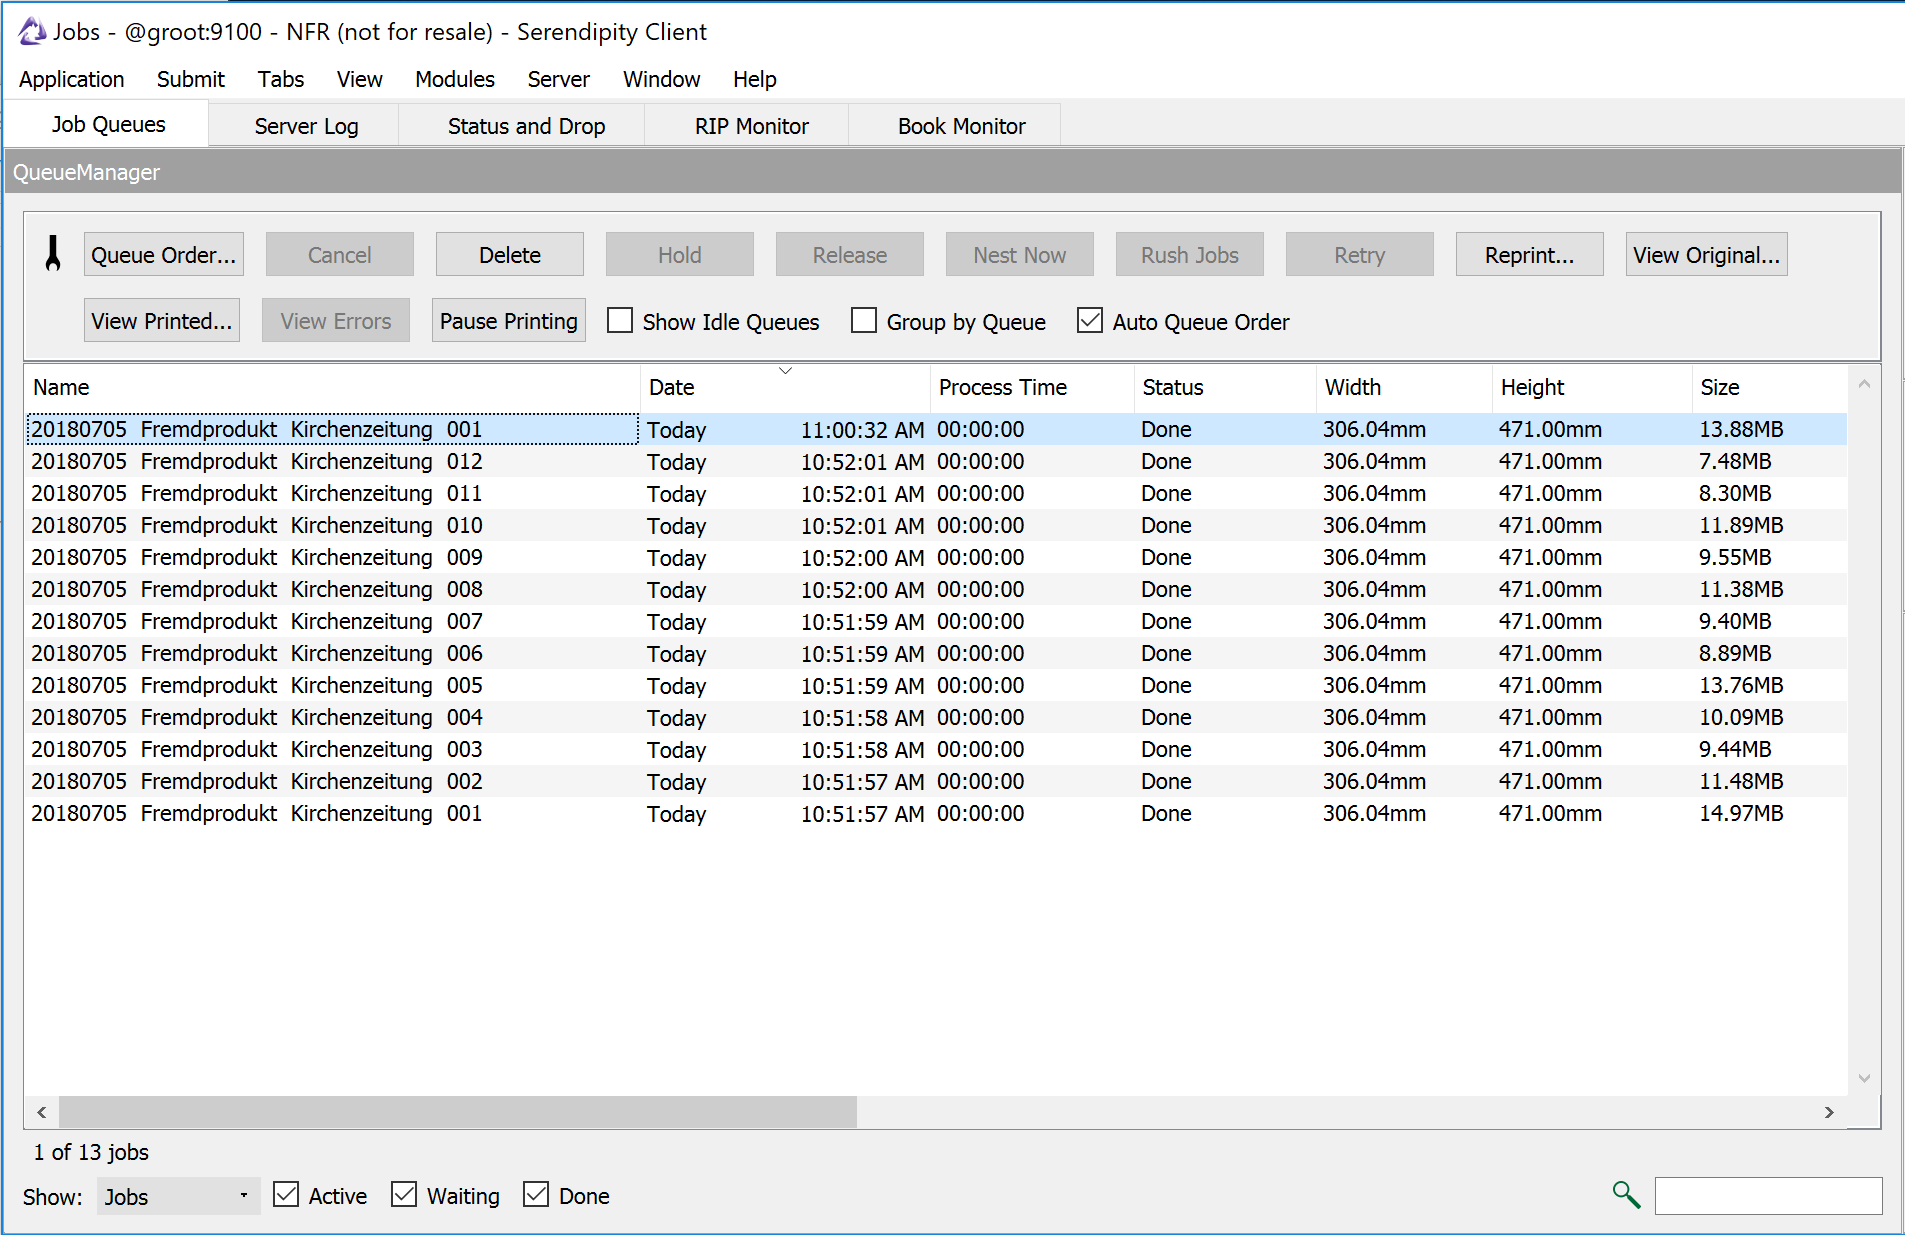
When submitted to a Pagesetup for proofing, the publication page jobs will appear in the QueueManager:
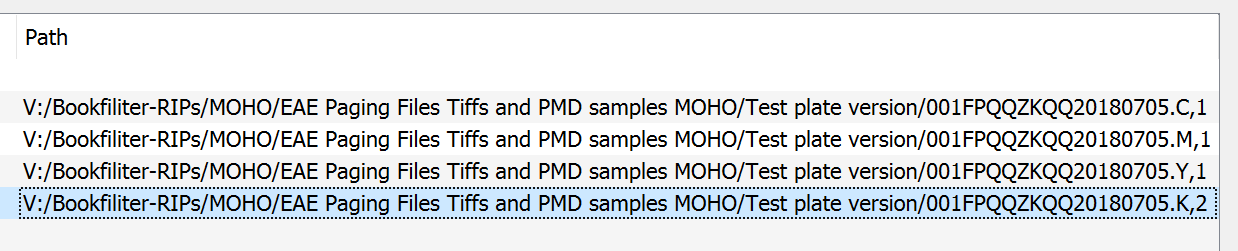
After soft proofing the 12 page newspaper publication above, an error was discovered in the black text (K) plate of page 1. A new black (K) plate is made and file is sent for RIPping by the platesetter.
In a short time, the new plate is polled by the RIP setup in Blackmagic / Veripress. The Job Genie recognises the plate as a new replacement version for the page 1 K plate. It inserts the new
001FPQQZKQQ20180705.K,2
plate into page 1 as follows:
After determining the page 1 job is again stable (3 polls), it is sent to the Pagesetup for proofing appearing in the QueueManager:
The new page version is displayed in the QueueManager Show: Publication view > Page Navigator panel:
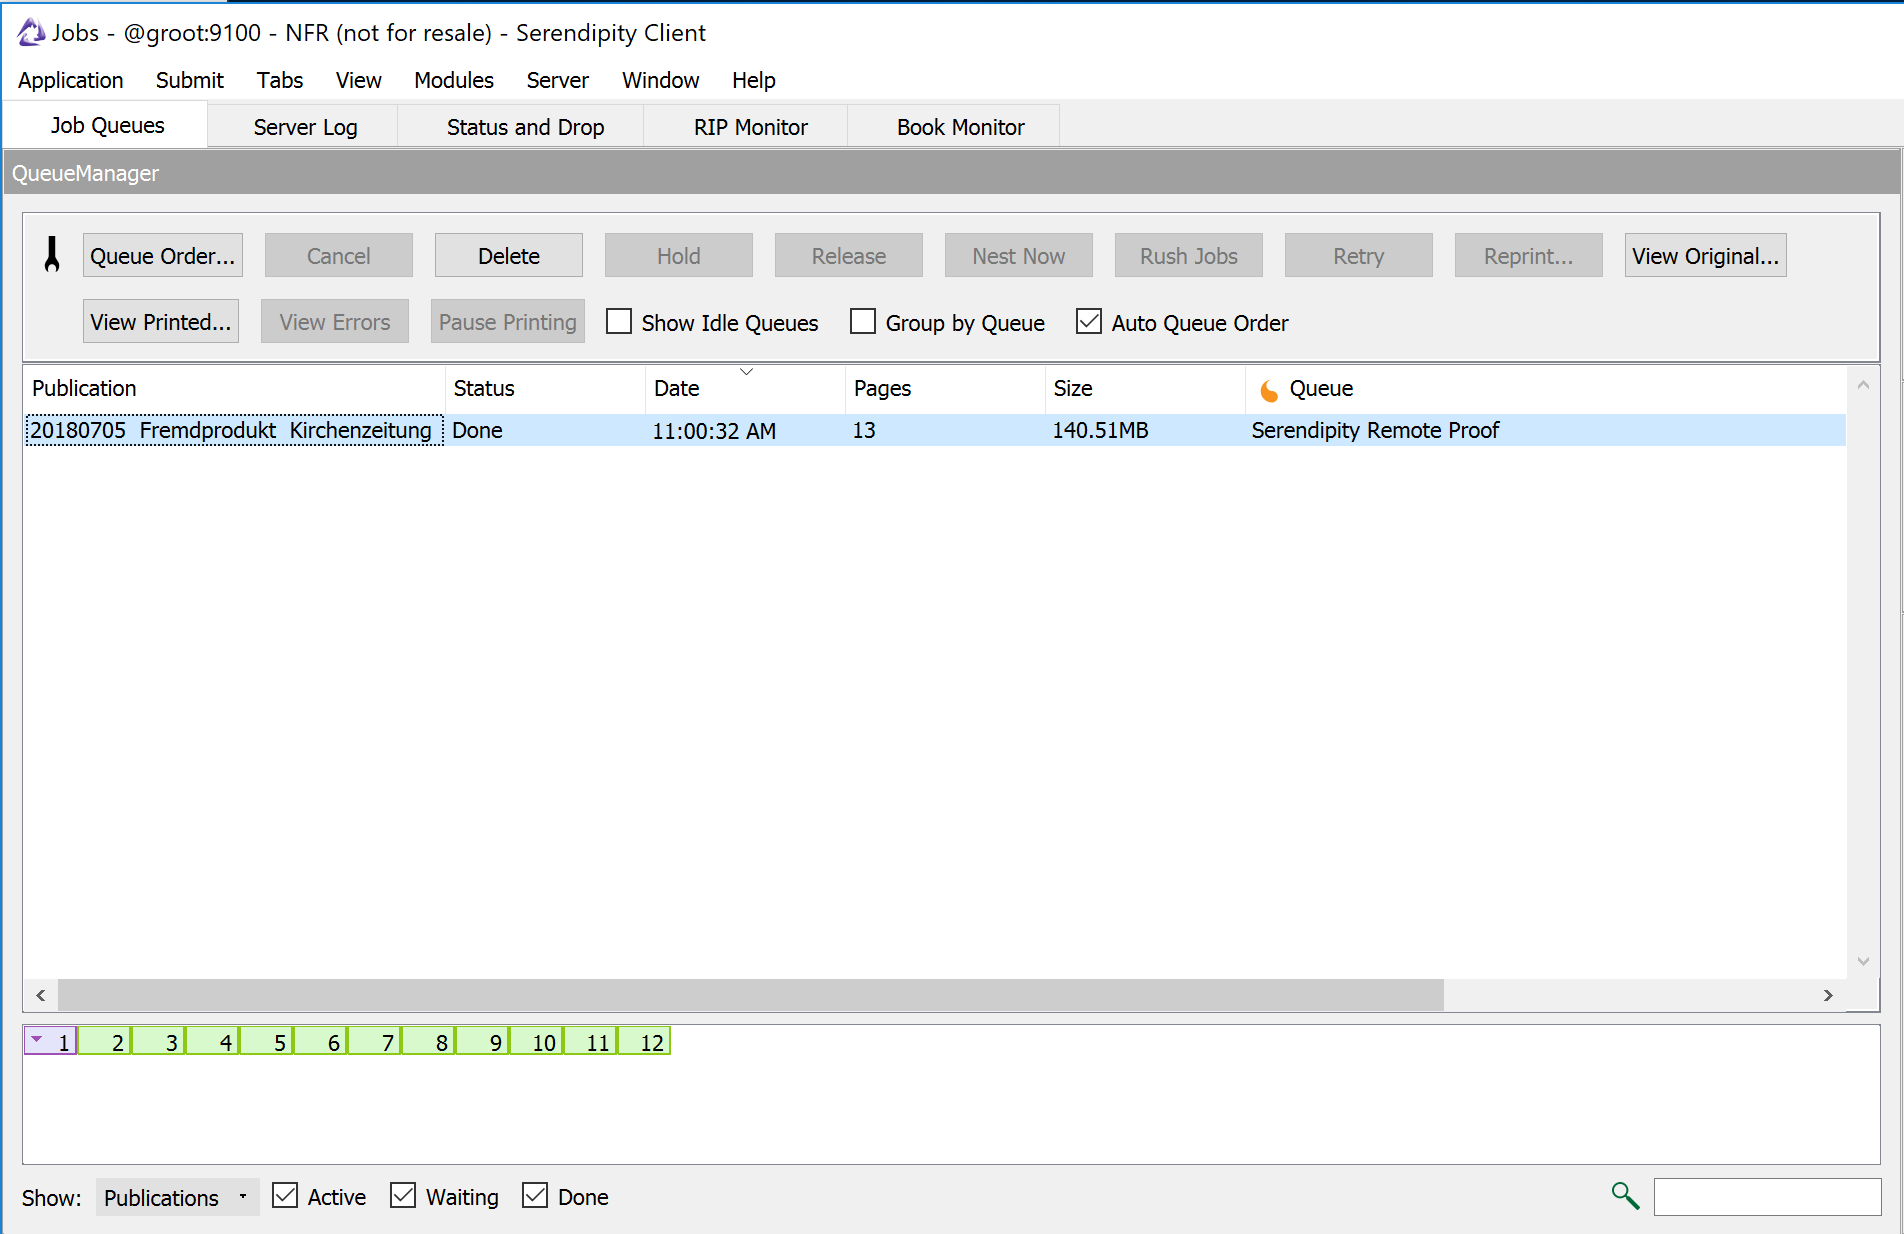
The purple page 1 denotes a page with multiple versions.
The Blackmagic / Veripress TouchConsole settings in this example have been configured to Select Newest Page for Duplicate Page Viewing in Softproof.
When the 180705 FremdProdukt Kirchenzeitung newspaper publication is loaded for soft proofing, the updated Page 1 will be displayed.