
Serendipity Blackmagic 7.1+ introduces a spot/special colour iteration function for your proofing workflow.
The Truespot application uses an iterative process to print, measure and verify spot colours, optimising them for a specific proofing media. Truespot generates a custom Replace Colour Set that is applied to all jobs passing through a Media, replacing matching job special colours with Truespot colours that are a closer match to the originals when printed.
Truespot colour iteration is a two part process comprised of adjustment and verification.
In the Adjustment phase, a chosen Special Colour Set is printed as a chart through a selected [Workbench] Media setup. The chart is then measured with a spectrophotometer, and the colours are adjusted (iterated) to produce printed results that are a closer Δe match to the spot colour Lab values. In normal use, the user will then be immediately prompted to proceed to Verification.
During Verification, the same Special Colour Set is again printed as a chart through the selected Media, this time using the iterated colours in place of the special colours. The chart is measured. Any iterated colours with a lower measured Δe when compared to the original special colour values are placed into the Truespot set for the Media.
Existing Truespot replace colour sets can be added to at any time by adjusting and verifying new Special Colour Sets for the Media.
The following is a step-by-step guide to performing a Truespot colour iteration on a Media.
- Open the Workbench application and configure your Jobticket, Pagesetup and Media as they will be for your proofing / print workflow.
- Ensure any spot colours to be for used in your workflow are loaded into the Special Colour Set(s) to be iterated with Truespot. Note – CMYK spot colours can not be iterated using Truespot, which can only adjust Lab spot colours.
- Open Truespot in the Client > Application menu. The Truespot application window will open displaying the Adjustment tab.
- Select the Truespot menu > Truespot Settings option. Enter the ∆e Tolerance over which the spot colours will be iterated, and the number of Patches per Strip you wish the printed Truespot charts to have. Default values are ∆e Tolerance: 2.5 and Patches per Strip: 24.
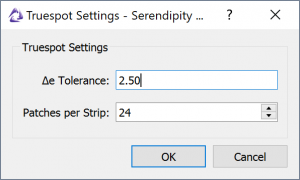
Truespot Settings with default ∆e Tolerance and Patches per Strip values.
- Select the instrument to be used from the Spectrophotometer drop-down menu. If available, click the Configure button to set the instrument options and illuminant condition.
- Click Print Chart.
- Select the print Media on which you wish to perform Truespot colour iteration from the list in pop-up window, then click OK.
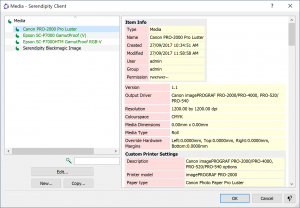
Select a Media
- In the next window select the Special Colour Set to be iterated, then click OK.
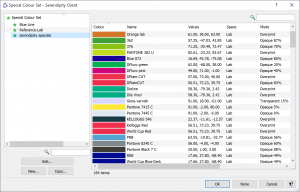
Select a Special Colour Set
- In the Submit window, confirm (or select) your Pagesetup and Jobticket, then click Submit.
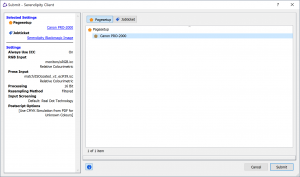
Submit your Truespot Chart for printing.
- The Truespot Adjustment Chart will print, allow the chart to dry for a few minutes.
- Click Measure button, be sure to choose the same Media and Special Colour Set as those selected in steps 7 and 8. Follow the prompts in the Device / Spectrophotometer panel to measure the chart.
- When the Adjustment Chart measurement is complete, a Truespot Verification pop-up message will appear. Click Print and Verify (recommended) to immediately print a verification chart using same the Media and Special Colour Set selected in the previous step. Truespot will automatically switch to the Verification window and initalise your spectrophotometer in preparation for measurement.
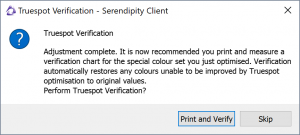 Alternatively, select Skip to view the measurement and iterated Lab details in the Adjustment tab measurement Panel.
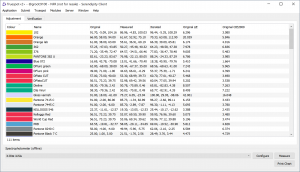
Adjustment Chart measurements
If this option is selected you will need to manually select the Verification tab, print and measure the Verification Chart, taking care to select the same Media, Jobticket and Special Colour Set.
- Allow the printed Verification Chart to dry for a few minutes. The Verification Chart is printed using the iterated (improved) values calculated for the spot colours. Follow the prompts in the Device/Spectrophotometer panel to measure the chart.
- When the Verification chart measurement is complete, the final results are displayed in the measurement panel.
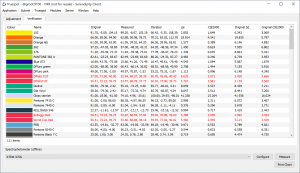
Verification Chart measurement results
A comparison of ∆e / CIE2000 vs the Original ∆e / CIE2000 values will show how the colours in listed in black have been improved by Truespot iteration. These colours are placed into a unique Replace Colour Set assigned to the Media. Colours listed in red were not improved by iteration and not are included in the set.


 Alternatively, select Skip to view the measurement and iterated Lab details in the Adjustment tab measurement Panel.


Further spot colours can be iterated by Truespot for the Media, by repeating the process above with other Special Colour Sets.
NOTE – for printer embedded spectrophotometers, the Truespot Adjustment and Verification process is completely automated after the initial Media and Special Colour Set selection and print submission.
For more details on the Truespot application and functions, consult the Serendipity Blackmagic product manual.