
The following is a guide to calibrating a display for colour accurate soft proofing in Serendipity Blackmagic / Veripress
We also offer a Calibrate & Calcheck – Essential Monitor Setup for Soft Proofing playlist on our YouTube Channel:
Display calibration uses these Serendipity Blackmagic / Veripress applications:
- Workbench
- Calcheck Chart
- Press
- SoftProof
- Displays
requires this data to be imported:
- Press match ICC profile
- (Optional) Verification colour chart values, in CGATS / ISO 12642 text file format
and is comprised of these steps:
- Creating a Calcheck Chart
- Creating a Press
- Assigning the Default Press to SoftProof
- Calibrating the Display
- Verifying the Display
In this guide, an Eizo CG319X display will be calibrated for soft proofing to a Fogra 39 2016 (ISO) offset press standard.
Creating a Calcheck Chart
A Calcheck Chart is a set of colour patches used to verify the colour output of the soft proofing display, matches the press standard gamut defined by your Press match ICC profile.
If a Calcheck Chart based on the press standard to be soft proofed is not already stored in your Blackmagic / Veripress Workbench database, one will have to be created. Information on creating and configuring a Calcheck Chart is available here.
Here, the ‘Fogra 39 Media Wedge 2016’ chart was created by importing the Lab values for the standard Fogra 39 Media Wedge from a CGATS / ISO12642 text file, using the Import Colours from Files… option in the toolbar of the Workbench > Calcheck Chart.
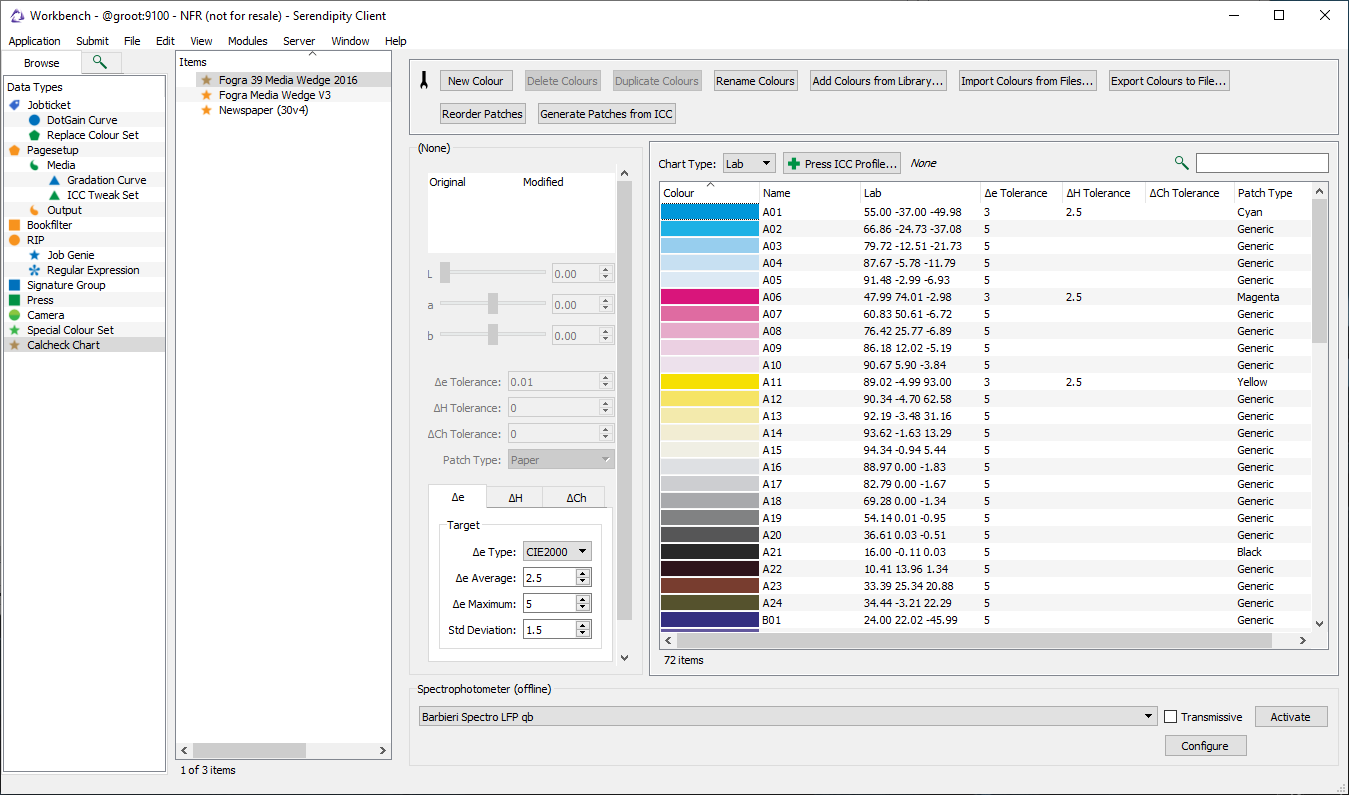
In accordance with Fogra 39 2016 standards, the following delta (Δ) measurement tolerances were configured:
Δe Type: CIE2000
Δe Average: 2.5
Δe Maximum: 5
∆e Std Deviation: 1.5
ΔH Average: 0 (not used)
ΔH Maximum: 5
ΔCh Average: 2.5
ΔCh Maximum: 5
Cyan, Magenta and Yellow patch tolerances – ∆e 3 / ∆H 2.5
Gray patch tolerances – ∆e 5 / ∆Ch 1.5
Paper patch tolerance – ∆e 3
Configuring the Press
The Press is used to emulate the colour and substrate (paper) properties of a press for soft proofing.
To create and configure a Press:
- Select the Press datatype in the Workbench application.
- Select the File menu > New option to create a new Press and rename it ‘Fogra 39 2016’
- In the Press Standard panel, click the Press Profile… button at the top of the Press Colours section to select the press match ICC profile.
- A ‘Choose an input ICC profile’ chooser window will pop-up, select the ISOcoated_v2_eciF39.icc profile then click OK.
- If the profile is not in the list, then select Upload File…, navigate to and select the ICC profile, click Open.
- Next select the match folder and click OK.
- Select ICC profile from the Paper Colour: Source drop-down menu to set the SoftProof to the paper white defined in the Press ICC profile.
- Click the Calcheck Chart… button in the Verify section to select the Calcheck Chart to be used to verify the display colour.
- A ‘Calcheck Chart’ chooser window will pop-up, select the ‘Fogra 39 Media Wedge 2016’ chart (created previously), then click OK.
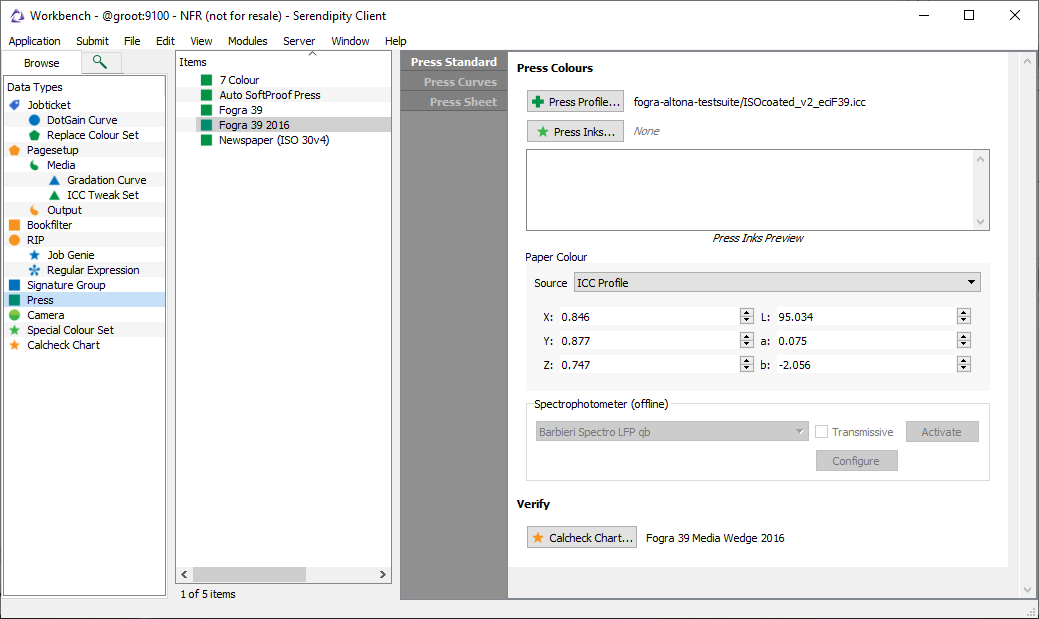
- Save the Press using the File menu > Save option (or ctrl/cmd+S).
Assigning the Default Press to SoftProof
Next, the Press configuration needs to be assigned set as the Default Press used to view proofs in the SoftProof application.
To assign the Press:
- Open SoftProof via the Application menu > SoftProof option.
In SoftProof, select File menu > SoftProof Settings. - The SoftProof Settings window will open, select the Default Press tab.
- Click the Press… button.
- A ‘Press’ chooser window will pop-up, select the ‘Fogra 39 2016’ Press (created previously), then click OK.
- Click OK in the SoftProof Settings window to set the Default Press.
- Close the SoftProof application.
Calibrating the Display
Display calibration sets the brightness, white point and gamma of the soft proofing monitor, measures and standardises its colour output, then saves an ICC profile defining its gamut.
To calibrate the monitor:
- Open the Displays application via the Application menu > Displays.
The Displays application will open on the Calibration summary tab. This tab shows data about attached monitors, including the monitor name and resolution (dpi) as well as their current calibration status.
- Click on the number button above each summary to identify each connected monitor and confirm the display to be calibrated for soft proofing.
- Select the monitor, in this case EIZO CG319X, named below Calibration in the left-side function list.
- In the EIZO CG319X Calibration panel configure the following settings:
- Brightness – 160 cd/m2, Calibration Tolerance – 5 cd/m2 (default)
- White Point – D50 (button)
- Gamma – 2.2 (button)
- Options – Use Hardware Calibration. This option, when available, allows Blackmagic / Veripress to control and set the monitor brightness, white point and gamma.
- Instrument (drop-down) – EIZO CG319X (screen #). This option uses the EIZO’s own internal instrument for calibration.
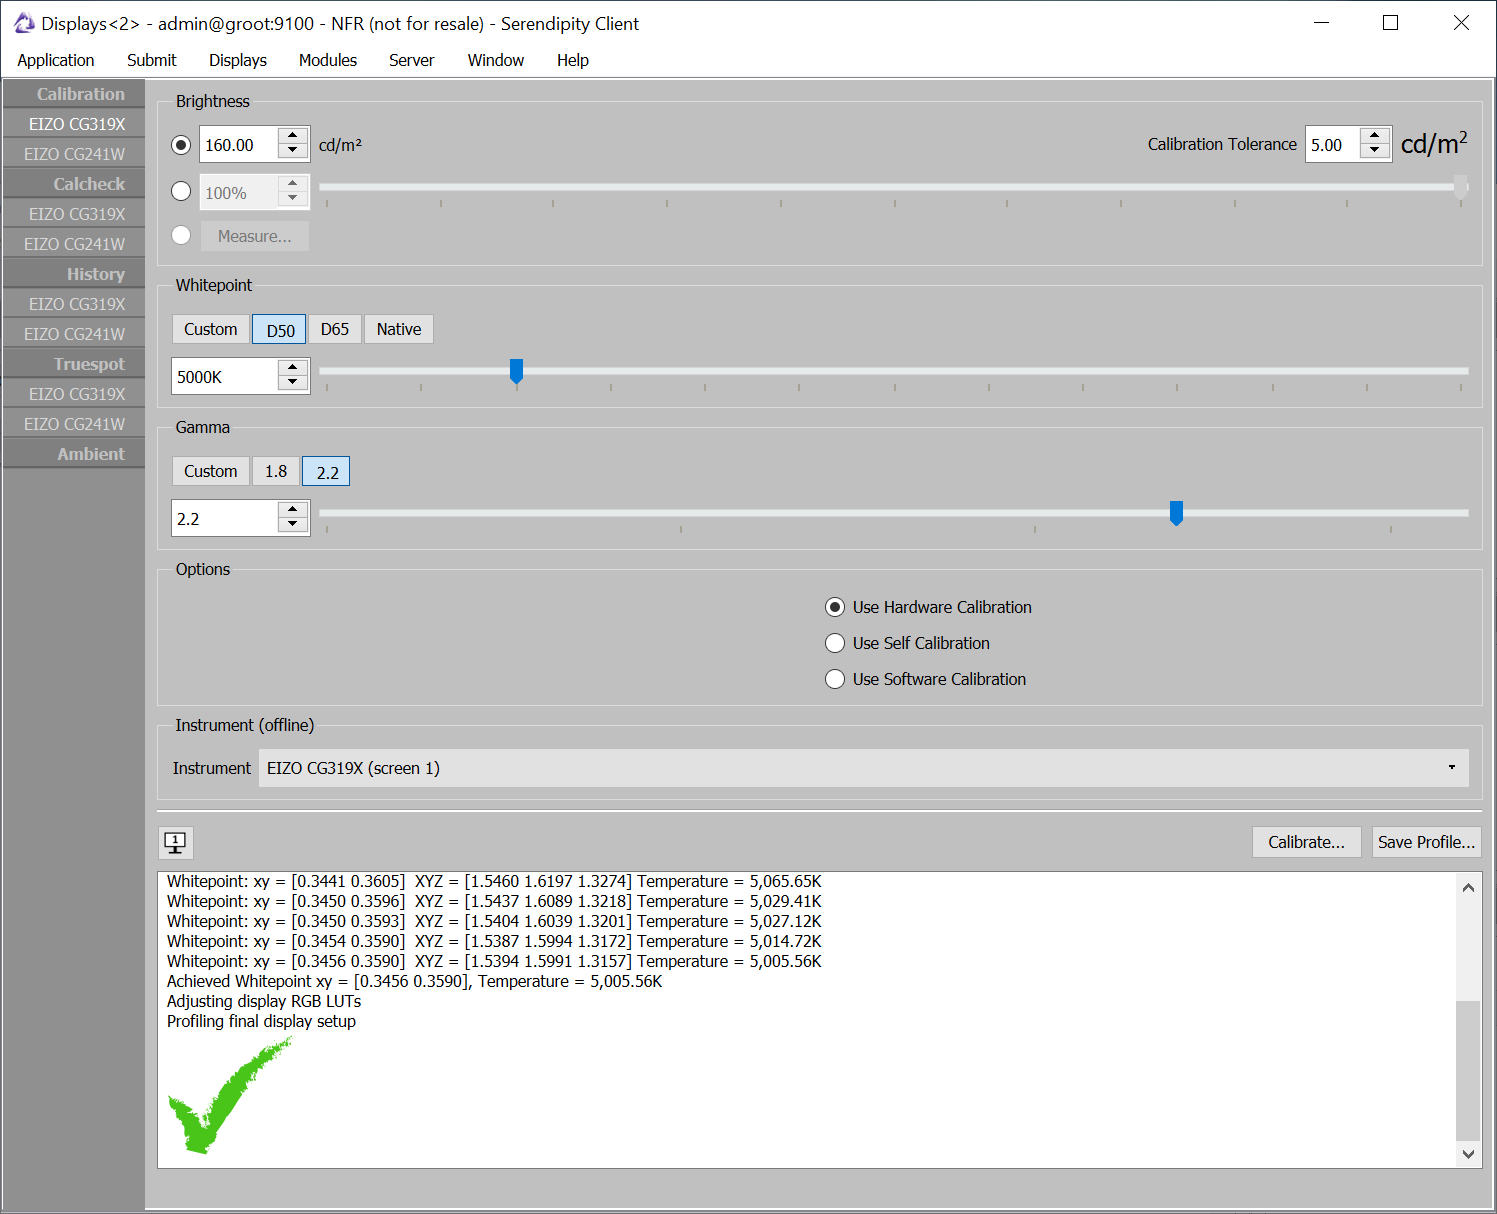
Note: The Brightness, Whitepoint and Gamma settings suitable for use will vary from display to display. Some manufacturers may suggest optimal settings for proofing. If colour verification (below) fails, the settings can be adjusted.
- Click the Calibrate button and follow the on screen instructions for your instrument – none in this case – to begin display calibration. The white panel at the bottom of the Displays window shows the progress of the calibration process.
- When calibration is complete a ‘Save ICC Profile’ file chooser window will open at the default screen ICC profile folder of your operating system.
- Name the ICC profile, e.g ‘EIZO-CG391X-160-D50-2.2.icc’, then click Save.
The profile is now saved as both the operating system native monitor profile, and the Serendipity Client default ICC profile for the monitor.
Leave the Displays application open and move on to…
Verifying the Display
The Displays application will now be used to verify that the soft proofing monitor accurately represents your chosen press gamut.
To verify the display:
- Select Calcheck in the left-side function list.
- Based on the previous steps, the SoftProof Calcheck Status panel will show the following:
- Softproof: Default Press
- Press: Fogra 39 2016
- Calcheck Chart: Fogra 39 Media Wedge 2016
- The EIZO CG319X Calcheck (white) summary panel will be blank.
- Select the EIZO CG319X monitor, named below Calcheck in the left-side function list.
- Configure the setting at the bottom of the EIZO CG319X Calcheck (verification) panel as follows:
- Instrument (drop-down) – EIZO CG319X (screen #)
- Click Measure to begin colour verification of the display using the colour patches defined in the ‘Fogra 39 Media Wedge 2016’ Calcheck chart.
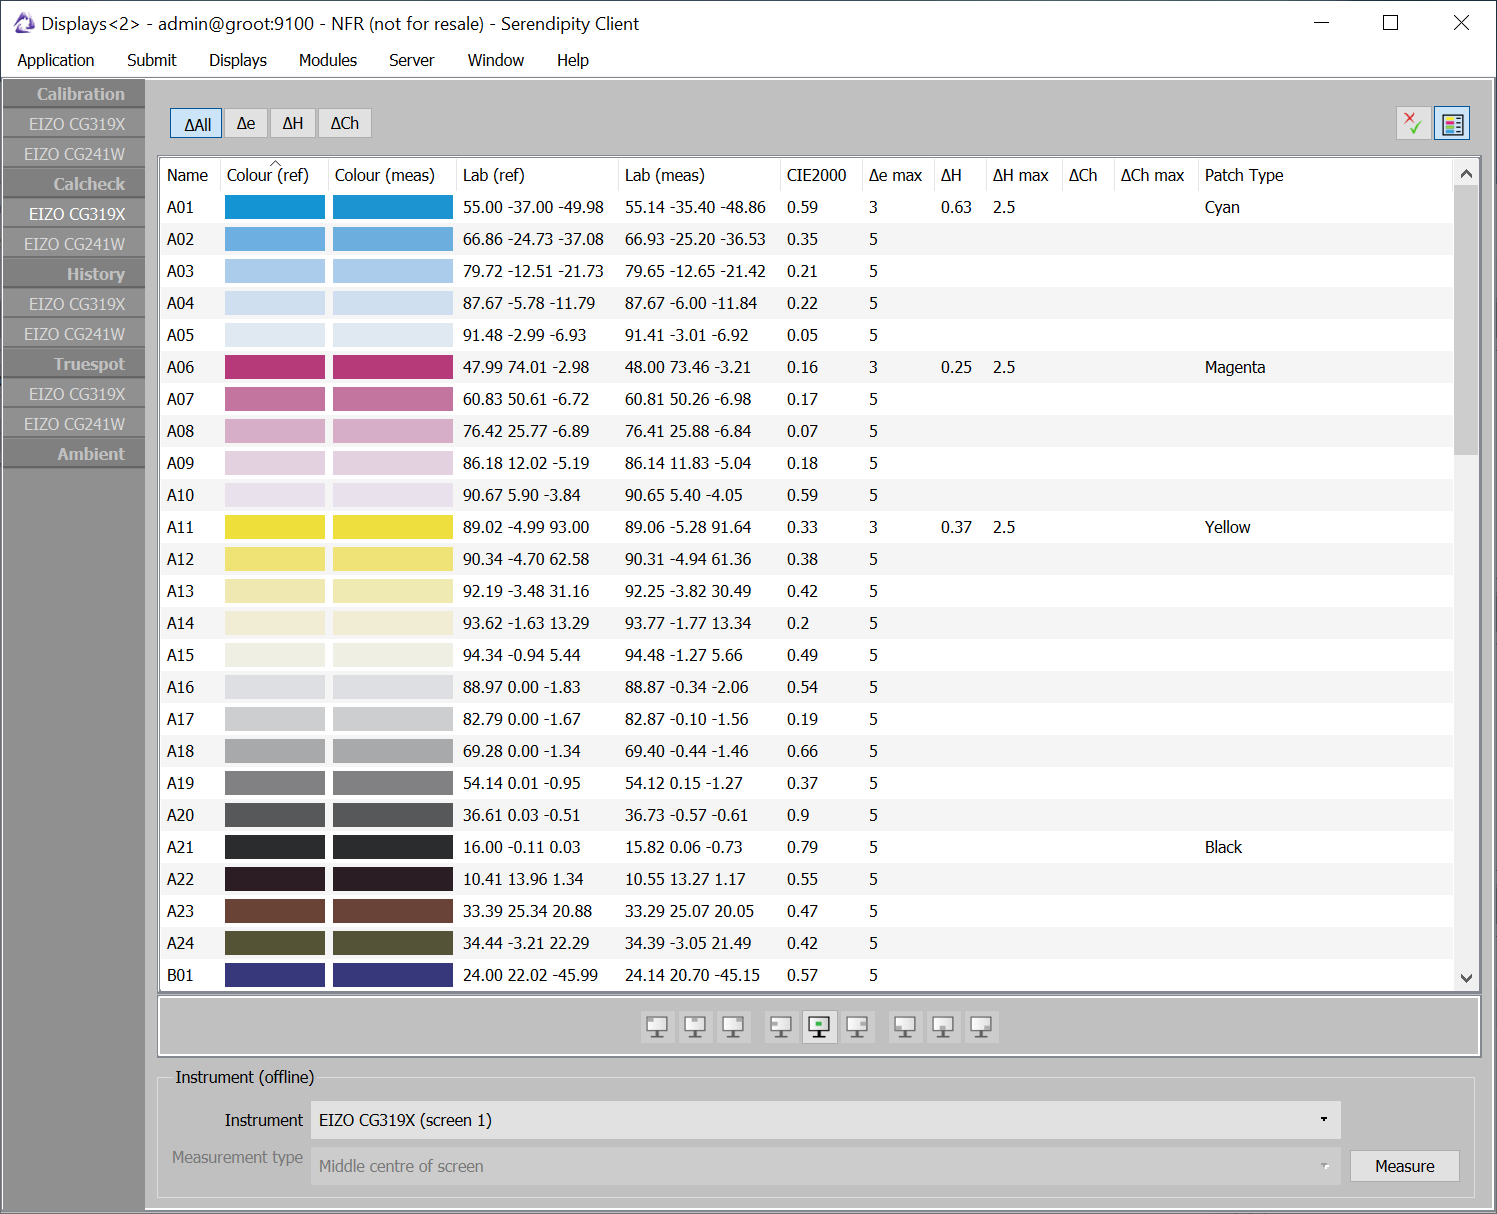
When complete a summary of the Calcheck verification will be displayed on screen.
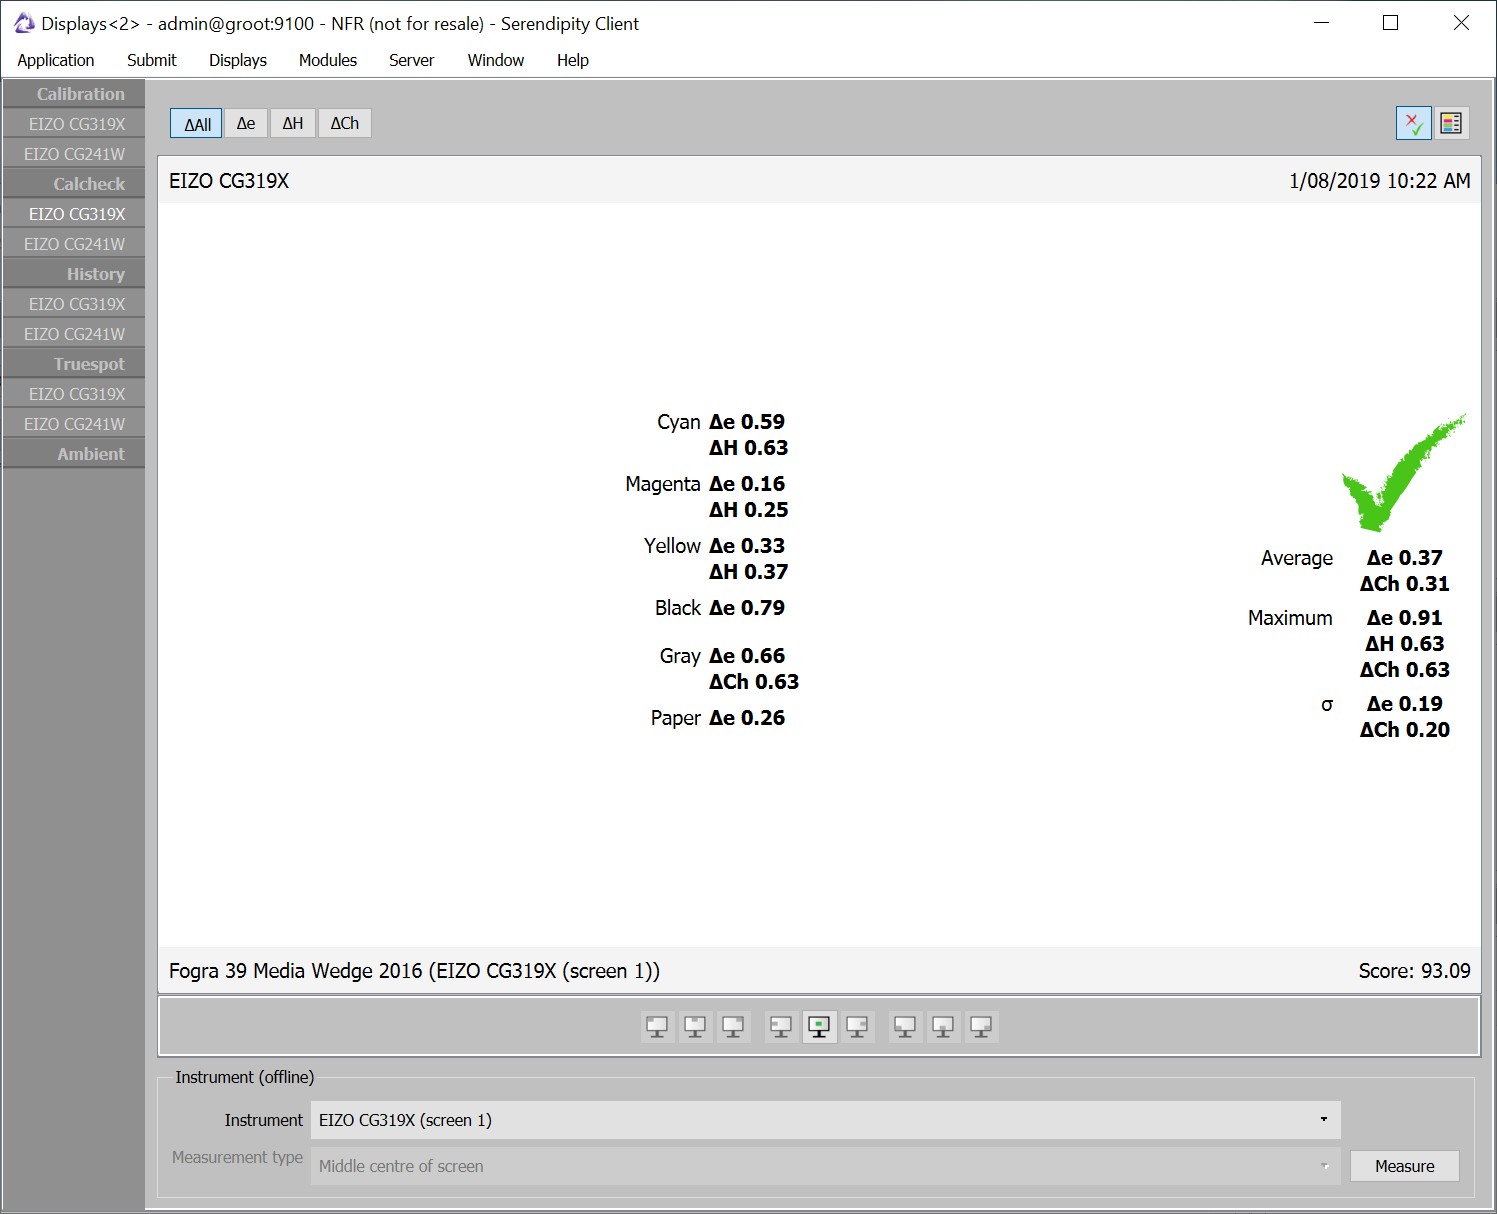
To view details of individual patch measurements click the Details button at the top-right of the panel.
Ready to soft proof
If the display passes Calcheck verification (green tick), it is now ready for colour accurate soft proofing.
The most recent Calcheck results are now viewable in the Calcheck summary. Previous Calcheck results can be viewed via the History menu option and in detail by selecting the monitor name below History.
If the display failed Calcheck verification (red ‘X’), or if you would like to attempt to improve the ∆ numbers, re-calibrate the monitor using adjusted Brightness and White Point values.