Serendipity Blackmagic / Megarip / Veripress 9.0 adds a new Angle Rotation feature allowing users to rotate a job by a defined value.
This new functionality is available when using the Studio application, when viewing jobs using the SoftProof application, and it is listed in the Jobticket > Fit & Rotate panel. The Angle Rotation functionality is also available within the C5 Client, Printer Effects panel.
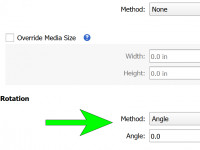
Jobticket Angle Rotation
- Select the Fit & Rotate panel within Jobticket.
- Select Angle from the Rotation Method dropdown menu.

- Enter the desired angle in the available field. This can be a positive or negative number (##.##).
- Save the Jobticket when done.
Any jobs submitted to this Jobticket will be automatically rotated the angle degree entered when processed.
Note: If a Studio Template is attached to a Jobticket, any additional Jobticket rotation methods will be ignored.
SoftProof Angle Rotation![]()
- View the selected job in the SoftProof application.
- Select the View menu > Rotate option, or click the Rotate icon in the right hand toolbar panel.
- A popup window will appear to enter the desired angle for rotation. Enter a value and press OK. This can be a positive or negative number (##.##).
- The job will be rotated within the SoftProof window for viewing.
- To undo any rotation, select the Revert Rotation button / or File menu > Revert option to revert to the original state of the opened job.
Studio Angle Rotation
Assets placed in the layout area can be angle rotated in multiple ways.
Note: Angle Rotation is only available for Asset Frame style of “Frame”. It is not available for Canvas Wraps, Frame with Border, Text or Markers.
Method One – Using the mouse to freehand rotate
- Place the asset in the layout area.
- Select the asset and while holding down the ALT key, left-click the mouse and drag in a slightly circular motion in the direction you wish to rotate the image. The frame will automatically start to turn to the desired angle of rotation.
- Simply release the mouse when you are done.
This video shows the freehand rotation in use:
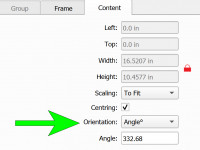
Method Two – Using the Content Panel > Orientation dropdown
- Place the asset in the layout area.

- Select the asset, and while selected go to the Box Properties > Content Panel.
- Select the Orientation dropdown > Angle.
- In the Angle field, enter the desired degree for rotation. This can be a positive or negative number (##.##).
- Press Enter when done. The asset will be rotated as required.
Note: Grouped assets can be angle rotated in Studio, however if rotated using the Content > Orientation > Angle dropdown method, each frame within the group will be rotated. If the alt+mouse drag freehand rotation option is used, all frames will be rotated as one group, not individually.
Cropping with Angle Rotation
It is possible to angle rotate and crop an asset in Studio, however if you continue to change the angle of rotation after cropping, it will alter the crop shown for the asset. It is best practice to apply any rotation first, then crop the asset to your desired outcome.


