Even though you cannot print from Veripress, Pagesetup’s can be set up as Mac OS X system printer destinations to allow jobs to be easily submitted for proofing via the Print option of third party software or design packages.
Jobs going to a published pagesetup will be automatically sent for processing and colour management in Veripress, eliminating the need for dropfolders or manual file submission.
Note: Jobs processed via Veripress in this way must be in a file input format available to your Veripress version.
Installing the Serendipity Printer Drivers
The first step when publishing a Pagesetup for the first time is to install the Serendipity Printer Drivers for Mac OS X.
The installation package is located on the Installation DVD (Version 5.3+) or can be downloaded from the Serendipity Software website.
If installing from the DVD:
- Navigate to the /drivers/mac folder and run the Serendipity Printer Drivers.pkg file.
- An installer window will appear. Follow the prompts to complete the installation of the drivers. The installer will require administrator access privileges.
Configuring a Pagesetup for Publishing as a TCP/IP System Printer
- In the Workbench select the Pagesetup to be published from the list of available items.
- Go to the Publish panel and enable the checkbox for TCP Port: Activate port number option.
- Enter the TCP port number into the field and save the Pagesetup.
 Note on Port Numbers: It is recommended that the port number assigned to each pagesetup be a port over 10000 to avoid any conflict with the operating system or an existing application. Each pagesetup to be published needs its own unique port number, for example, 10200, 10201, etc.
Note on Media: When submitting jobs to a published Pagesetup the default Media assigned to the Pagesetup is used. If you wish to publish to a different Media (paper type & configuration) on the same printer each Media configuration required needs to be assigned to its own Pagesetup with its own unique port number.
Creating a TCP/IP Mac OS X System Printer
A system printer needs to be created and configured on the Mac OS X computer that is running the Veripress Server.
- Open the System Preferences for Mac OS X.
- Choose Print & Fax.
- Click the + icon at the bottom of the printer list panel to create a new printer.
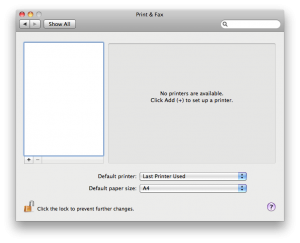
- Select the IP icon at the top of the Add Printer window.
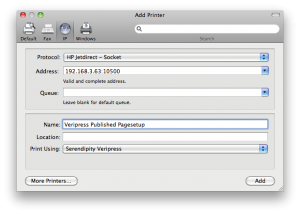
- Protocol – Select HP Jetdirect – Socket from the dropdown menu.
- Address – Enter the TCP/IP address and port information for the printer setup in the following format: ComputerIPAddress:PagesetupPortNumber (e.g., 192.168.3.63:10201). The IP address for the printer should NOT be used.
- Name – Enter the desired name for the printer. It should be easily recognisable as a published pagesetup and/or the particular pagesetup being published.
- Print Using – Select Printer Software from the dropdown menu. A list of available Mac OS X Printer Drivers will popup.
- Either scroll down the list and select Serendipity Veripress or type “Serendipity” in the filter field and select Serendipity Veripress and click OK.
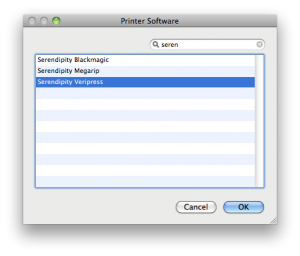
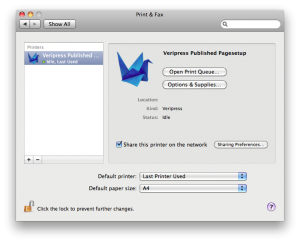
- Click Add to add the new printer.
- Set the published pagesetup “Printer” as the system default and/or share the printer on the network as required.
Configuring a Pagesetup for Publishing as a Bonjour Printer
- In the Workbench select the Pagesetup to be published from the list of available items.
- Go to the Publish panel and enable the Printer: Mac checkbox. This lists the pagesetup in the Mac OS X system Bonjour destinations as “Pagesetup name @ computer name”.
- Save the pagesetup configuration when done.

Creating a Bonjour System Printer for Mac OS X
A system printer needs to be created and configured on the Mac OS X computer running the Veripress Server.
- Open the System Preferences for Mac OS X.
- Select Print & Fax.

- Select the Default icon at the top of the Add Printer window.
- Choose the pagesetup from the Printer Name list. The pagesetup will be named “Pagesetup name @ computer name” and the Kind will be listed as Bonjour.
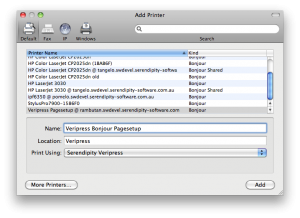
- Print Using – If you have installed the Serendipity Printer Drivers the Print Using field should auto-fill to show Serendipity Veripress.
- If the Serendipity Printer Drivers have not been installed, cancel the printer setup and install the drivers as per the instructions at the beginning of this document.
- If the field does not auto-fill choose Select Printer Software from the dropdown menu. A list of available Mac OS X system printer drivers will popup. Either scroll down the list and select Serendipity Veripress or type “Serendipity” in the filter field and select Serendipity Veripress. Click Add.
- Name – Enter the desired name for the printer. It should be named to be easily recognisable as a published pagesetup and/or the particular pagesetup being published.
- Click Add to add the new printer.
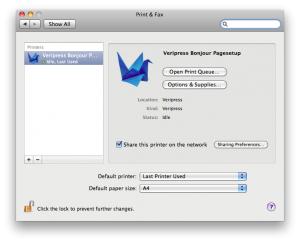
- Set the published pagesetup “Printer” as the system default and/or share the printer on the network as required.


