Double-sided proofing can be achieved using various double-sided printers. Below will be an outline of how to setup and configure the Media, Pagesetup and Output to successfully print front and back and show the adjustments needed to back the images up accurately.
The printers currently supported are the Fuji DoubleProof and the Techsage Spinjet. For this example a DoubleProof 5000 is to be setup, using a roll of media 1067mm wide. For the front and back calibration a test file was created for this size media.
Configuration
In order to successfully back-up the front and back side prints, two (2) Media types will need to be configured – one for the front side and one for the back. Both print to the same printer and vary only in margin and rotation, depending on the working method, i.e., work and turn, work and tumble, etc.
Configuring the Media
The first Media created is to be called DoubleProof – front. This is configured as a standard Media, selecting the preferred printing resolution.
In the customise section, the following options are presented:
- Device Model – DoubleProof
- Duplexing Control – Front side of duplex print
- Print Quality – Normal
- Use Light Inks – Disabled
- Save the Media with the above settings.
- Duplicate the Media and rename the copy to DoubleProof – back.
- Change the Duplexing Control to Back side of duplex print.
- Save the duplicated Media.
Configuring the Output
Next we setup the duplexing mode.
- Select the Output datatype and create a new one. Give it a name so you know it relates to double-sided printing.
- Select the DoubleProof/Spinjet 5000 output driver.
- Do not allocate a Media via the Change Media button.
- Configure the Destination to your preferred driver.
- In the Collating panel select Duplexing for the Collation Method.
- Set the Top Page as Odd.
- Set the Maximum Number of Jobs to 2. This means every two pages will be duplexed to create a single page (two-sided) job.
- Save the Output.
Configuring the Pagesetup
Two (2) Pagesetups will need to be created for double-sided printing. One will be used with the Media DoubleProof – front, the other with DoubleProof – back. Two are required as the back side will need to be rotated.
- Create a new Pagesetup called DoubleProof – front.
- Change Output button – Select the Output created above and link it to the Pagesetup.
- Change Media button – Select the Media called DoubleProof – front and link it to the Pagesetup.
- Enter the sheet dimensions for width in the Sheet panel.
- Rotation should be set to None.
- Make sure the Slugline or Logo box options are not enabled as these are placed outside the image but form part of the job. This will affect where the image is positioned, making it difficult to align if they are left enabled.
- Save the Pagesetup.
- Duplicate the Pagesetup and rename it to DoubleProof – back.
- Change Media button – Select the Media called DoubleProof – back and link it to the Pagesetup.
- Change the rotation to 180 degrees. This is to facilitate both heads at the top of the page and can be changed later to suit workflows.
- Save the duplicated Pagesetup.
The Test Page
The basis principles for the test page are to make it the full width of the media with some part of the image all the way to the end, and to make the depth long enough to allow double-sided printing to take place.
The specification for this should be in the user guide for the device.
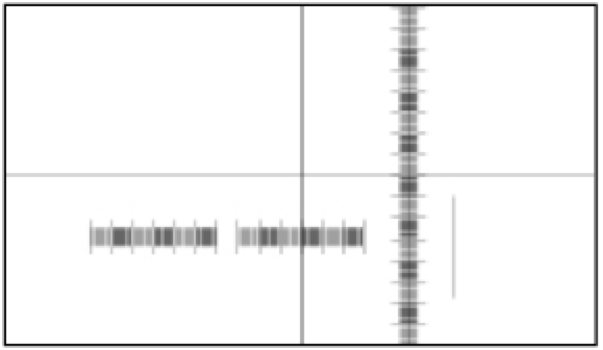
A test job for media 1067mm wide will look like this (see image).

The job is 1067mm x 540mm and has a cross exactly in the middle, stretching to the edges of the dimension. This enables the user to determine where the printable area is so the correct margins can be selected.
Printing the Job
- Select the Submit menu > Files.
- Choose your job and select Open.
- Select the Front side Pagesetup and Media from the lists appearing on screen.
- Enter a publication name and make the first page 1. If this option does not appear, click the Publication icon at the bottom of the screen to show the options.
- Submit the file.
This will send the test job to the Front page Media/Pagesetup configuration.
- Repeat the procedure to send the same test job to the Back page Media/Pagesetup configuration. The only difference being the First page option will be set to 2.
- Make sure the same publication is selected as this will ensure it is duplexed with the front page also going to the same publication. Any filename can be used, as long as front and back (pages 1 and 2 respectively) are assigned to the same publication.
- Pressing Submit will process the two files. The back side will rotate 180 degrees. As the first job appears in the queue it will have the same state for a short time and then duplexing will begin. A new job will be created which is a combination of the two single sides. The first side will print, cut and be held by the double-sided unit. The roll media will unload and the held sheet will reload and align itself for printing. The second page of the duplexed job will then print and calibration can begin.
- Make sure the lead of the job is marked for the front and back pages as they are printing. In order to calibrate successfully, the top of the job and which page is the front need to be known.
Printer Specifics
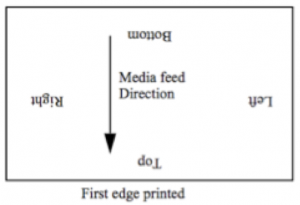
The printer is configured so the first part of the job is the top and the left and right are taken from the media feed direction as it is printing (see image).

As the printer feeds this way, the double proofing unit holds the media by the bottom. When the roll has unloaded, the bottom is fed back into the printer and is therefore the first out. As the back page is rotated by 180 degrees, the first part of the job printed is the bottom. This will therefore line up with the bottom of the front page.
Calibration
- Lay the sheet on a table and measure the margins. This is the distance between the edge of the media and the start of the image.
- Measure front and back and enter the details on the test print.
- Measure the vertical line length front and back.
For the device used for this example, the following values were measured:
| Front | Back | Gap | |
| Left | 6.0 | 5.5 | – |
| Top | 7.0 | 18.0 | – |
| Right | 3.5 | 8.0 | – |
| Bottom | 6.0 | 36.0 | – |
| Vertical | – | – | 30.0 |
| Horizontal | – | – | 2.0 |
| Measurements in mm | |||
The line length for the front was 540mm (which it should be) as this is the first page printed. The back however was 499mm. This was the result as there was not enough front page to allow the back page to print as a sheet. Being a sheet, it needs more area to grip the page.
To provide more area:
- Select the DoubleProof – front Pagesetup in the Workbench.
- Go to the Sheet panel.
- Take the values for Back Top and Bottom margins and enter them in the Margins section.
- Save the Pagesetup.
- Repeat the process of submitting the test print to front and back as before.
This time when the job has printed the vertical gap should be a lot closer and the line vertical length should be 540mm, indicating there is now sufficient page area to print the job as a sheet on the back.
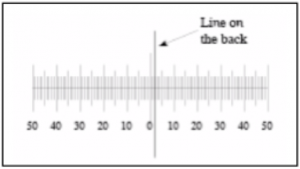
The final step is to bring into alignment the vertical and horizontal lines. In the test print, the printed rules can be used to determine the gap. With this print, the vertical gap is 5.5mm and the horizontal gap is 2mm. The only thing to determine is which way the image needs to be moved.
Looking at the horizontal line first, the front image (shown by the rule) needs to be pushed to the right for it to line up. A 2mm margin needs to be placed on the left margin of the front sheet. If the line was to the other side of 0, a back left margin would be entered instead, to push the back image away from the edge to the right.

For the vertical margin, the front image is higher than the back. The front image cannot be moved down as this shifts the bottom margin and so the gap does not get smaller. By remembering which part of the back is printed first the direction to move the image can be determined. It should always be the lead.
For the example configuration where the back is rotated, the lead image is the bottom of the job. Rotation occurs before the margins are set, therefore the margin must be entered as a top margin on the back side Pagesetup.
- Select the DoubleProof – back Pagesetup.
- Under the Sheet panel enter a top margin of 6mm in the Margins section.
- Save the Pagesetup.
- Print the job again to check and make small adjustments to the margins if necessary.
Limitations
A high accuracy should be achieved when backing up. Correct for paper stretch by using the accuracy correction but this will alter the size of the image printed and margins may need further adjustment.
There is no way in the software at present to compensate for skew. The only way to fix this is to reload the paper. Subsequent loads may alter paper position slightly and therefore margins may also need adjustment. It is good practice to run the test job out again to check after each new roll is loaded.
