Calcheck Charts are used by the Calcheck and Displays applications in Blackmagic and Veripress to colour verify printed output or displays for softproofing.
The two most common methods used to create a Calcheck Chart are to either import a defined chart from a file, or generate a chart from a press ICC match profile. To begin creating a chart:
- Open the Workbench application.
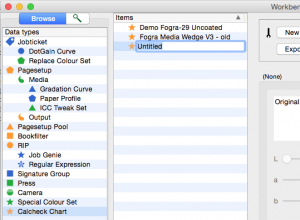
- Select Calcheck Chart from the Workbench datatypes list.
- Create a new chart via the File menu > New option.
- Enter a name for the chart by typing in the highlighted “Untitled” name field.
- Open the Calcheck Chart Toolbar (spanner icon).
Import Patches from Files
Follow this method if you have an ISO 12642/CGATS formatted file with defined verification chart values. (See below for Generating Patches from an ICC profile).
- Click the Import Colours from Files button in the toolbar.
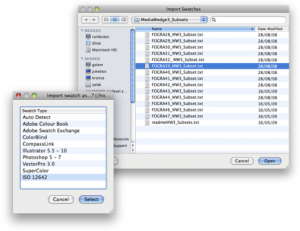
- Select the desired colour patch set (ISO12642/CGATS format) .txt file from the file chooser and click Open.
- Choose the format of the file (usually ISO 12642) to be imported and click Select.
- A popup window will notify how many patches have been imported. Click OK to dismiss. The imported patches are now listed in the Calcheck Chart.
- Patch delta tolerances need to be configured. Calcheck Chart has default delta tolerances but you may need to alter these to meet your press standard.
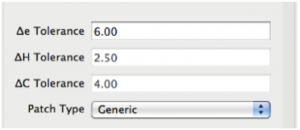
Generic type patches usually make up the majority of the patches in a Calcheck Chart. If required, change the Generic patch delta tolerances by selecting all the Generic patches in the list, then enter the desired tolerance levels to be used for the patches.
Note: Multiple patches can be block marked (shift+click) or individually marked (CTRL/CMD+click) to change patch type and tolerances simultaneously.
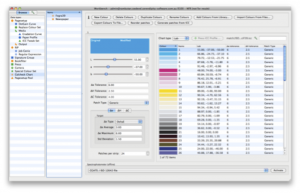
- Process Colour (Cyan, Magenta, Yellow, Black), Gray and Paper patches need to be defined in the delta tolerances set for each patch.
- Choose the first of these patches from the list. Select the patch type for the patch from the dropdown menu and enter the specific tolerance values (or leave the default values).
- Repeat this process for all process colour, gray and paper patches being defined.
Note: There will normally only be one patch in the set/chart defined as Cyan, Magenta, Yellow, Black and Paper however, it is common to have several defined Gray patches. Check the specifications for your imported patch set or press standard for patch definitions.
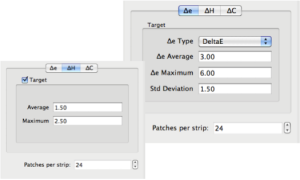
- Choose the ∆E standard against which the Calcheck Chart will be compared from the ∆E Type dropdown menu. Set the ∆E Average, Maximum and Std Deviation tolerances for the chart.
- Enter the number of Patches Per Strip for the chart when it is printed.
Note: deltaE (CIE76) is the usual standard used for verifying printed proofs, CIE2000 is appropriate for a chart to be used for colour verifying a monitor when softproofing.
- If either ∆H or ∆C are to be measured when calchecking, click the ∆H/∆C tabs, tick the Target checkbox and enter the values for those relevant.
- Save the completed Calcheck Chart via File menu > Save when done.
Generate Patches from ICC
Follow these instructions if you have a Press ICC profile and want to use Blackmagic or Veripress to generate a chart from the ICC profile gamut information:
- Click the Generate Patches from ICC button in the toolbar.
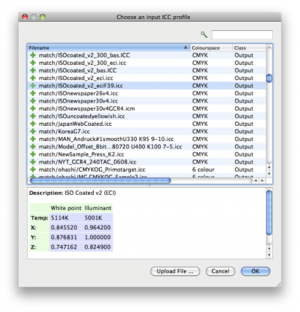
- Select the same Press ICC profile as assigned as the Press Input Profile in your Jobticket (for printed proofs) or Press (for softproofing) from the Blackmagic/Veripress database. Click OK.
- If the ICC profile has not been used previously in Blackmagic/Veripress, select Upload File… and follow the prompts to locate, select and upload the ICC profile.
- Set the number of patches for the chart in the Calcheck Chart Generator popup window and click OK.
- The patches are now generated from the ICC profile and listed in the Calcheck Chart.
- Patches defining Process Colours (Cyan, Magenta, Yellow and Black), Gray and Paper are automatically generated when the chart is created.
- Patch delta tolerances will need to be configured if different to the default Calcheck Chart settings.
Generic type patches usually make up the majority of the patches in a Calcheck Chart. If required, change the Generic patch delta tolerances by selecting all the Generic patches in the list, then enter the desired tolerance levels to be used for the patches.
Note: Multiple patches can be block marked (shift+click) or individually marked (CTRL/CMD+click) to change patch type and tolerances simultaneously.
- Process Colour (Cyan, Magenta, Yellow, Black), Gray and Paper patches need to be defined in the delta tolerances set for each patch.
- Choose the first of these patches from the list. Select the patch type for the patch from the dropdown menu and enter the specific tolerance values (or leave the default values).
- Repeat this process for all process colour, gray and paper patches being defined.
Note: The Calcheck Chart Generator creates one patch in the chart set for Cyan, Magenta, Yellow, Black and Paper plus 3 Gray patches. If more process colour or gray patches are required for the chart, they can be added via the Add New Colour option in the toolbar. In this case, the Lab or CMYK values for the new patch must be defined.
- Choose the ∆E standard against which the Calcheck Chart will be compared from the ∆E Type dropdown menu. Set the ∆E Average, Maximum and Std Deviation tolerances for the chart.
- Enter the number of Patches Per Strip for the chart when it is printed.
Note: deltaE (CIE76) is the usual standard used for verifying printed proofs, CIE2000 is appropriate for a chart to be used for colour verifying a monitor when softproofing.
- If either ∆H or ∆C are to be measured when calchecking, click the ∆H/∆C tabs, tick the Target checkbox and enter the values for those relevant.
- Save the completed Calcheck Chart via File menu > Save when done.
CMYK Calcheck Charts
Calcheck Charts made up of patches defined by Lab values are recommended for all standard proofing workflows.
However, if a CMYK Calcheck Chart is required, a chart can be created manually or by importing defined CMYK chart from a file.
- Ensure the ISO 12642/CGATS formatted file from which the chart is to be created includes CMYK values.
- Choose CMYK from the Chart Type dropdown menu above the patch list panel. Once CMYK is selected the Press ICC Profile field will automatically be assigned with the default system Input CMYK Profile.
- If the default system ICC profile is not the same Press ICC profile assigned as the Press Input Profile in your Jobticket (for printed proofs) or Press (for softproofing), click the Press ICC Profile button and select the ICC profile from the list.
Once the above steps are complete, follow the Import Patches from Files procedure (above).

