DotGain Curves are assigned to a Blackmagic/Veripress proofing Pagesetup to represent or compensate for press or platesetter dot gain.
DotGain Curves can be created manually by a click and drag method, by entering individual input and output points, by entering values into a DotGain table, or by importing a table from a CSV file.
To make a DotGain Curve:
- Open the Workbench application.
- Select DotGain Curve from the datatypes list.
- Create a new curve via File menu > New.
- Enter a name for the curve and press Enter.
- Open the DotGain Curve Toolbar (spanner icon).
Use any of the methods outline below to create a DotGain Curve:
Click and Drag
New curves are displayed as a straight line (linear, with no effect on incoming colour data). Left-click on any point of the curve and drag the curve to the desired shape.

The curve produced is a bezier curve. A line with a handle at each end passes through the anchor point on the curve.
Dragging each handle alters the curve at the anchor point. Increasing or decreasing the handle distance from the anchor point smoothes or sharpens the curve shape on either side of the anchor, which remains fixed.
If required, left-click on another part of the curve to create a new anchor and drag the curve into the desired shape. Any number of additional anchors can be added.
To remove an anchor point, select the point and press the Delete key.
- Save the completed DotGain Curve when done via File menu > Save.
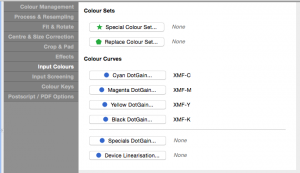
- Assign the curve to the appropriate process or special channel using the DotGain buttons under Colour Curves in the Input Colours tab of the Jobticket.
Anchor points used to create a DotGain Curve can be entered precisely in the Input (source file ink coverage) and Output (printed coverage value to be used to reproduce the required source coverage taking dot gain into account) fields.
- Enter values into the Input and Output fields then press Add to create the anchor point.
- Existing anchor points can be changed by first selecting the point on the curve, altering the Input and Output values and pressing Modify.
DotGain Table
If the dot gain for the press or platesetter is known, a DotGain Curve can be created by entering values into a DotGain table.
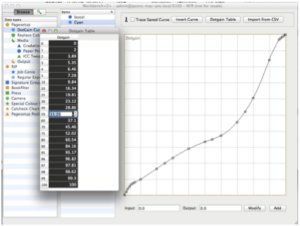
- After creating and naming a new DotGain Curve, press the DotGain Table button in the toolbar (spanner icon). A popup window containing the table will open.
- Double-click on each of the black fields and enter the required coverage values for each coverage % listed in gray (left). Anchor points will be added, creating the DotGain Curve as each value is entered into the table.

- Close the DotGain Table window and save the completed curve via File menu > Save.
- Assign the curve to the appropriate process or special channel using the DotGain buttons under Colour Curves in the Input Colours tab of the Jobticket.
Importing DotGain Values from a CSV File
Some Platesetter RIPs are able to export combined press ink channel dot gain values as a CSV file. Appropriately formatted should be comprised of press ink channel names and delimited values for each of the coverage % values used by the DotGain Table.
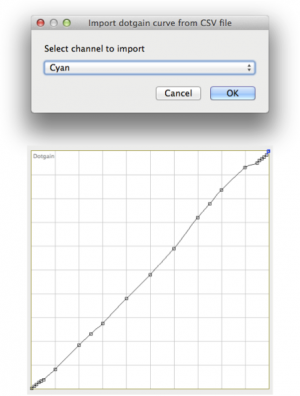
- After creating and naming a new DotGain Curve, press the Import from CSV button in the toolbar.
- Select the CSV file from the choose window and click Open.
- If the CSV file contains colour characterisation (dot gain) data for multiple ink channels, a popup will appear prompting you to choose which channel to import. The data will import and the curve will be created.

- Save the completed DotGain Curve via File menu > Save.
- Assign the curve to the appropriate process or special channel using the DotGain buttons under Colour Curves in the Input Colours tab of the Jobticket.
- If required, repeat steps 1-4 to create DotGain Curves for each press ink channel.
Inverting DotGain Curves
Files (plates) sent to the platesetter are rendered by the platesetter RIP with a curve taking into account the colour characterisation (or dot gain) of each ink channel when printed on the press. These curves can be reproduced or imported for use by Blackmagic/Veripress when proofing press jobs.
In order to process and proof however, it is necessary to return the RIPped job to its original form before colour managing the job for softproofing or output to an inkjet printer. This is achieved by inverting the press dot gain curves.
Incoming job/plates have the inverted DotGain Curves applied to them, compensating for the curve applied by the platesetter RIP and returning them to their original form for colour management and proofing.
After creating or importing then saving the DotGain Curve for a press ink channel:
- Open the DotGain Curve toolbar.
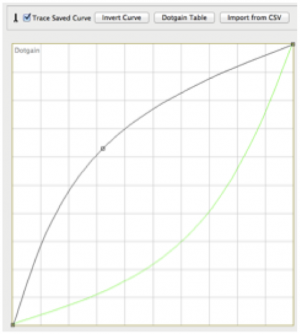
- Click the Invert Curve button. You will see the curve invert on screen.
- If the Trace Saved Curve checkbox is ticked, the original curve will be displayed in green when the Invert Curve button is pressed.

- Save the inverted curve via File menu > Save.
- Assign the curve to the appropriate process or special channel using the DotGain buttons under Colour Curves in the Input Colours tab of the Jobticket.


