Overview
Plate separated, single-bit screened TIFFs have become predominant in print industry workflows. The TIFF Based (Generic) input filter is designed to poll jobs from RIPs that produce 1-bit TIFF files – one for each process or spot colour plate of a particular job.
While the TIFF Based (Generic) input filter has a limited intelligence and can recognise standard filenames such as “jobname_plate.tif”, it will not understand or be able to correctly poll a filename like “J3717p1S1CCyan.tif”.
Every site requires particular information detailed in its filenames and there can be as many filename conventions to define jobs, colour and plates as there are workflows.
If you are a user of Serendipity Blackmagic, you will have come across a datatype in the Workbench named Job Genie.
The Job Genie utility can configure the TIFF Based RIP input filter to recognise any filename convention, no matter how unique or complex the workflow. Moreover, Job Genie can be used to rename files to have more user-friendly on screen names, or group files together into a single publication.
After it is created, the Job Genie is selected in a RIP queue using an input filter, such as Tiff Based RIP (User Configurable) to poll the chosen directories for the defined filenames.
This guide will explain step-by-step how to create a Job Genie, starting with simple filenames and moving on to more complex filenames.
| Simple Filenames: | golfclub_black.tif |
| golfclub_cyan.tif | |
| golfclub_magenta.tif | |
| golfclub_yellow.tif |
| Complex Filenames: | TB04.1ST.xxx.017-048.CMYK.pdf.k.tif |
| TB04.1ST.xxx.017-048.CMYK.pdf.c.tif | |
| TB04.1ST.xxx.017-048.CMYK.pdf.m.tif | |
| TB04.1ST.xxx.017-048.CMYK.pdf.y.tif | |
| TB04.1ST.xxx.017-048.CMYK.pdf.P273.tif | |
| BS04.1ST.xxx.001.CMYK.pdf.k.tif | |
| BS04.1ST.xxx.001.CMYK.pdf.c.tif | |
| BS04.1ST.xxx.001.CMYK.pdf.m.tif | |
| BS04.1ST.xxx.001.CMYK.pdf.y.tif |
Example 1 – Simple Filenames
The first example is a one page proof for a Golf Club advertisement.
The filenames are basic enough that they could be recognised and understood by the Tiff Based RIP (Generic) input filter in Blackmagic however, creating a Job Genie is a good starting point in understanding how the Job Genie functions.
- Create a new Job Genie and rename it “Simple”.
- Create a Task for the Job Genie by clicking on the Add button at the bottom of the Task panel. Task 1 will appear in the panel.
Each task in a Job Genie specifies how the job or filenames are collected, defined, broken down into parts, displayed in the RIPMonitor and QueueManager and if appropriate, collected into a Publication.
Tasks are processed in order by the Job Genie, meaning once a job name has been matched by the task it is removed from any searches done by subsequent tasks.
Note: This first Job Genie (for simple filenames) has only one task. The Job Genie created later (for complex filenames) will require two tasks.
There are five (5) tabs used within the Job Genie for configuring the collection and sorting filenames:
1 – Collect Files
2 – Filename Breakdown
3 – Jobname + Plate
4 – Publication + Pages
5 – Display
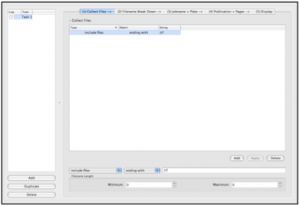
(1) Collect Files
This tab defines the filename types that are collected for sorting by the Job Genie. Files are collected by choosing an Action, a Definition of that Action, and a Character String for the Job Genie to search for.
For this example, the RIP software outputs files named:
- golfclub_black.tif
- golfclub_cyan.tif
- golfclub_magenta.tif
- golfclub_yellow.tif
to the directory being polled by the Blackmagic RIPMonitor.
As each file is a 1-bit TIFF plate for the job, the best way to collect them is to have the Job Genie collect files ending with “.tif”.
- In the bottom of the panel you will find the Action dropdown menu. Select the option Include Files.
- From the second dropdown menu, select Ending With.
- In the string field, type .tif
- Click the Add button.
The Type, Match and String will appear in the Collect Files panel.
If any changes need to be made to a task, either click the Delete button and create a new one, or select the definition line in the panel window, select and/or type the new parameters and click Apply.
The Minimum and Maximum fields at the bottom of the screen in the Filename Length panel can be used to only include files of certain character length – not used in this example.
(2) Filename Breakdown
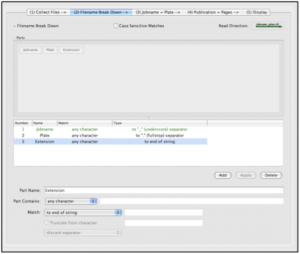
This tab is where the different parts of the filename are broken down and identified for the Job Genie. It is important at this stage to look at the filenames and plan how they will be broken down. Each part can then be defined using a wide range of selection parameters.
For this example, the files are broken down into the following named parts:
- Jobname: golfclub_
- Plate: black.
- Extension: tif
At the top of the panel is the Case Sensitive Matches checkbox. Leave this unchecked, as case is not important in the filenames.
Click on the Read Direction box to the top right of the panel. Note it alternates from Left -> Right and Left <- Right as you click it. Often a file that is hard to break down when read from one direction (due to the filename or the separator characters) can be broken down easier when “read” the other way.

The breakdown above shows the parts defined to be read from Left to Right. If we switched to reading Right to Left, the file would breakdown like this:
- Jobname: golfclub
- Plate: _black
- Extension: .tif
In this instance, Left -> Right will be used.
To define the filename parts, there are three (3) separate entries required: Jobname, Plate and Extension.
Jobname Definition:
- Type Jobname in the Part Name field.
- Select any character from the Part Contains dropdown menu.
- Select to “_” (underscore) separator from the Match dropdown menu.
- Select discard separator from the final dropdown menu. This will remove the underscore so it does not show up on the screen as part of the “Jobname”.
- Click the Add button.
Plate Definition:
- Type plate in the Part Name field. This part is where the Job Genie defines the colour plates for the job.
- Select any character from the Part Contains dropdown menu.
- Select to “.” fullstop (separator) from the Match dropdown menu.
- Select discard separator from the final dropdown menu.
- Click the Add button.
Extension Definition:
- Type extension in the Part Name field.
- Select any character from the Part Contains dropdown menu.
- Select to end of string from the Match dropdown menu (defines this part as whatever is left of the filename).
- Click the Add button.
(3) Jobname + Plate
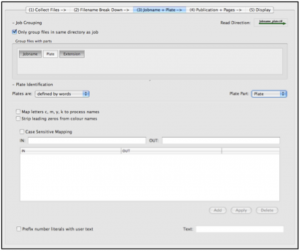
This tab is where the Job Genie groups the separated files that will become complete jobs. For this example, it will group together the four 1-bit TIFF files into a full CMYK job for proofing.
- Tick the checkbox – Only group files in same directory as job. This is so only files common to a single directory with the defined filename structure will be combined into jobs.
- Within the Group Files with Parts panel, click on the Jobname and Extension tiles to highlight them. This will group any files with the same Jobname and Extension – in this case, the four files with the jobname “golfclub” and ending in “tif”.
- Leave the Plate tile unselected. It is normal to leave the Plate part unselected, otherwise the Job Genie will “group” each 1-bit TIFF on its own.
The lower part of the tab is used to define how the plates are recognised by the Job Genie.
- Select defined by words from the Plates are dropdown menu.
- Select Plate from the Plate Part dropdown menu. This list is comprised of your defined file parts.
Note: The other sections to this tab will be discussed in the second, complex example.
At this point, if you return to tab (2) you will see the Plate file part has turned GREEN in the panel. This simplifies the identification of the filename part defined as the plate.
(4) Publication + Pages
This tab can be skipped over for this simple example, as our job does not have page numbers, nor is it part of a publication. This tab will be discussed in the second, complex example.
(5) Display
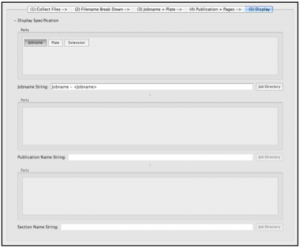
This tab is where the Jobname that will be displayed in the RIPMonitor and in the QueueManager is defined. The panel is made up of three (3) sections – Jobname, Publication Name and Section Name.
Only the Jobname section will be used for this example.
Note the filename parts represented as tiles in the Parts panel. As the file to be proofed has a defined “Jobname” part, the job will be named “golfclub“, based on the file “golfclub_black.tif” used in this example.
- Click the Jobname tile to highlight it. You will see <Jobname> appear in the Jobname String field. This means that files collected by this Job Genie will be named on screen as the “Jobname” part of the filename. In this example when polled in the RIP queue, a job called golfclub will be displayed in the RIPMonitor.
The same method can be used to assign any gray filename part (or parts) as the jobname.
Note: Tiles appear in the Jobname String field in the order they are selected.
The Jobname String field can also accept typed input. For example, “Job name -” could be typed in front of the <Jobname> entry with the field appear like Job name – <Jobname>.
When polled, the same job would then appear on screen as Job name – golfclub.
Note: It is good practice to put in a typed space before clicking the next tile, unless you want the filename parts to run together on screen.
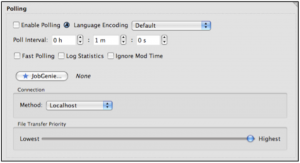
At this point, the Job Genie is complete. Save the configuration and load it into the RIP Datatype in the Workbench. This is done via the Polling panel.
When the RIP directory is polled, the jobs will appear in the RIPMonitor application.
Example 2 – Complex Filenames
The following example deals with not only more complicated filenames, but also explains how to create a Job Genie with two (2) tasks. Both tasks will collect files and group plates into single proof jobs and also group those jobs into multi-page publications. The naming and assigning of spot colour plates will also be covered.
The two sets of files used are 1-bit TIFFs produced for the platesetter of two newspapers.
| (1) | TB04.1ST.xxx.017-048.CMYK.pdf.k.tif | (2) | BS04.1ST.xxx.001.CMYK.pdf.k.tif |
| TB04.1ST.xxx.017-048.CMYK.pdf.c.tif | BS04.1ST.xxx.001.CMYK.pdf.c.tif | ||
| TB04.1ST.xxx.017-048.CMYK.pdf.m.tif | BS04.1ST.xxx.001.CMYK.pdf.m.tif | ||
| TB04.1ST.xxx.017-048.CMYK.pdf.y.tif | BS04.1ST.xxx.001.CMYK.pdf.y.tif | ||
| TB04.1ST.xxx.017-048.CMYK.pdf.P273.tif |
The first set of files are pages of a tabloid newspaper, sent to the platesetter as 2UPs, so the files are output with two page numbers – “017” and “048”. This set also has an extra spot plate “P273” to be used in an advertisement. They will need to be stitched together with the other pages of the same issue as they are output by the platesetter RIP so the newspaper can be proofed in its entirety before going to press. This set of files will be dealt with by Task 1 of the Job Genie.
The second set of files are the plates for the front page “001” of a broadsheet newspaper. The pages are sent individually to the platesetter. The files will need to be collected into an entire newspaper for proofing and will be dealt with by Task 2 of the Job Genie.
Task 1 Setup
- Create a new Job Genie in the Workbench and name it Newspapers.
- Click Add in the task panel. Task 1 will appear in the list.
- Click on Task 1 and rename it to Tabloid.
- Go to the (1) Collect Files tab. As in Example 1 (above), each of the files for this complex example are 1-bit TIFF plates for the job. The Job Genie will be configured to collect files ending with “.tif”.
- In the bottom of the panel you will find the Action dropdown menu. Select the option include files.
- From the second dropdown menu select ending with.
- In the string field type .tif
- Click the Add button.
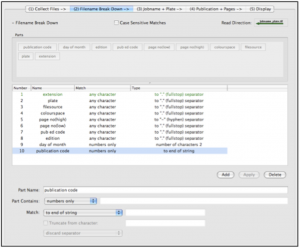
(2) Filename Break Down
The filenames for this example are longer and more complex than those used in the first simple example, containing more information about the contents of the file. The filenames will need to be broken down into more parts to make the jobs meaningful to the press operators who will be proofing the job.
- The Job Genie will be set to read the incoming files from Right to Left. Click the Read Direction button to change the arrow direction so it is pointing to the left.
- The Case Sensitive Matches box is to remain unchecked.
Next, the filename break down is planned. The file parts to be used will consist of the following:
- Publication Code – the two or more digit code given to the newspaper being ripped.
- Day of Month – a two digit number representing the day of printing.
- Edition – the edition of the newspaper.
- Pub ed code – the code used for the region for which the newspaper is printed.
- Page no(low) – the lower of the page numbers of the 2UP page pair.
- Page no(high) – the higher of the page numbers of the 2UP page pair.
- Colourspace – the colourspace the page was created in, for example, CMYK, RGB, Grayscale.
- Filesource – the pre-RIP format of the page file.
- Plate – the plate colour of the file.
- Extension – the file extension (.tif).
The filenames will break down like this:
Filename: TB04.1ST.xxx.017-048.CMYK.pdf.k.tif
becomes
- Publication code: TB
- Day of Month: 04
- Edition: .1ST
- Pub ed code: .xxx
- Page no(low): .017
- Page no(high): -048
- Colourspace: .CMYK
- Filesource: .pdf
- Plate: k
- Extension: .tif
Note the separators in front of the parts as the filenames are being read Right to Left.
Defining the filename parts from last to first (right to left):
Extension Definition:
- Type extension in the Part Name field.
- Select any character from the Part Contains dropdown menu.
- Select to “.” (fullstop) separator from the Match dropdown menu.
- Select discard separator from the final dropdown menu.
- Click the Add button.
Plate Definition:
- Type plate in the Part Name field.
- Select any character from the Part Contains dropdown menu.
- Select to “.” (fullstop) separator from the Match dropdown menu.
- Select discard separator from the final dropdown menu.
- Click the Add button.
Filesource Definition:
- Type filesource in the Part Name field.
- Select any character from the Part Contains dropdown menu.
- Select to “.” (fullstop) separator from the Match dropdown menu.
- Select discard separator from the final dropdown menu.
- Click the Add button.
Colourspace Definition:
- Type colourspace in the Part Name field.
- Select any character from the Part Contains dropdown menu.
- Select to “.” (fullstop) separator from the Match dropdown menu.
- Select discard separator from the final dropdown menu.
- Click the Add button.
Page no(high) Definition:
- Type page no(high) in the Part Name field.
- Select any character from the Part Contains dropdown menu.
- Select to “-” (hyphen) separator from the Match dropdown menu.
- Select discard separator from the final dropdown menu.
- Click the Add button.
Page no(low) Definition:
- Type page no(low) in the Part Name field.
- Select any character from the Part Contains dropdown menu.
- Select to “.” (fullstop) separator from the Match dropdown menu.
- Select discard separator from the final dropdown menu.
- Click the Add button.
Pub ed code Definition:
- Type pub ed code in the Part Name field.
- Select any character from the Part Contains dropdown menu.
- Select to “.” (fullstop) separator from the Match dropdown menu.
- Select discard separator from the final dropdown menu.
- Click the Add button.
Edition Definition:
- Type edition in the Part Name field.
- Select any character from the Part Contains dropdown menu.
- Select to “.” (fullstop) separator from the Match dropdown menu.
- Select discard separator from the final dropdown menu.
- Click the Add button.
Day of Month Definition:
- Type day of month in the Part Name field.
- Select numbers only from the Part Contains dropdown menu.
- Select number of characters from the Match dropdown menu and enter 2 in the string field. This means the Job Genie will be looking for a string of 2 characters of numerical value only.
- Click the Add button.
Publication Code Definition:
- Type publication code in the Part Name field.
- Select any character from the Part Contains dropdown menu.
- Select to end of string from the Match dropdown menu.
- Click the Add button.
Note: The publication code part and the preceding day of the month part are the reason we are reading the files from right to left.
This fictional newspaper publisher uses publication codes of differing lengths, for example, TB, MVTB, LTB. Given there is no separator between the publication code part and the day of month part, it is easier to read from right to left.
The Job Genie will first encounter the day of month part, which is always comprised of two digits (numbers only) then goes on to read any other characters remaining in the filename as the publication code.
The alternative to this would be to read left to right and define the publication part first:
Alternative Publication code Definition:
- Type publication code in the Part Name field.
- Select any character from the Part Contains dropdown menu.
- Select to numeric separator from the Match dropdown menu.
- Select include separator with next part from the final dropdown menu.
- Click the Add button.
This method would have the Job Genie search for any characters at the beginning of the filename for the publication code until it encountered the “0” (numeric separator). The zero would then be included in the next part – day of month “04” – which would run to the “.” separator.
Though in this example the choice has been made to read right to left, either method is fine and each suited to different purposes, illustrating the power and flexibility of Job Genie.
Despite the filename parts being defined in last to first order, the filename part tiles in the top panel appear in logical order, due to the Read Direction.

(3) Jobname + Plate
This tab is where the files are grouped together into a single job.
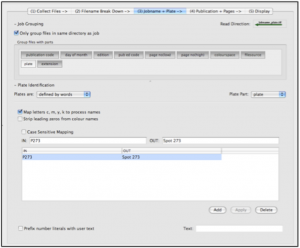
- Tick the checkbox – Only group files in same directory as job. This is so only files common to a single directory with the defined filename structure will be combined into jobs.
- Within the Group Files with Parts panel, click on the publication code, day of month, edition, pub ed code, page no(low), page no(high), colourspace, filesource and extension tiles to highlight them. Leave the plate tile unselected. It is normal to leave the plate part unselected as it is necessary to group the 1-bit TIFF files into combined jobs for proofing.
- Select defined by words from the Plates are dropdown menu.
- Select Plate from the Plate Part dropdown menu. This list is comprised of your defined file parts.
- Tick the Map letters c, m, y, k to process names box. This will identify the four process plates in the job files.
The 5th (spot) plate of the job also needs to be identified.
“TB04.1ST.xxx.017-048.CMYK.pdf.P273.tif”
To do this we use the Plate Identification panel. The plate filename parts are mapped to a particular colour in the system default Special Colour Set.
- Type P273 in the IN field.
- Type Spot 273 (the name of the Special Colour in your set to map the colour to) in the OUT field.
- Click the Add button.
(4) Publication + Pages
This tab is where the Page Number and Publication parts of the filename are defined and where the publication code filename part can be given a full name. The primary purpose of this tab is to have the Job Genie define a publication and send any grouped jobs with the same publication name to that publication as pages.
This is particularly useful when autoproofing, where jobs are automatically submitted as they arrive in the RIPMonitor queue.
- Select defined by numbers from the Page numbers are dropdown menu.
- Select page no(low) from the Page Number Part dropdown menu.
- Select publication code from the Publication Part dropdown menu.
- Type TB in the IN field.
- Type Tabloid Newspaper in the OUT field.
- Click the Add button.
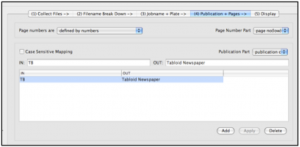
This means any jobs collected by the Job Genie with the TB publication code will appear in Blackmagic or Veripress queues as Tabloid Newspaper. Many publication names can be defined in this panel (if required), so if the platesetter RIP outputs files in the same filename format for multiple publications they can all be defined and understood by the same Job Genie.
Note: In tab (2) the Page Part will now be displayed in DARK BLUE, the Publication Part in PURPLE and the Plate Part in GREEN.
(5) Display
Tiles for all the filename parts will be present in Jobname String, Publication Name String and Section Name String areas. The Section Name String is not used for this example:
Click on the following tiles in order:
Publication code, day of month, edition, pub ed code, page no(low), page no(high).
The Jobname String field should display the following:

To make the jobname appear legibly, text and spacing can be added to the Jobname String field.
- Click on the field to insert spacing and text so the line appears like this:
<publication code>day:<day of month><edition>edition(<pub ed code>) Pages: <page no(low)> – <page no(high)>
Save the Job Genie and assign it to the RIP in the Workbench, via the RIP datatype, Polling panel.
The files when polled in the RIPMonitor will now be presented in a user-friendly format:
Tabloid Newspaper day:04 1ST edition(xxx) Pages:017 – 048
Note: Job Genie recognises the tags <> as the start and end of file parts. Be careful when adding text to the string to not delete them. The Jobname String can be entered manually, taking care to type the <filename parts> correctly.
The final step is to define the Publication Name String:
- Click on the following tiles in order: publication code, day of month, edition, pub ed code.
- As above, add text and spaces to the string field so it appears like this:
<publication code>day:<day of month> <edition> edition(<pub ed code>)
The above when polled will appear in the QueueManager as a Publication named:
Tabloid Newspaper day:04 1ST edition(xxx)
Note: The Publication Name is put together in a similar way to the jobs being grouped together in the (3) Jobname + Plate step. Just as the plate is not highlighted (so the Job Genie groups the plates together as one job when naming the Publication), the page filename parts are not selected so the Job Genie collects all of the page jobs together into a single publication. In this example, the files are all combined to form a complete newspaper for proofing.
Now we can move on to the second tasks to be set up – the Broadsheet.
It is assumed at this point that familiarity with the user interface allows for a briefer explanation for the complex Job Genie.
Note: Task 2 below, rather than being entered from scratch, is defined by copying and modifying Task 1 created previously.
To duplicate Task 1:
- Click on the name Task 1 to highlight it.
- Click the Duplicate button at the bottom of the list.
- Rename the Tabloid copy to Broadsheet.
(1) Collect Files
This tab should have the panels defined as outlined below to collect the TIFF files:
- Type – Include Files
- Match – Ending With
- String – .tif
(2) Filename Break Down
Break down and define the filename parts for file “BS04.1ST.xxx.001.CMYK.pdf.k.tif” like this:
- Publication Code: BS
- Day of Month: 04
- Edition: .1ST
- Pub ed code: .xxx
- Page no: .001
- Colourspace: .CMYK
- Filesource: .pdf
- Plate: .k
- Extension: .tif
- Case Sensitive Matches: Unchecked
- Read Direction: Right to Left <–
The Filename Parts panel is defined as such:
| Number | Name | Match | Type |
| 1 | extension | any character | to “.” (fullstop) separator |
| 2 | plate | any character | to “.” (fullstop) separator |
| 3 | filesource | any character | to “.” (fullstop) separator |
| 4 | colourspace | any character | to “.” (fullstop) separator |
| 5 | page no | any character | to “.” (fullstop) separator |
| 6 | pub ed code | any character | to “.” (fullstop) separator |
| 7 | edition | any character | to “.” (fullstop) separator |
| 8 | day of month | numbers only | number of characters 2 |
| 9 | publication code | any character | to end of string |
(3) Jobname + Plate
This panel is to be defined in the following way:
- Only group files in the same directory as job: Ticked
- Read Direction: Right to Left <–
- Group Files With Parts: publication code, day of month, edition, pub ed code, page no, colourspace, filesource, extension
- Plates are: defined by words
- Plate Part: plate
- Map letters c, m, y, k, to process names: Ticked
- Highlight and delete the “P273” entry from the duplicated task as this is not required.
(4) Publication + Pages
This panel is to be defined as such:
- Page numbers are: defined by numbers
- Page Number Part: page no
- Publication Part: publication code
- Case Sensitive Mapping: Unchecked
- Remove the TB/Tabloid Newspaper from the duplicated task information and replace it with IN – BS, OUT – Broadsheet Newspaper
(5) Display
This panel is to be defined as such:
- Select the following Jobname Parts in the top panel: publication code, day of month, edition, pub ed code, page no
- Modify the Jobname String to read:
<publication code> day:<day of month> <edition>edition(<pub ed code>) Page:<page no>
This will produce jobs in the RIPMonitor appearing as:
Broadsheet Newspaper day:04 1ST edition(xxx)
to which all of the grouped page jobs will be sent.
Note: Tasks are processed in order by the Job Genie. Once a jobname has been matched by the task, it is removed from searches by subsequent tasks.
The Tabloid task was defined prior to the Broadsheet task due to the page no part of the Broadsheet task. The naming structure of both types of filenames in this example are identical, except for the Tabloid TB filenames having two page no parts separated by a hyphen.
If the Broadsheet task was listed as the first one actioned by the Job Genie, it would parse all of the files in the polling directory and when it reached a TB file, it would read:
- extension: .tif
- plate: .k
- filesource: .pdf
- colourspace: .CMYK
- page no: .017-048
This is due to the page no part being defined in the Broadsheet task an any character to “.” (fullstop) separator. As the hyphen is not defined anywhere in the task, it sees “017-048” as a page number and continues through the rest of the file. As far as the Job Genie is concerned, this file is structured within the parameters and the job is grouped and sent to the RIPMonitor. Once the Job Genie completed the Broadsheet task and went on to the Tabloid task, there wouldn’t be any files to collect as they would have already been (incorrectly) collected by the Broadsheet task.
There are other ways to prevent this, such as defining the page no part as numbers only, or by setting the specific filename length to be collected in each task in tab (1).
Experimentation is the key to understanding the Job Genie tool. Once mastered, there is almost no limit for its uses. Any further Job Genie queries may be directed to our support team: support@serendipity-software.com.au
