Blackmagic and Veripress users have the ability to apply various attributes to special colours in order to simulate actual printed results, especially in the packaging industry.
For example a foil which is printed on top is set to a knockout so that the special colour is not affected by any colour below it. All of these attributes can be seen in SoftProof and can be changed on the fly to see the effects. However, it is important to understand how these work and their limitations.
Overprint
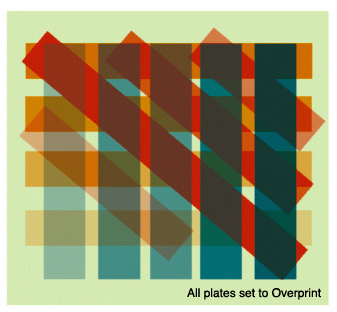
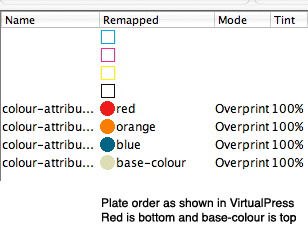
This is the default setting and most commonly used. The effect of overprint is a mix of colours that fall on top of one another. The job below shows four spot plates that all have the default attribute of Overprint set. You can see as one colour passes over another the apparent colour changes as the mix of the two or more plates. The order of the plates from bottom to top is Red, Orange, Blue, Base-colour (Green).
Knockout
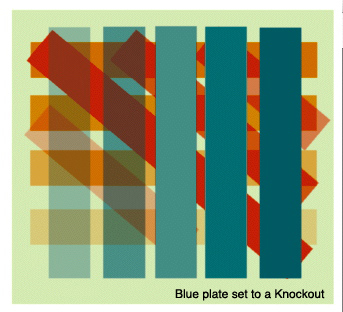
This has the effect of knocking out objects below but has no effect on the objects above it. i.e. jobs below do not influence the colour of the knockout colour. This is true when the object is 50% or greater in tint. When the object is less than 50% then there is influence as the attribute does not entirely knockout. The job below shows the effects of changing the blue plate to have a knockout attribute.
Here the Blue plate has been changed in the SoftProof to be a knockout. The blue bars from left to right are 25%, 49%, 50% , 75%, 100%. As the object drops below 50% you can see that influence of objects below are allowed and the behavior is the same as Overprint. This is because the object is not solid but has a screen. This 50% value is an inbuilt threshold which is designed to simulate the actual printed job.
The order of the plates is important. The Red and Orange plates are below the blue plate and so they are affected by the knockout but have no bearing on the blue where the tint values are above 50%. But the Base colour is last (on top) and so this still has a bearing on the viewed colour.
Primer
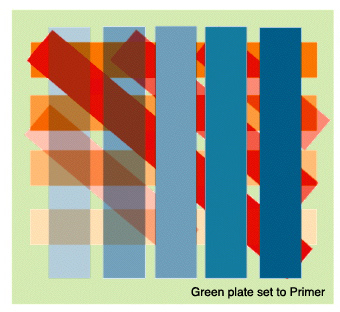
This attribute paints the colour everywhere that other colours are not. Therefore it has no bearing on the other colours. The image below shows what happens when we change the Base colour (which is currently positioned on top of the other three plates) to be a Primer instead of Overprint. It no longer has any bearing on the other colours.
Opaque
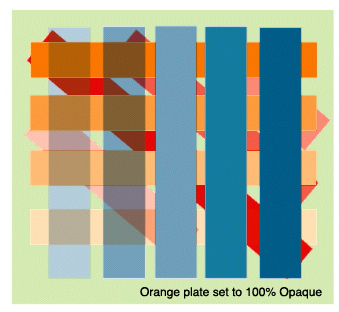
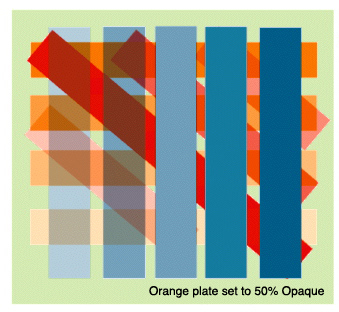
An object that is 100% opaque prevents light from passing through. As the percentage of opacity drops then more light is allowed to pass. This is represented in printing by allowing some of the objects below to show through when the value is less than 100% but acts as a knockout when opacity value reaches 100%. Below are two images where the Orange plates properties have been changed to Opaque. The one on the left is when the Opaque value is set to 100% so it acts as a knockout. It knocks out the Red as this is below the Orange (except the bottom orange bar as this is a 25% object – see Knockout above) but does not have any affect on the Blue. The image on the right is the result of setting the Opaque value to 50% and you can see some of the Red is coming through. Compare this with the image above where Orange is still an Overprint. When the Opaque value is set to 0% then the behaviour is that of overprint.
Transparent
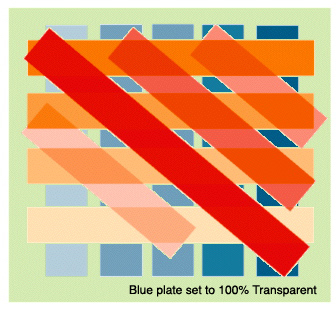
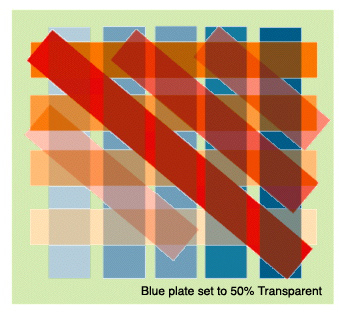
When an object is transparent it allows light to pass through. The amount of light can be controlled in the same way you can control opacity. The more transparent the more the plates underneath have an influence in the viewed colour. At 100% transparent the colour has no relevance on any colour in the same path so you will only see that colour where no other colour object is present. As you reduce the transparency then more of the colour comes through until it reaches 0% where the plate acts the same as overprint. Below are two images where the Blue plate (which is on top of Orange and Red) has been given a transparent property. On the left the value is 100% transparent so you only see the blue where Red and Orange are not and those colours are not altered by blue. On the right the transparency value is set to 50% so you start to see some of the Blue influence where is lets the other object show through.
Plate Order
The order of the plates at the time the job is submitted is very important as this determines which plates print over which. Process plates are always laid first followed by the spot colours in the order they are to be printed. This depends on how the job is submitted.
For jobs where the plates are contained within the one file such as a PDF then the order that PDF was created is the order that plates will be printed. There is no control within the Client for this.
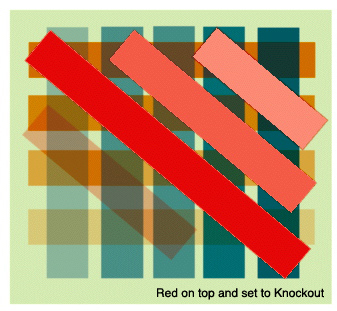
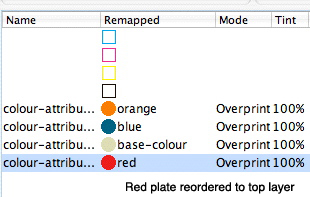
Other jobs that are separated such as Separated Tiff files show all the plates that are associated with the job. Double click the job in the RIPMonitor and the plates are displayed. If the job is directly submitted from here then this is the order of the plates. This order can be changed in the VirtualPress by dragging plates to new positions in the list. To show how this affects the outcome the image below shows what happens when the Red plate (which was on the bottom) is moved to the top, Imaged and then changed in the SoftProof to be a Knockout.

