
Serendipity Blackmagic / Megarip 8.1+ adds a Simulate screening option to Screen Print Mode.
When enabled, screen printing mode separates a job into single plates and prints them as ‘black’. The feature is nominally designed to print halftone dot screens onto clear film media for use in screen printing or inkjet CTP (computer-to-plate).
Pre version 8.1, generating halftone dots for printer output required the use of Serendipity’s own printer screening, and a Paper Profile with only one printer dot enabled per ink channel. This meant screen printing separations were unavailable to printers only able to accept contone CMYK / RGB input.
The Simulate screening option provides halftone screen output from contone only printer drivers. This allows printers with HTM / Printer’s Screening drivers to print screens / CTP plates, in both CMYK and RGB print modes.
Configuring screen printing with Simulate Screening in RGB mode
First, create an Output, Media, Pagesetup and Jobticket to be used for your workflow in the Workbench. For details on how to do this, refer to the the Knowledge Base article here.
Open the Media in the Workbench
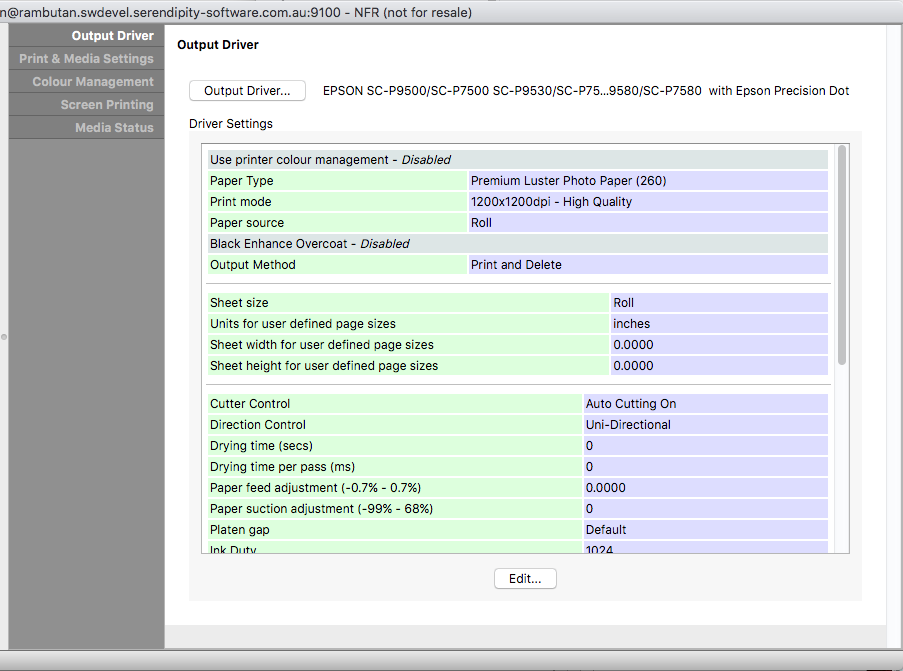
- In the Output Driver panel of the Media
- Click the Output Driver button, then select the HTM or Printer’s Screening driver for your printer.
- Click the Edit button below the Driver Settings area.
- Configure the printer model, paper type, resolution and/or print quality mode for your film media. We recommend uni-directional printing, and a higher printer resolution (1200+ dpi) for optimal halftone dot definition.
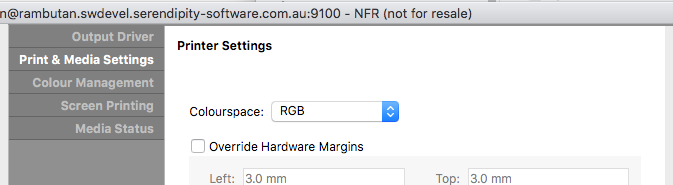
- In the Print & Media Settings panel
- Set Printer Settings > Colourspace: to RGB
- In the Colour Management panel
- Assign an RGB ICC profile to ICC Profiles > Output > Profile. The default sRGB is fine, although any RGB profile can be used.
- Next, in the Screen Printing panel
- Tick the Enable Screen Print Mode checkbox
- Tick the Simulate screening checkbox.
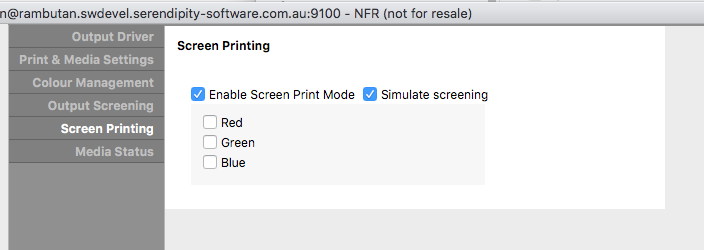
Note – When Simulate screening is enabled in RGB print mode, Red, Green and Blue “inks” will be available for selection. If these are left unchecked (recommended) all channels are used by default to produce black print output.
- In the Output Screening panel
- Select Halftone in the Output Screening Defaults Method: drop-down menu.
- Select your desired halftone dot shape from the Dot Shape: drop-down menu.
- Tick the Supercell checkbox in the Halftone Options: drop-down menu below the Plate List.
- Click the Defaults button to show the maximum recommend halftone screen LPI for the printer resolution selected.
- Click the Edit button to adjust the screen angle and LPI of each process and special plate if required.

Save the Media, then Linearise it as described the RGB Media Calibration guide.
Note – after a test print, if the density of the film separations is not high enough, try increasing the print resolution and/or print quality in the Media > Output Driver > Driver Settings.
Configuring screen printing with Simulate Screening in CMYK mode
First, create an Output, Media, Pagesetup and Jobticket to be used for your workflow in the Workbench. For details on how to do this, refer to the the Knowledge Base article here.
Open the Media in the Workbench
- In the Output Driver panel of the Media
- Click the Output Driver button, then select the HTM or Printer’s Screening driver for your printer.
- Click the Edit button below the Driver Settings area.
- Configure the printer model, paper type, resolution and/or print quality mode for your film media. We recommend uni-directional printing, and a higher printer resolution (1200+ dpi) for optimal halftone dot definition.
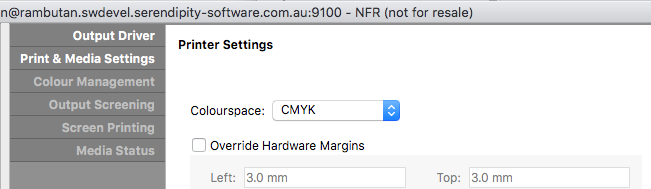
- In the Print & Media Settings panel
- Set Printer Settings > Colourspace: to CMYK
- In the Colour Management panel
- Assign a CMYK ICC profile to ICC Profiles > Output > Profile. The default Standard SWOP profile is fine, although any CMYK profile can be used.
- Next, in the Screen Printing panel
- Tick the Enable Screen Print Mode checkbox
- Tick the Simulate screening checkbox.
- Tick the Black ink channel checkbox.
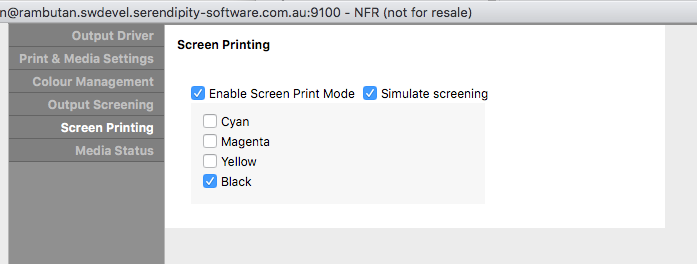
Note – While using the Black printer ink is recommended for most separated plate output, another ink can be used. Cyan, for example, is commonly used for printing inkjet CTP plates.
- In the Output Screening panel
- Select Halftone in the Output Screening Defaults Method: drop-down menu.
- Select your desired halftone dot shape from the Dot Shape: drop-down menu.
- Tick the Supercell checkbox in the Halftone Options: drop-down menu below the Plate List.
- Click the Defaults button to show the maximum recommend halftone screen LPI for the printer resolution selected.
- Click the Edit button to adjust the screen angle and LPI of each process and special plate if required.
Save the Media, then Linearise it as described the CMYK Calibration guide.
Note – After a test print, if the density of the film separations is not high enough, try selecting (ticking) an extra ink channel, such as Magenta, in the Media > Screen Printing panel. If the density remains too low, increase the print resolution and/or print quality in the Media > Output Driver > Driver Settings.
For more general information about screen printing functionality and configuration, refer to the Blackmagic or Megarip product manuals.