
Serendipity Blackmagic and Megarip support the Advanced Black & White Photo Mode available to particular Epson printer models using HTM or EPD (Epson Precision Dot) drivers.
Advanced Black & White mode can be used to produced both neutral and toned black & white photographs, allowing the user to adjust brightness, gamma and contrast settings along with shadow and highlight tones.
The mode and its features are accessed via Workbench > Media > Custom Settings in Media using one of the Epson HTM drivers mentioned above.
Colour images submitted to Media using Advanced B & W mode are converted to black and white when printed.
TO ACTIVATE AND APPLY ADVANCED B & W SETTINGS:-
– the Media must be configured in an RGB or Black & White colour space.
– the Media and Print mode selected in Custom Settings must be one of the “(B&W)” media, e.g. Premium Luster Paper (260) (B&W) (720 x 1440 dpi).

Media and Print Mode
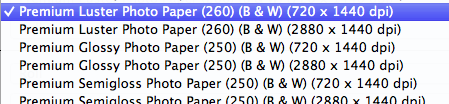
Choose a suitable (B & W) media from the drop-down list
It’s also important to note the effects of the Advanced Black & White mode are applied by the Epson HTM driver within the printer, they are not visible in Blackmagic or Megarip previews. The images below provide a visual guide to the effects controlled by each of the Advanced Black & White Options.
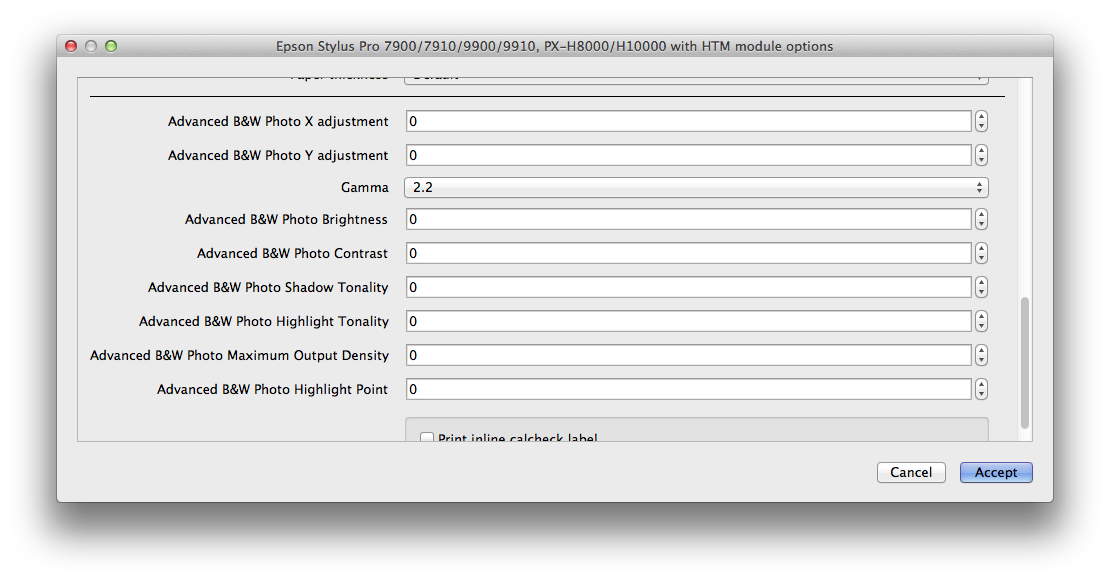
Advanced Black & White options available in the Media Custom Settings
Colour – X and Y adjustment
The X and Y adjustment fields are used to add a hue to the a black and white output. The default setting is Neutral (i.e. X=0, Y=0). The images below demonstrate the colouring options available when the X and Y values are set to maximum values across the available colour gamut.
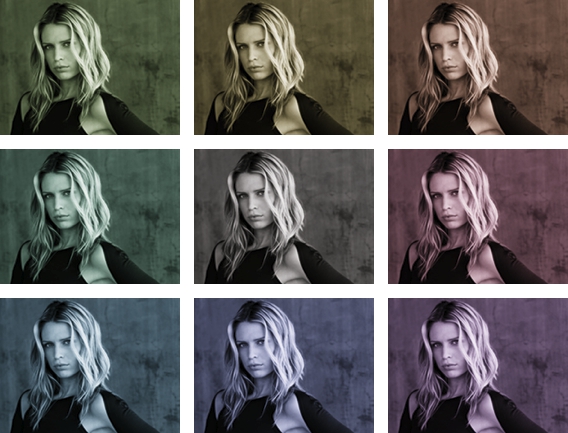
Top Left – Green (X=-53, Y=53), Top Centre – Yellow (X=0, Y=75), Top Right – Red (X=53, Y=53),
Middle Left – Green/Cyan (X=-75, Y=0), Middle Centre – None/Neutral (X=0, Y=0), Middle Right – Red/Magenta (X=75, Y=0),
Bottom Left – Cyan (X=-53, Y=-53), Bottom Centre – Blue (X=0, Y=-75), Bottom Right – Magenta (X=53, Y=-53)
Gamma
The Gamma setting is used to change the overall tonal scale of the B & W output. There are 5 gamma settings available, the default setting is 2.2.

Light – 1.6, Normal -1.8, Dark – 2.0, Darker (default) – 2.2, Darkest – 2.4
Brightness
The Brightness setting alters the overall darkness or lightness of the image.

Left – Minimum (-25), Centre – Default/Neutral (0), Right – Maximum (25)
Contrast
Contrast determines the difference between the light and dark areas of the image.

Left – Minimum (-25), Centre – Default/Neutral (0), Right – Maximum (25)
Shadow Tonality
Shadow Tonality adjusts how much of the hue applied to an image affects the shadow areas.

Left – Minimum (-25), Centre – Default/Neutral (0), Right – Maximum (25)
Highlight Tonality
Highlight Tonality adjusts how much of the hue applied to an image affects the highlight areas.

Left – Maximum (-25), Centre – Default/Neutral (0), Right – Minimum (25)
Maximum Output Density

Left – lowest (-50), Centre – low (-25), Right – normal/default (0)
Highlight Point
Turning on the Highlight Point option helps to reduce the gloss differential in an image by adding density the highlight areas of the image. Gloss differential is a visible difference in the glossy surface of a print across areas with different amounts of ink or between printed or non-printed areas of the image.

Left – Default/Off (0), Right – On (1)
NOTE to Epson SC-P9000 / SC-P7000 users
Advanced Black & White Photo mode is only available to printers with the K3 ink set installed. Violet ink set printers do not have access to the print mode.