
Serendipity Blackmagic / Megarip / Veripress Pagesetups can be published as Mac OS X system printer destinations to allow jobs to be easily submitted via the Print option of third party software or design packages.
Jobs printed to a published Pagesetup will be automatically sent for processing, colour management and printing, eliminating the need for drop folders or manual file submission.
This guide outlines configuring and publishing Pagesetups as IPP (Internet Printing Protocol) system printers. For details on configuring system printers using TCP/IP or Bonjour refer to these Blackmagic, Megarip and Veripress articles.
NOTE: Jobs submitted in this way must be in a file format accepted by your software version.
Installing the Serendipity Printer Drivers
When publishing a Pagesetup for the first time, it will be necessary to install the Serendipity Printer Drivers for Mac OS X.
The installation package is located on the Installation DVD or can be downloaded from the Serendipity Software website.
If installing from the DVD:
- Navigate to the /drivers/mac folder and run the Serendipity Printer Drivers.pkg file.
- An installer window will appear. Follow the prompts to complete the installation of the drivers. The installer will require administrator access privileges.
Configuring a Pagesetup for Publishing as an IPP Printer
- In the Workbench select the Pagesetup to be published from the list of available items.
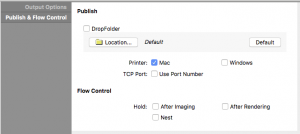
- Go to the Publish & Flow Control tab and enable the Printer: Mac checkbox. This makes Pagesetup available to the Mac OS X print system.
- Save the Pagesetup configuration when done.

Creating an IPP System Printer
A system printer needs to be created and configured on the Mac OS X computer which the Blackmagic / Megarip / Veripress Server is running.
- Open the Mac OS X System Preferences.
- Select Printers & Scanners.

- Click the ‘+’ icon at the bottom of the printer list panel to create a new printer.
- Select the IP icon at the top of the Add Printer window.
- Address: Enter the TCP/IP address of the computer followed by port 8081 in the following format: ComputerIPaddress:8081 (e.g. 192.168.1.3:8081).
- Protocol: Select Internet Printing Protocol – IPP from the dropdown menu.
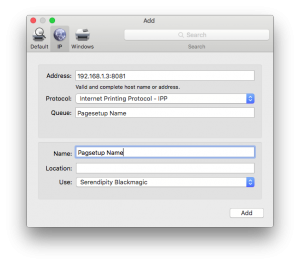
- Queue: Enter the name of the Pagesetup to be published exactly as it is named in the Workbench.
- Name: Enter the desired name for the printer. The name should be easily recognisable as the particular Pagesetup being published.
- Location: leave this field blank.
- Use: choose Select Software… from the dropdown menu. A list of available Mac OS X system printer drivers will popup. Scroll down the list or type “Serendipity” in the search box and select the ‘Serendipity…’ driver matching your product. Click OK.

- Click Add to add the new printer.
- Set the published Pagesetup “Printer” as the system default and/or share the printer on the network as required.


Publishing the Asset Queue as an IPP system printer
The Studio Asset queue can also be published as an IPP system printer destination.
- Configure the system printer as outlined above.
- In step 7, type asset drop as the pagesetup name in the Queue field.
NOTE ON PORT 8081: All IPP printer traffic goes through port 8081, printers are differentiated by their ‘Queue’ names.
NOTE ON MEDIA: When submitting jobs to a published Pagesetup, the default Media assigned to the Pagesetup is used. If you wish to publish to a different Media (paper type & configuration) on the same printer, each Media configuration needs to be assigned to its own Pagesetup, and a new system IPP printer destination created.